
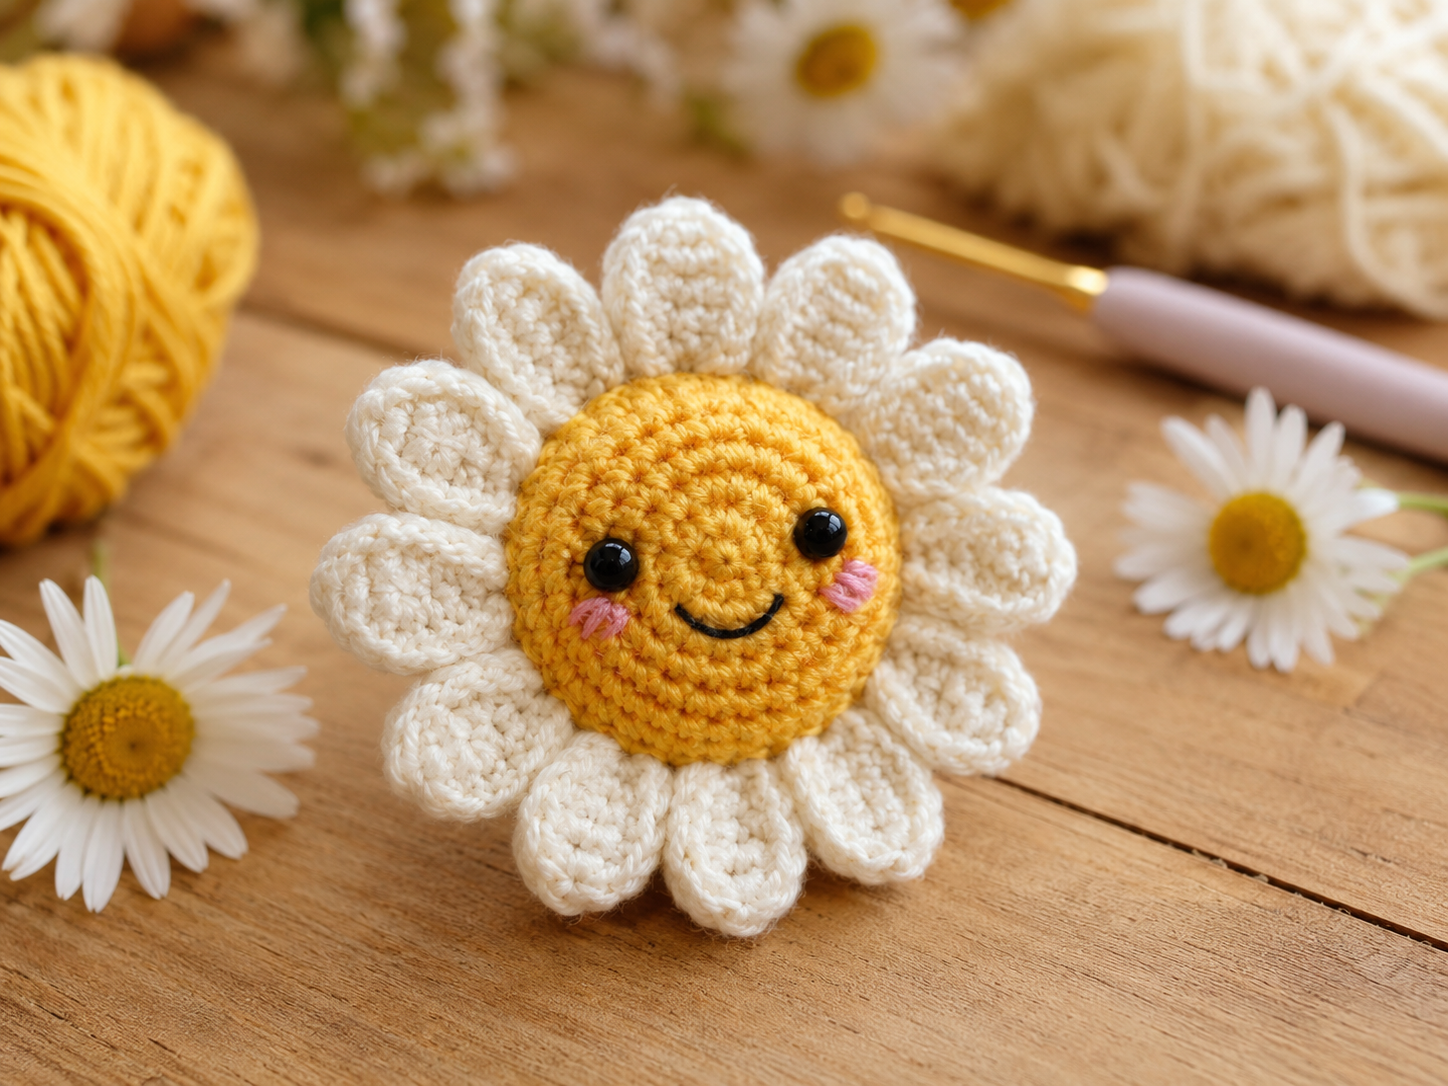
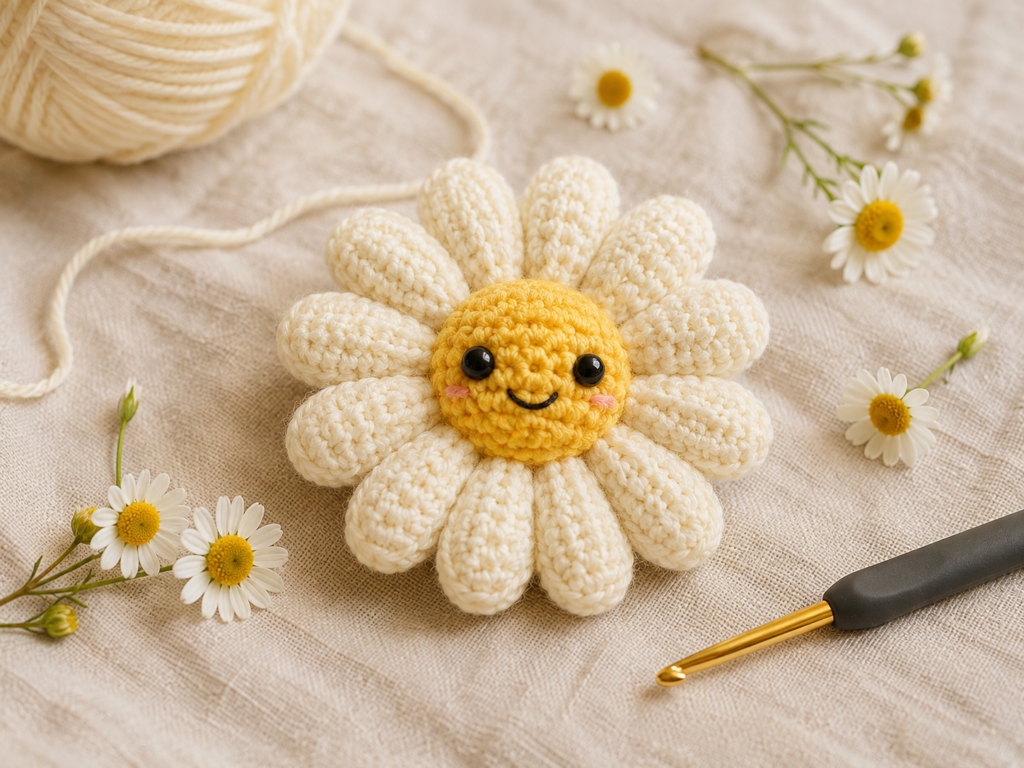
This Daisy Mini Plush crochet pattern is a small, beginner-friendly amigurumi project that combines a simple stuffed flower center with soft crochet petals. The finished daisy is approximately 8 cm (3.1 inches) across, making it a practical size for a keychain, bag charm, small gift, shelf decoration, or handmade plush collection.
The project uses basic crochet techniques rather than complicated shaping, so it is a good way to practice working in continuous rounds, increasing, decreasing, stuffing, sewing and attaching small crochet components.
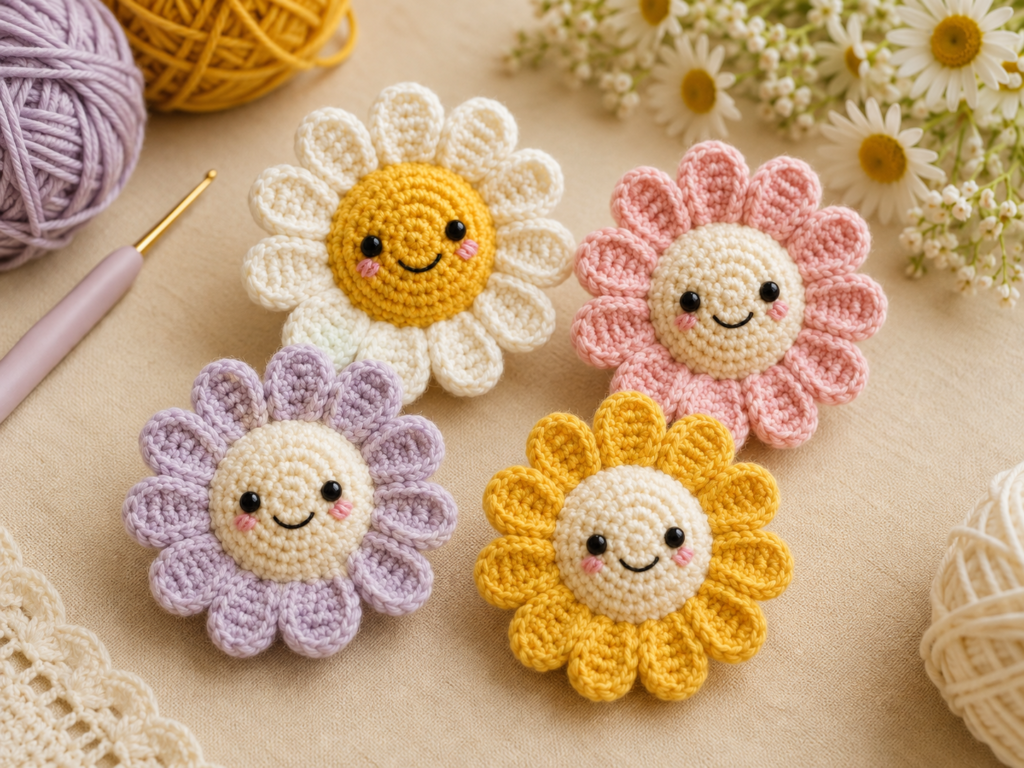
You can make the classic yellow-and-white version shown here, or change the colors to create pastel daisies, seasonal flowers, or a whole collection of miniature crochet flowers.
Pattern note: The instructions below are written as a beginner-friendly pattern based on the construction and proportions of the pictured design. Your finished size may vary depending on yarn, hook size and crochet tension.
Table of Contents
- What Makes This Daisy Pattern Beginner-Friendly?
- Daisy Mini Plush Project Details
- Materials and Tools
- Yarn and Hook Selection
- Crochet Abbreviations
- Understanding the Pattern
- How to Crochet the Daisy Center
- How to Add the Safety Eyes
- How to Crochet the Daisy Petals
- How to Attach the Petals
- How to Stuff and Shape the Plush
- How to Embroider the Face
- Final Assembly
- How to Make a Larger Daisy
- Color Combinations and Customization
- Common Problems and How to Fix Them
- Tips for Better Amigurumi Results
- Ways to Use Your Crochet Daisy
- Frequently Asked Questions
- Related Crochet Patterns
What Makes This Daisy Pattern Beginner-Friendly?
If you are looking for easy crochet patterns for beginners, small amigurumi projects are a useful place to start because they let you practice the basic techniques without committing to a large project.
This daisy introduces several important crochet skills:
- Working into a magic ring
- Crocheting in continuous rounds
- Increasing stitches
- Decreasing stitches
- Counting stitches accurately
- Maintaining consistent tension
- Stuffing a three-dimensional crochet piece
- Attaching crocheted pieces
- Embroidering simple facial details
- Shaping and positioning petals
The project is also relatively economical because the flower center and petals require only small quantities of yarn.
Once you are comfortable with this pattern, the same basic techniques can be applied to many other crochet amigurumi patterns, including small animals, fruits, flowers and decorative plushies.
Daisy Mini Plush Project Details
| Detail | Recommendation |
|---|---|
| Project type | Crochet flower plush |
| Difficulty | Beginner |
| Approximate size | 8 cm / 3.1 in |
| Main technique | Amigurumi-style crochet |
| Main stitch | Single crochet |
| Yarn weight | Worsted weight |
| Center color | Yellow |
| Petal color | Cream or white |
| Recommended hook | 3.5 mm |
| Safety eyes | 6 mm |
| Stuffing | Polyester fiberfill |
| Approximate time | 1–2 hours |
| Construction | Crochet center + petals |
| Best for | Gifts, charms, decoration and plush collections |
The finished dimensions are only an estimate. Crochet tension differs considerably from one person to another, even when the same yarn and hook are used.
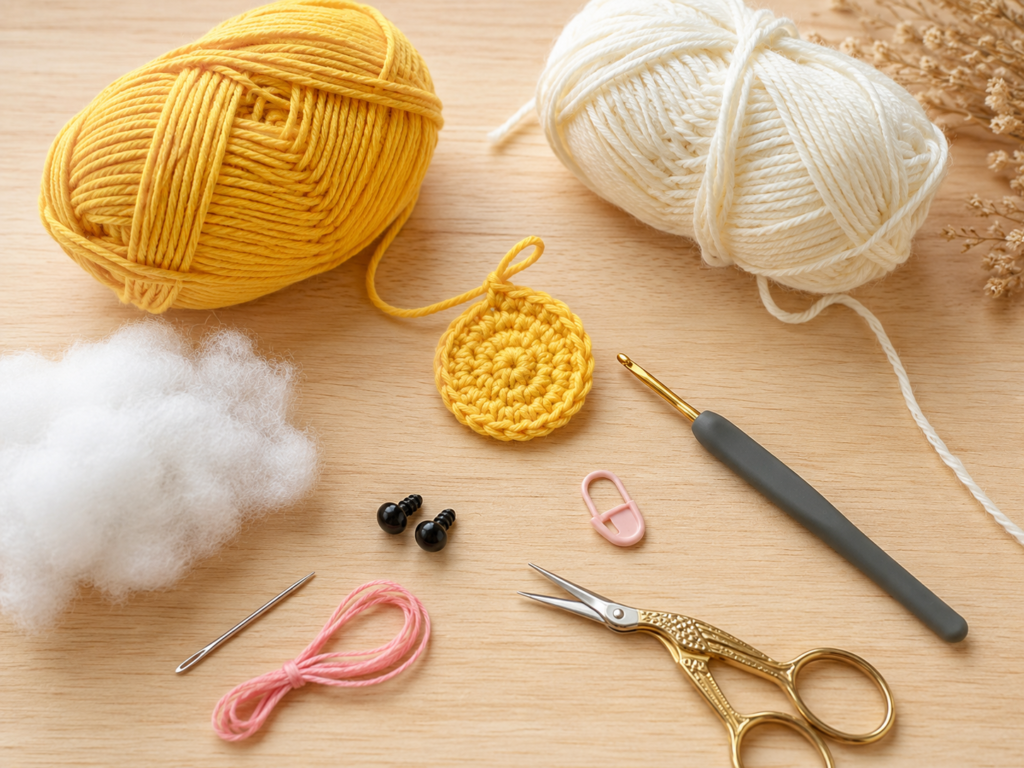
Materials and Tools
Yarn
You will need:
- Yellow worsted-weight yarn for the center
- Cream or white worsted-weight yarn for the petals
- Small amount of pink yarn or embroidery thread for the cheeks
- Small amount of black embroidery thread if you prefer embroidered facial details
You do not need a full skein of each color. This makes the project particularly useful for leftover yarn.
Other Materials
| Supply | Purpose |
|---|---|
| 3.5 mm crochet hook | Main crochet hook |
| 6 mm safety eyes | Facial details |
| Polyester fiberfill | Stuffing |
| Tapestry needle | Sewing and finishing |
| Scissors | Cutting yarn |
| Stitch marker | Tracking rounds |
| Optional keychain clasp | Turning the plush into a charm |
Yarn and Hook Selection
The hook size is important for amigurumi.
For a stuffed crochet project, you generally want a fabric that is firm enough that the stuffing cannot easily be seen through the stitches.
A 3.5 mm hook with worsted-weight yarn is a useful starting point, but your own tension should determine the final choice.
If your stitches are loose
Try a smaller hook, such as 3.0 mm.
If your stitches are extremely tight
You may prefer a 3.75 or 4.0 mm hook.
The goal is not to follow the hook size blindly. The goal is to produce tight, even stitches without making the fabric uncomfortable to work into.
Crochet Abbreviations
The pattern uses US crochet terminology.
| Abbreviation | Meaning |
|---|---|
| MR | Magic ring |
| ch | Chain |
| sc | Single crochet |
| hdc | Half double crochet |
| dc | Double crochet |
| sl st | Slip stitch |
| inc | Increase |
| dec | Decrease |
| st | Stitch |
| sts | Stitches |
| R | Round |
What does an increase mean?
An increase means working two single crochets into the same stitch.
What does a decrease mean?
A decrease combines two stitches into one.
For amigurumi, an invisible decrease is preferable because it creates a smoother surface.
Understanding the Pattern Before You Start
The yellow center is worked as a small rounded amigurumi shape.
The general construction is:
Increase → work even → decrease → stuff → close
The white or cream petals are then attached around the outside.
This construction is useful because the center becomes slightly three-dimensional rather than remaining completely flat.
How to Crochet the Daisy Center
Use yellow yarn.
Work in continuous rounds unless otherwise specified.
Place a stitch marker in the first stitch of every round.
Round-by-Round Pattern
| Round | Instructions | Stitch Count |
|---|---|---|
| R1 | 6 sc into MR | 6 |
| R2 | inc around | 12 |
| R3 | (sc, inc) × 6 | 18 |
| R4 | (2 sc, inc) × 6 | 24 |
| R5 | (3 sc, inc) × 6 | 30 |
| R6 | (4 sc, inc) × 6 | 36 |
| R7 | sc around | 36 |
| R8 | (4 sc, dec) × 6 | 30 |
| R9 | (3 sc, dec) × 6 | 24 |
| R10 | (2 sc, dec) × 6 | 18 |
| R11 | (sc, dec) × 6 | 12 |
| R12 | dec around | 6 |
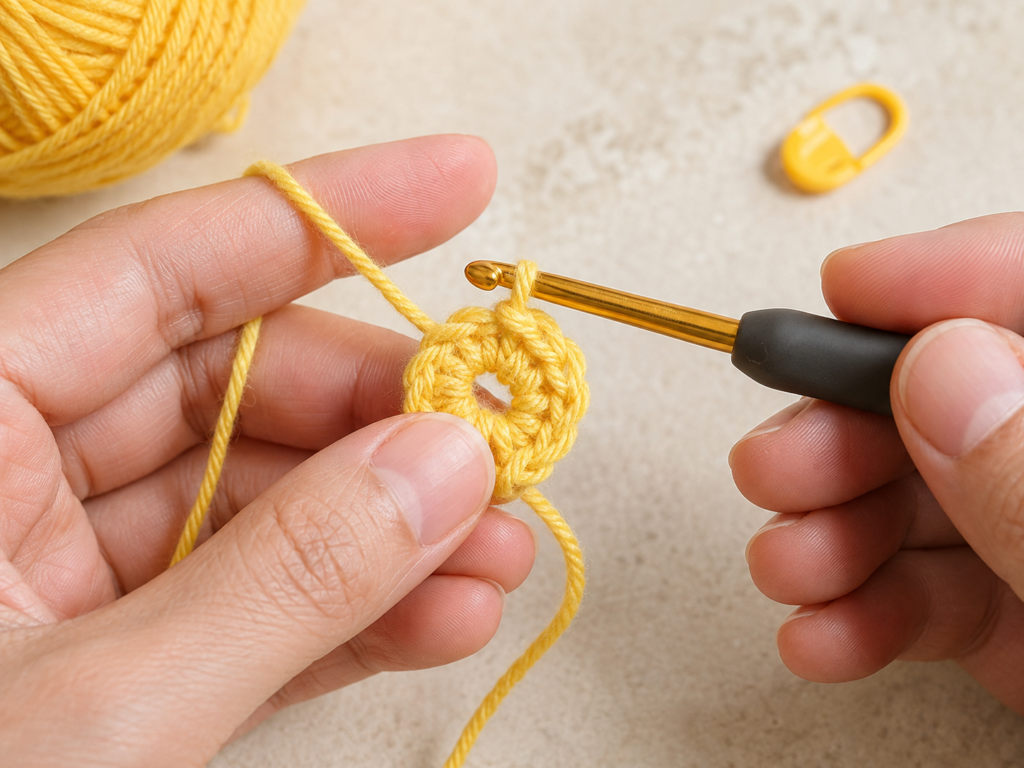
Round 1: Magic Ring
Make a magic ring.
Work:
6 sc into the ring.
Pull the starting tail to close the center.
You should have:
6 stitches
Make sure the ring is pulled tightly enough that there is no large hole in the middle.
Round 2: Increase
Work:
inc around
This means placing two single crochets into every stitch.
You should now have:
12 stitches
Round 3
Work:
(sc, inc) × 6
You should have:
18 stitches
At this point, the center will begin to look like a small circular disk.
Round 4
Work:
(2 sc, inc) × 6
Stitch count:
24
Round 5
Work:
(3 sc, inc) × 6
Stitch count:
30
Round 6
Work:
(4 sc, inc) × 6
Stitch count:
36
This is the widest part of the center.
Round 7
Work:
36 sc around
Do not increase during this round.
Keeping the same stitch count allows the center to develop some depth rather than continuing to expand.
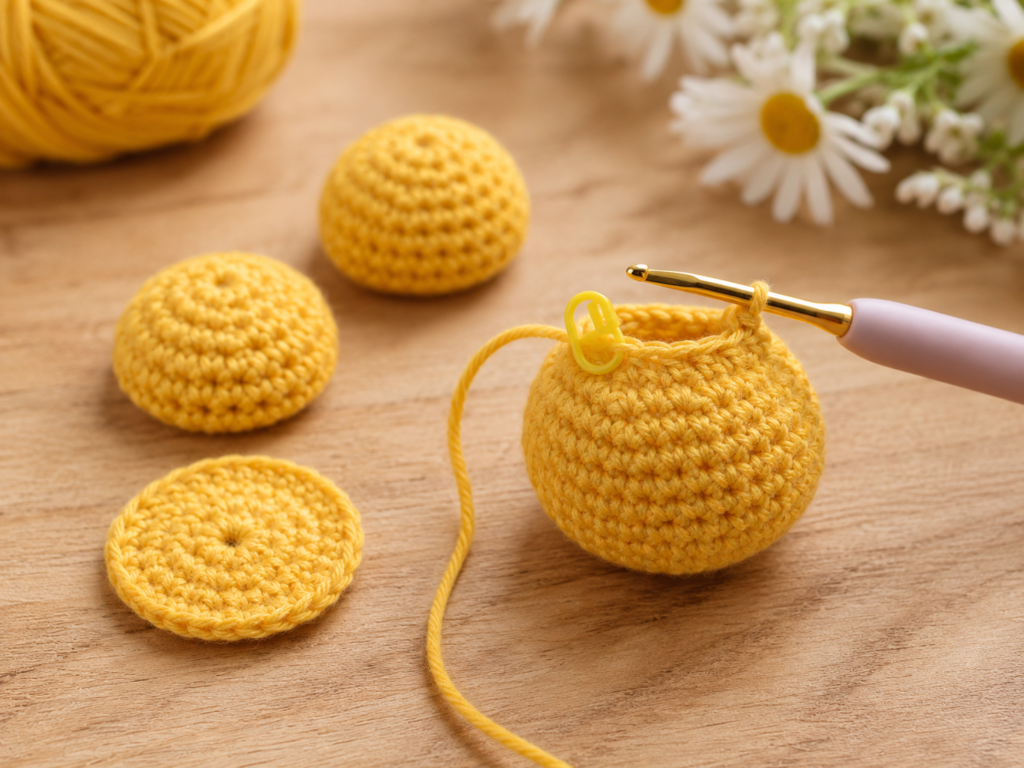
Begin Shaping the Center
Now you will decrease the stitch count.
Round 8
Work:
(4 sc, dec) × 6
Stitch count:
30
Round 9
Work:
(3 sc, dec) × 6
Stitch count:
24
Round 10
Work:
(2 sc, dec) × 6
Stitch count:
18
At this point, the opening is becoming smaller, so this is a good time to check the shape and add the facial details.
How to Add the Safety Eyes
Insert the 6 mm safety eyes before the opening becomes too small.
Place them approximately 3–4 stitches apart, depending on the expression you want.
Do not rely only on counting stitches. Look at the actual piece from the front.
The eyes should be:
- Approximately level with each other
- Centered on the yellow portion
- Far enough apart to leave room for the smile
- Securely attached from the inside
If you are making the daisy for a very young child, replace safety eyes with securely embroidered eyes.
Round 11
Work:
(sc, dec) × 6
Stitch count:
12
Begin adding stuffing gradually.
Round 12
Work:
dec × 6
Stitch count:
6
Fasten off, leaving a long tail for closing.
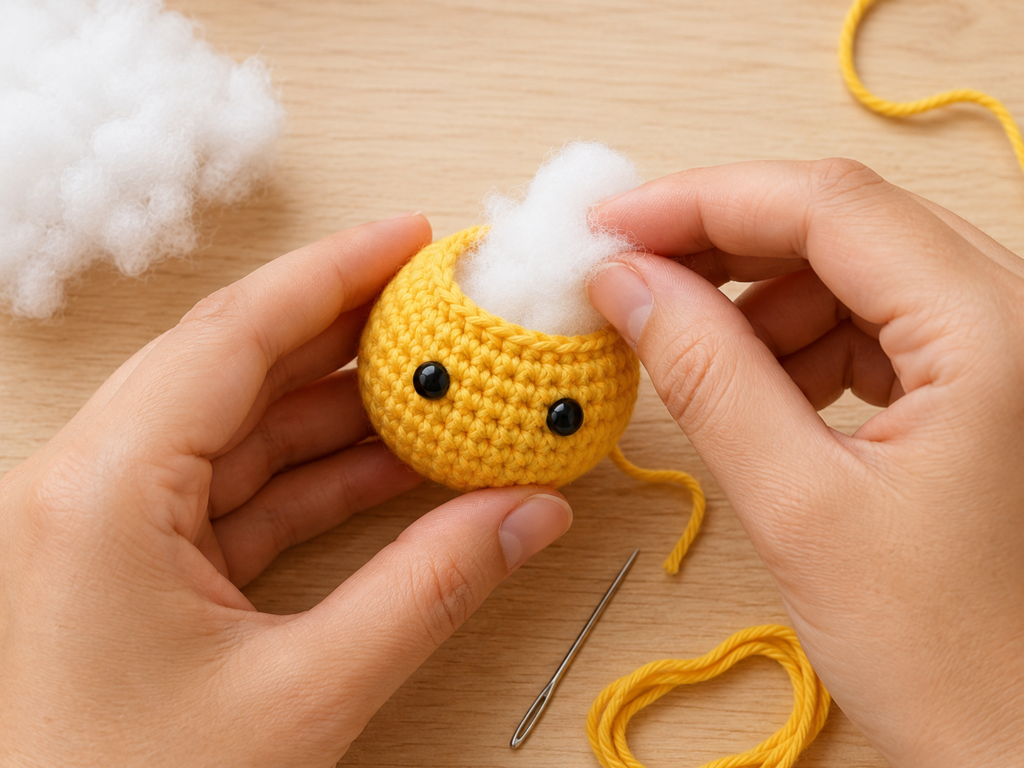
How to Stuff the Daisy Center
Stuffing is one of the easiest places to accidentally change the appearance of an amigurumi project.
Avoid pushing one large piece of fiberfill into the center.
Instead, separate the stuffing into small pieces.
Recommended method
- Add a small amount of fiberfill.
- Push it gently toward the outer edges.
- Rotate the piece.
- Add another small amount.
- Check for soft or empty areas.
- Continue until the center is evenly filled.
- Check the shape before closing.
The center should feel firm but still have some flexibility.
Avoid overstuffing
If the stitches begin stretching apart, you have probably added too much stuffing.
Visible gaps are especially noticeable with yellow yarn because white stuffing can show through easily.
How to Close the Center
Once the center has been stuffed:
- Thread the remaining yarn tail onto your tapestry needle.
- Insert the needle through the front loops of the remaining stitches.
- Continue around the opening.
- Pull gently.
- The opening should close.
- Secure the yarn.
- Hide the remaining tail inside the center.
Do not pull aggressively. Excessive tension can create a pointed or distorted center.
How to Crochet the Daisy Petals
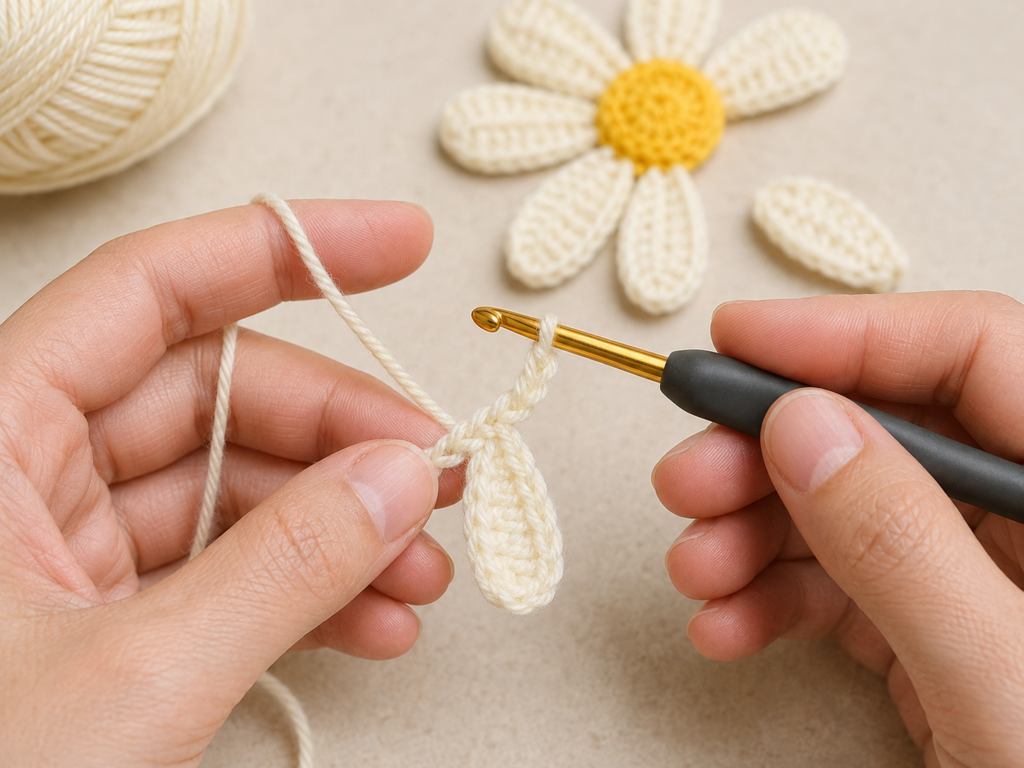
Now switch to cream or white yarn.
The petals are intentionally simple so that beginners can make them without complicated shaping.
For each petal:
Ch 7
Starting in the second chain from the hook:
- Hdc in the next 2 chains
- Dc in the next 2 chains
- Hdc in the next 2 chains
- Sl st back into the base
This creates one rounded petal.
Petal Construction
Step 1
Chain 7.
Step 2
Starting in the second chain from the hook:
2 hdc
Step 3
Work:
2 dc
Step 4
Work:
2 hdc
Step 5
Slip stitch back into the base.
You now have one petal.
Repeat the same process to create the remaining petals.
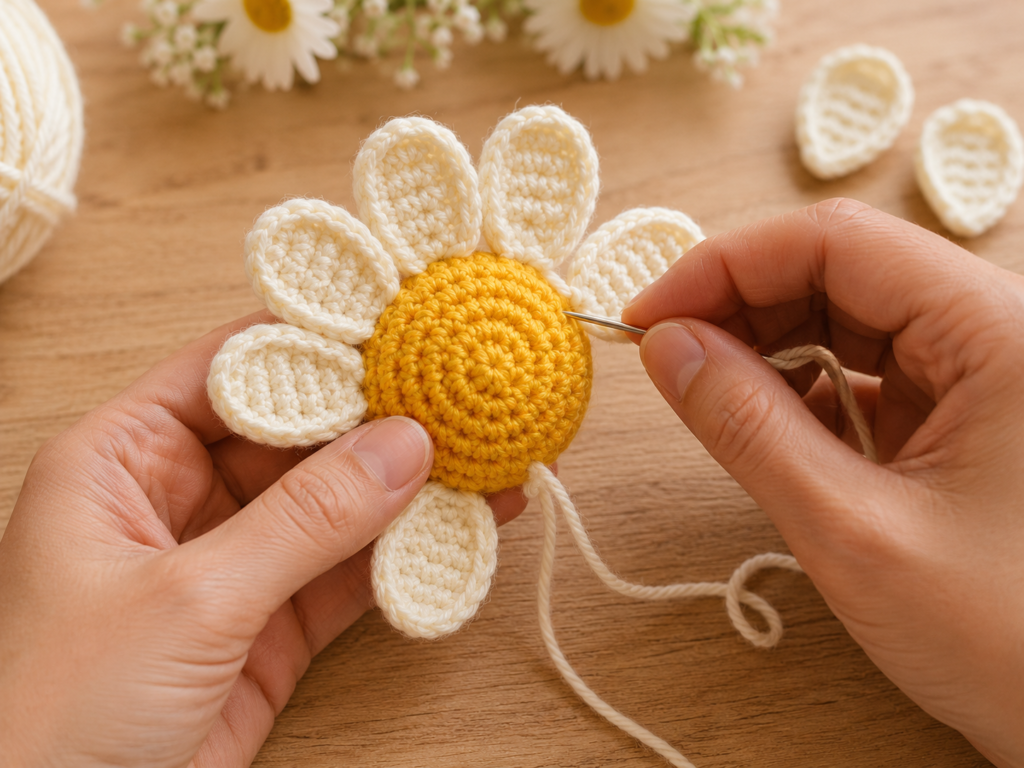
How Many Petals Should You Make?
For this miniature flower, approximately 10–12 petals creates a full appearance.
| Petals | Result |
|---|---|
| 8 | Open and minimalist |
| 9 | Slightly fuller |
| 10 | Balanced |
| 12 | Full daisy |
| 14 | Very dense |
If you are trying to reproduce the soft, full look of the pictured flower, I recommend starting with 12 petals.
How to Attach the Petals
Before sewing, place all the petals around the yellow center.
This is important because it allows you to check the spacing before permanently attaching anything.
Step-by-step
- Place the first petal at the top.
- Place the second petal slightly to the side.
- Continue around the center.
- Adjust the spacing.
- Check the flower from above.
- Once satisfied, sew each petal into position.
Use small stitches near the base of each petal.
Avoid sewing through the visible front portion of the petal because the stitches may become noticeable.
How to Create Fuller Petals
If your petals appear too flat, gently shape them with your fingers.
You can:
- Curve the outer edge slightly
- Fold the base backward
- Pull the center of the petal outward
- Adjust the angle between neighboring petals
Small changes make a surprisingly large difference to the finished flower.
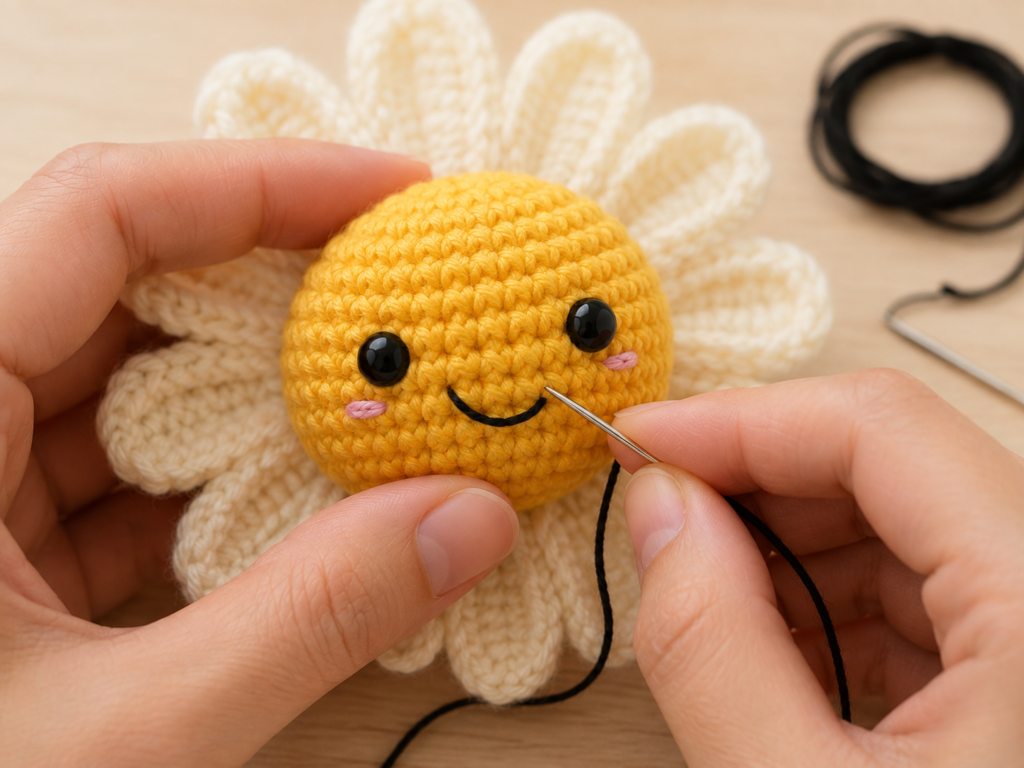
Adding the Face
The face is what gives the finished flower its character.
Eyes
Use 6 mm safety eyes or embroider them.
Smile
Use black embroidery thread and make a small curved line.
You don’t need many stitches.
Two or three small embroidery stitches are usually enough for a simple smile.
Cheeks
Use pink embroidery thread or a tiny amount of pink yarn.
Place one small blush mark beneath each eye.
Keep the cheeks subtle. Large embroidered cheeks can overpower the small face.
Final Assembly
Once the center and petals are complete:
- Check that all petals are securely attached.
- Check the position of the eyes.
- Check that the smile is centered.
- Adjust the stuffing if necessary.
- Shape the flower with your fingers.
- Weave in all remaining yarn ends.
- Trim excess yarn.
- Attach optional keychain hardware.
Your finished mini daisy should have a rounded center with evenly distributed petals.
How to Turn It Into a Keychain
If you want to use the flower as a bag charm or keychain, add a secure attachment point.
A simple method is to crochet a small loop with matching yarn and sew it firmly to the back of the flower.
For additional strength, pass the yarn through several stitches rather than attaching the loop to only one stitch.
If using metal hardware, make sure the connection is secure before using the finished item.
How to Make a Larger Daisy
The easiest way to make a larger version is to use thicker yarn.
However, you can also enlarge the crochet center by adding additional increase rounds.
For example:
| Round | Example |
|---|---|
| R6 | (4 sc, inc) × 6 = 36 |
| R7 | (5 sc, inc) × 6 = 42 |
| R8 | (6 sc, inc) × 6 = 48 |
| R9 | sc around |
| R10 | sc around |
You would then begin decreasing gradually.
The important principle is to maintain a smooth transition between increases and decreases.
Don’t simply add several increases to one round because this can create a ruffled or hexagonal shape.
How to Make the Daisy Smaller
For a smaller flower:
- Use lighter-weight yarn.
- Use a smaller crochet hook.
- Stop increasing earlier.
- Make shorter petals.
For example, you could stop the center at 30 or 36 stitches instead of continuing to a larger diameter.
Daisy Color Combinations
Changing the colors can completely change the personality of the project.
| Center | Petals | Look |
|---|---|---|
| Yellow | White | Classic daisy |
| Golden yellow | Cream | Warm and natural |
| Pink | White | Soft and feminine |
| Orange | Cream | Autumn-inspired |
| Lavender | White | Pastel |
| Blue | Cream | Whimsical |
| Coral | Cream | Modern |
| White | Yellow | Traditional flower variation |
| Pale pink | Cream | Neutral pastel |
| Bright yellow | Pale pink | Playful |
You can also make several flowers in different color combinations and display them together.
Common Problems and How to Fix Them
The stuffing is visible
This usually means your stitches are too loose.
Try using a smaller hook.
The center is flat
You may not have added enough stuffing.
Add small amounts gradually and redistribute the fiberfill toward the edges.
The center is lumpy
The stuffing has probably been inserted unevenly.
Remove some stuffing and reshape it before adding more.
The petals are different sizes
This is usually caused by inconsistent tension or differences in the chain stitches.
Count the chains for every petal and try to maintain the same tension throughout.
The flower looks crowded
You may have too many petals for the size of your center.
Try 10 petals instead of 12.
The flower has large gaps between petals
Either reduce the size of the center or increase the number of petals.
The flower doesn’t lie flat
Check the attachment points.
If individual petals are sewn at different angles, the finished flower can twist.
Lay the flower flat before sewing each petal permanently.
The face looks uneven
Do not attach the eyes immediately after completing the round.
First place them temporarily, step back and look at the project from the front.
Small adjustments can make the face much more symmetrical.
Tips for Better Amigurumi Results
1. Count every round
Even experienced crocheters occasionally lose a stitch.
The stitch count at the end of each round is your quality check.
2. Use a stitch marker
This is especially important when working continuously without joining rounds.
3. Keep consistent tension
Uneven tension can make the center appear lumpy.
4. Use an invisible decrease
This creates a cleaner surface than a standard decrease.
5. Stuff gradually
Small pieces of fiberfill produce a much smoother shape.
6. Check symmetry before sewing
Always position your components before permanently attaching them.
7. Weave in ends properly
Loose yarn tails can work themselves out over time, especially if the finished flower is used as a keychain or bag charm.
What Can You Make With This Crochet Daisy?
The finished flower can be used in several ways.
Mini Plush
Keep the original design as a small decorative plush.
Bag Charm
Add a secure loop and clasp.
Keychain
Attach keychain hardware to the back.
Backpack Decoration
Make several flowers in different colors and attach them together.
Handmade Gift
A set of miniature flowers makes an inexpensive handmade gift.
Crochet Bouquet
Make several daisies and combine them with crochet leaves and stems.
Seasonal Decoration
Change the colors to match spring, summer or a particular celebration.
Desk Decoration
A small collection of crochet flowers can be displayed in a bowl, basket or miniature vase.
Project Planning: How Much Yarn Do You Need?
Because the project is small, you can use leftover yarn from larger projects.
| Material | Approximate Requirement |
|---|---|
| Yellow yarn | Small amount |
| White/cream yarn | Small amount |
| Pink embroidery thread | Few centimeters |
| Black embroidery thread | Few centimeters |
| Fiberfill | Small handful |
Exact yarn consumption depends on yarn weight, tension and how much stuffing you use.
A Useful Tip for Consistent Flowers
If you intend to make several daisies, make the first flower your reference sample.
Measure:
- Overall diameter
- Center diameter
- Petal length
- Number of petals
- Eye placement
Then use those measurements for subsequent flowers.
This is especially helpful if you are making a collection, garland or crochet bouquet.
Safety Considerations
If this project is intended for a baby or very young child, avoid safety eyes and other detachable components.
Instead, embroider the eyes securely.
Also make sure all sewn components are firmly attached and regularly inspect handmade toys for loose parts.
For decorative pieces and older children, safety eyes can be used according to the manufacturer’s instructions.
Frequently Asked Questions
Is this a good crochet project for beginners?
Yes. The center primarily uses single crochet, increases and decreases, while the petals use simple chains and basic stitches. It is a useful introduction to small amigurumi crochet projects.
How long does it take to crochet the daisy?
An experienced crocheter may complete it in around an hour, while a beginner may need closer to two hours or more depending on their pace.
What size will the finished daisy be?
The pictured style is approximately 8 cm (3.1 inches) across. Your finished size will depend on yarn, hook size and tension.
Can I use cotton yarn?
Yes. Cotton yarn can produce a more structured flower with clearly defined stitches. Acrylic yarn can create a softer result.
Can I use plush yarn?
Yes, but the stitch definition will be less visible and counting stitches can be more difficult. Plush yarn is generally easier once you are already comfortable with amigurumi.
How many petals should a daisy have?
For this project, 10–12 petals work well. Twelve creates a fuller appearance.
Can I make the petals longer?
Yes. Increase the starting chain by one or two stitches and adjust the stitches accordingly.
Can I make this crochet flower without a magic ring?
Yes. A chain-based starting method can be substituted, although a magic ring usually creates a cleaner center for amigurumi.
Why is my crochet center not round?
Check your stitch counts. Missing or adding an increase can cause the shape to become uneven. Also check that your tension remains consistent.
Can I sell finished daisies made from this pattern?
If you are using a pattern created by someone else, check the designer’s terms regarding finished-item sales. If you are publishing your own original pattern, clearly state your own usage policy.
Affiliate Disclosure
This post may contain affiliate links. If you purchase a product through one of our links, we may earn a small commission at no additional cost to you. These commissions help support the website and allow us to continue creating free crochet tutorials, patterns and project guides. We only recommend products that are relevant to the project and useful to crocheters.
Related Crochet Patterns
If you enjoyed this Daisy Mini Plush crochet pattern, continue exploring more small and beginner-friendly projects from the site.
Free Crochet Penguin Amigurumi Pattern
A cute black-and-white penguin featuring a rounded body, white belly, orange feet and detailed assembly instructions.
Crochet Duck With Strawberry Hat: Free Amigurumi Pattern & Step-by-Step Tutorial
A charming crochet duck pattern with a strawberry-inspired hat, making it a fun project for anyone who enjoys cute crochet animals.
Crochet Kitty Plush Pattern: Cute, Soft & Beginner-Friendly Cat Amigurumi
A smaller crochet project featuring a cat-shaped design that works well for practicing simple shaping and decorative crochet.
5 Crochet Dog Toy Patterns Your Pup Will Love
If you’re interested in making crochet projects for pets, explore a collection of simple crochet dog toy ideas and construction techniques.
Crochet Panda Patterns
Continue your collection of cute crochet animal patterns with beginner-friendly panda designs and amigurumi inspiration.
Final Thoughts
The Daisy Mini Plush is a good example of how a small crochet project can teach several important techniques without becoming overwhelming.
The center gives you practice with continuous rounds, increases, decreases and stuffing, while the petals introduce simple shaping and assembly. Once those techniques become familiar, you can apply the same principles to many other easy crochet patterns, especially small amigurumi projects.
The pattern is also highly customizable. Change the center color, experiment with different petal shades, alter the number of petals or add a keychain loop to create an entirely different finished piece.
For beginners, I recommend making the classic yellow-and-white version first. Once you are comfortable with the construction, try making a second flower with different colors and compare the results.
If you are building a collection of free crochet patterns for beginners, this is a particularly useful small project to keep on hand because it requires little yarn, can be completed relatively quickly, and offers plenty of opportunities for customization.







