
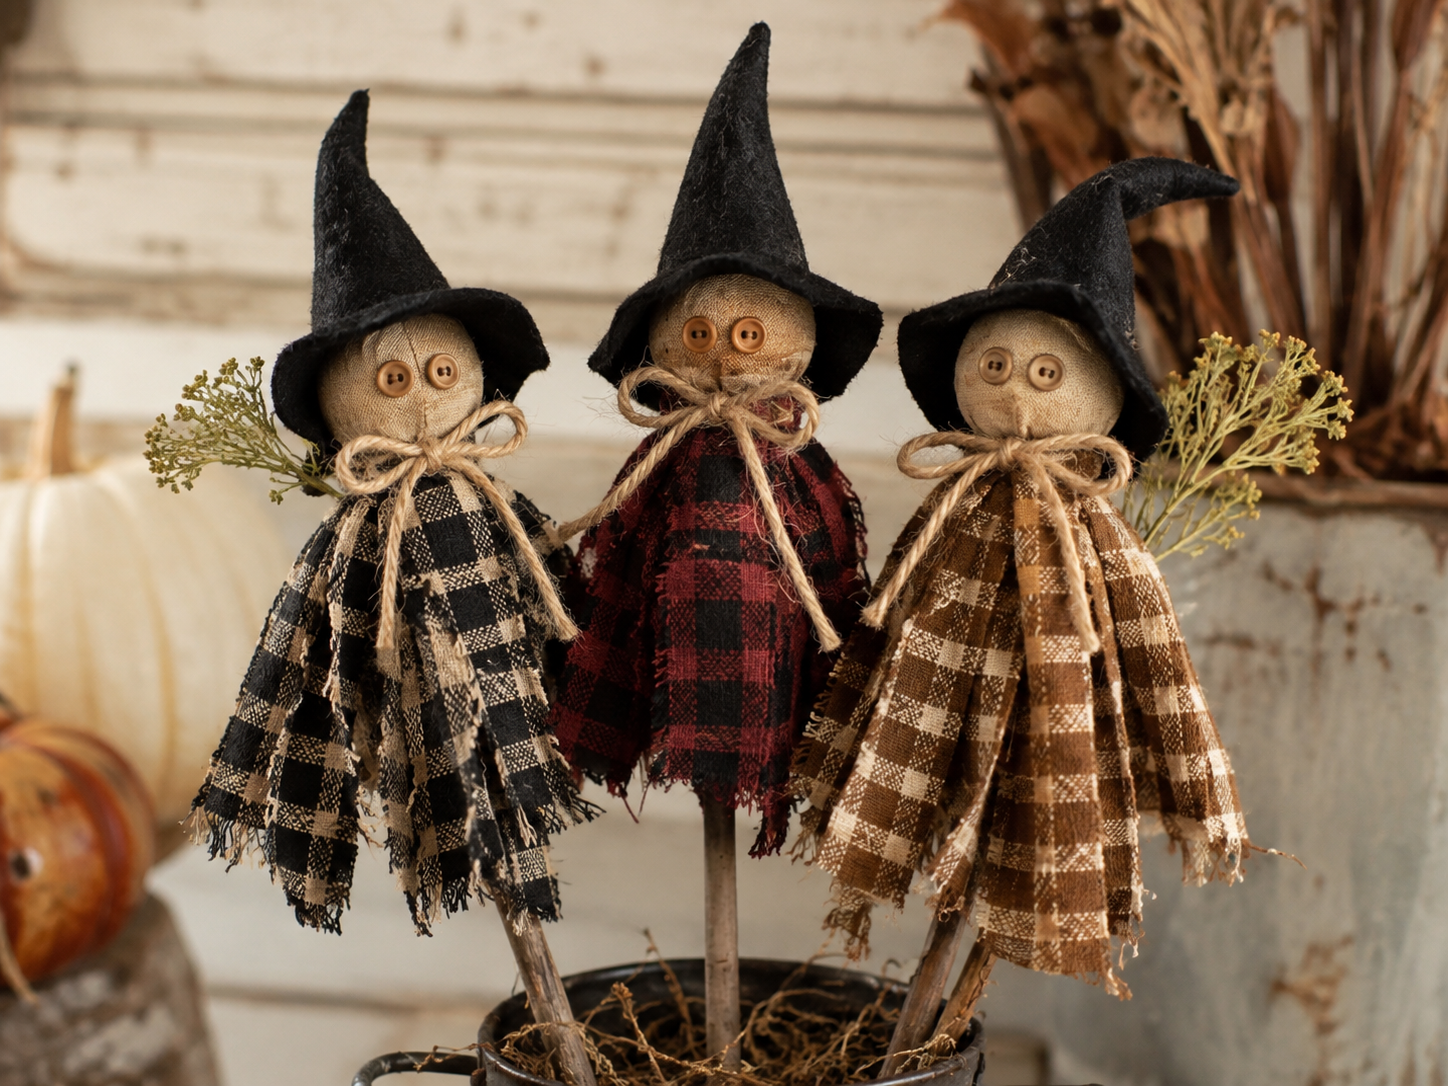
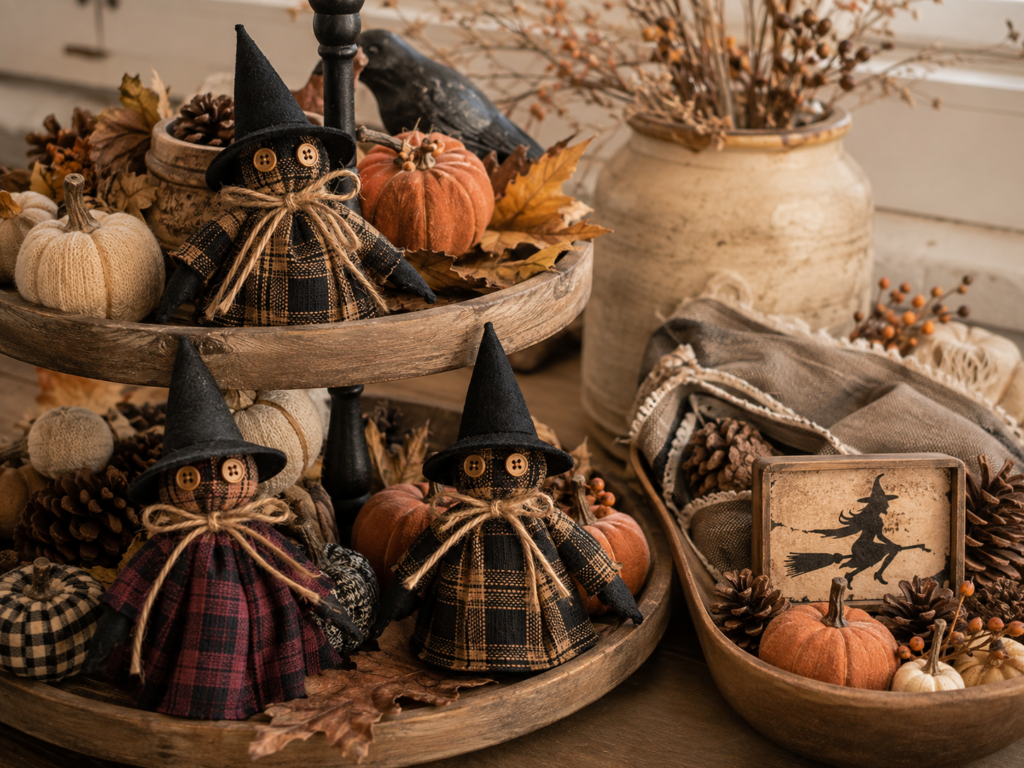
If you love rustic Halloween decorating, these DIY homespun fabric witch picks are an easy way to add handmade character to bowls, tiered trays, shelves, floral arrangements, baskets, and seasonal displays.
Made from small pieces of homespun or plaid fabric, foam balls, jute and a few simple craft supplies, these little witches have a primitive farmhouse look that works especially well with autumn and Halloween decor.
The best part is that you can make them in different fabrics, sizes and colors, and you don’t need advanced sewing skills. Most of the construction can be completed with scissors, fabric and hot glue.
This tutorial walks through the complete process, including the materials, measurements, cutting guide, assembly, witch hat, facial details, finishing, variations and decorating ideas.
Project note: The measurements below are a practical DIY version of the pictured style. Because fabric thickness, foam-ball size and the amount of fabric used can vary, small adjustments may be necessary while assembling your witch.
Table of Contents
- Why You’ll Love These DIY Witch Picks
- Project at a Glance
- Materials and Tools
- Fabric Selection
- Measurements and Cutting Guide
- Understanding the Construction
- Step 1: Prepare the Fabric
- Step 2: Cover the Foam Head
- Step 3: Create the Witch Body
- Step 4: Secure the Neck
- Step 5: Add the Eyes
- Step 6: Make the Witch Hat
- Step 7: Attach the Hat
- Step 8: Make the Jute Bow
- Step 9: Add Greenery or Floral Details
- Step 10: Add the Wooden Pick
- Step 11: Shape and Finish the Witch
- How to Make Multiple Witch Picks
- Color and Fabric Combinations
- Different Sizes
- Ways to Use Your Witch Picks
- Troubleshooting
- Safety and Crafting Tips
- Frequently Asked Questions
- Final Thoughts
Why You’ll Love These DIY Witch Picks
These little fabric witches are a great project if you enjoy primitive crafts, farmhouse Halloween decor and handmade seasonal decorations.
They have several advantages over larger Halloween projects:
- They use very little fabric.
- You can use fabric scraps from previous projects.
- No complicated sewing pattern is required.
- The body is created with simple fabric strips.
- The face takes only a couple of small buttons.
- Each witch can be customized.
- They can be made in batches.
- They work particularly well as seasonal bowl fillers and tiered-tray decorations.
The construction is also forgiving. If the fabric isn’t perfectly even or the skirt isn’t completely symmetrical, that actually adds to the handmade primitive appearance.
Project at a Glance
| Project Detail | Recommendation |
|---|---|
| Project type | Rustic Halloween craft |
| Skill level | Beginner |
| Crafting method | Cutting, wrapping, gluing and tying |
| Approximate finished height | 8–12 inches |
| Head | 1-inch foam ball |
| Fabric | Homespun, plaid or cotton |
| Fabric strip width | About 1/2 inch |
| Fabric strip length | About 4 inches |
| Hat material | Black felt |
| Eyes | Small buttons |
| Tie | Jute twine |
| Pick | Wooden skewer or craft stick |
| Optional decoration | Dried flowers or greenery |
| Tools | Scissors, hot glue gun |
| Sewing required | None for basic version |
The finished size will depend on the length of the wooden pick and the size of the foam ball.
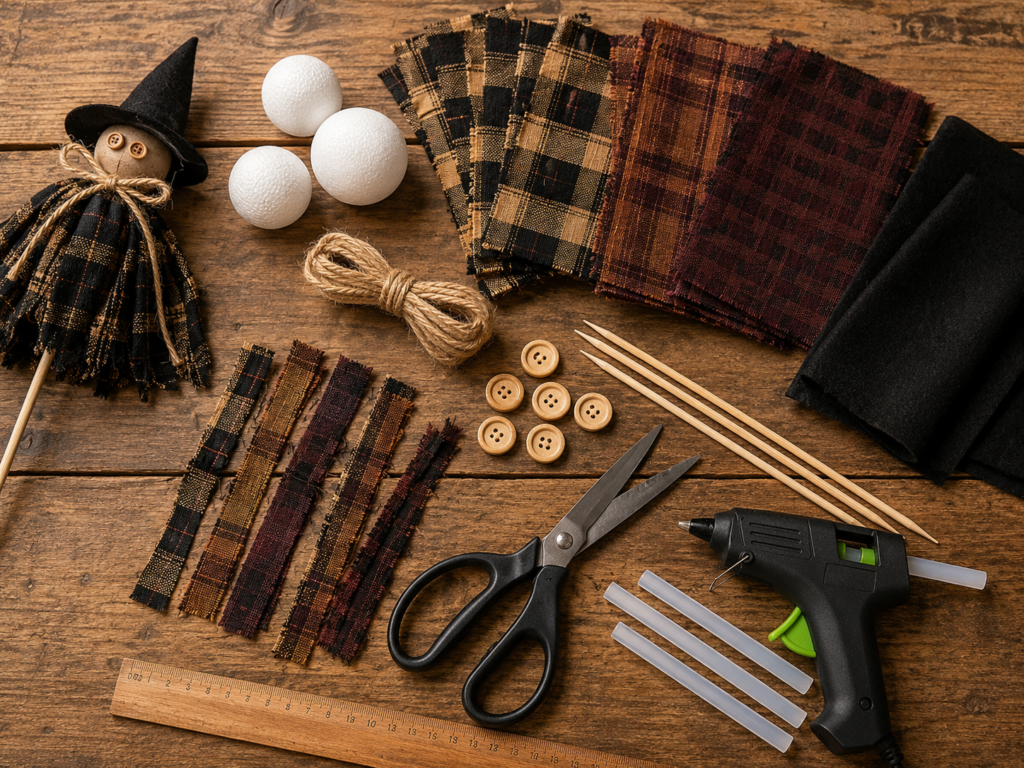
Materials and Tools
Main Materials
1. Small foam balls
Use approximately 1-inch foam balls for the basic version.
These create the rounded head.
You can substitute:
- Small papier-mâché balls
- Lightweight wooden balls
- Crumpled aluminum foil covered with fabric
- Other lightweight craft spheres
However, foam is particularly easy to work with because it is lightweight and simple to cover.
2. Homespun fabric
Choose homespun, cotton or lightweight plaid fabric.
Traditional primitive colors include:
- Black
- Brown
- Burgundy
- Mustard
- Cream
- Dark orange
- Olive green
- Rust
Plaid fabric works especially well because the irregular pattern contributes to the rustic aesthetic.
3. Black felt
Use medium-weight black felt for the pointed witch hat.
4. Jute twine
Jute is used around the neck and can also be used for the decorative bow.
5. Wooden picks
Use wooden skewers, floral picks or craft sticks depending on how you intend to display the witches.
6. Buttons
Two small buttons make simple primitive-style eyes.
Choose brown, black, brass or wooden buttons.
7. Optional greenery
You can add:
- Dried flowers
- Artificial greenery
- Small faux berries
- Tiny twigs
- Dried grasses
Tools
| Tool | Purpose |
|---|---|
| Fabric scissors | Cutting fabric |
| Regular scissors | Cutting felt and jute |
| Hot glue gun | Securing materials |
| Glue sticks | Adhesive |
| Ruler | Measuring strips |
| Pencil or fabric marker | Marking felt |
| Wire cutters | Optional, for floral stems |
| Small paintbrush | Optional finishing |
Choosing the Right Fabric
The fabric has a major influence on the finished appearance.
For a primitive Halloween look, choose fabric that has some texture rather than extremely smooth, shiny fabric.
Good choices
- Homespun cotton
- Cotton plaid
- Lightweight flannel
- Primitive reproduction fabrics
- Small-scale checks
- Muted Halloween prints
Fabrics to avoid
Very thick fabric can make the body bulky.
Very slippery fabric can also be difficult to glue and control.
For this project, a lightweight to medium-weight cotton is generally easiest.
Fabric Measurements and Cutting Guide
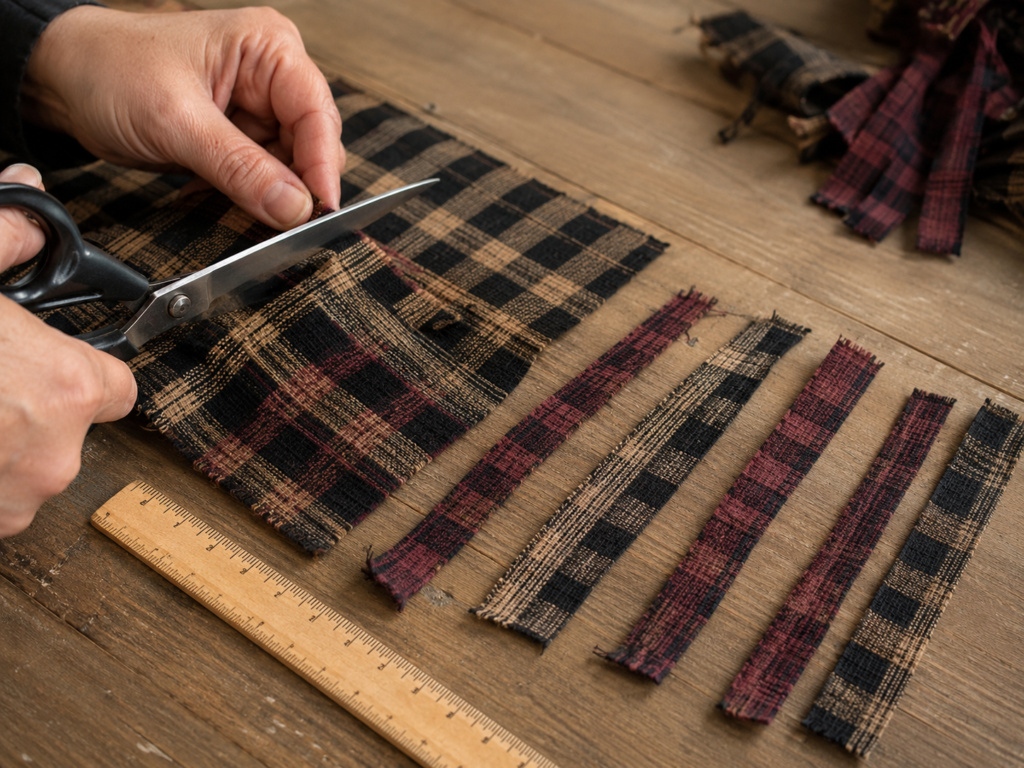
For one witch, prepare approximately:
| Component | Quantity | Suggested Size |
|---|---|---|
| Body strips | 18–24 | 1/2 × 4 inches |
| Neck tie | 1 | 12–14 inches |
| Hat felt | 1 | About 4 × 5 inches |
| Bow | 1 | 8–10 inches jute |
| Head covering | Enough strips | Adjust to foam |
| Wooden pick | 1 | 8–12 inches |
| Buttons | 2 | Small |
The exact number of fabric strips depends on the thickness of your fabric and how full you want the skirt.
For a fuller witch, use more strips.
Understanding the Construction
The witch is made from a few simple components:
Foam ball → fabric head/body → jute neck → buttons → felt hat → decorative bow → wooden pick
The fabric strips serve two purposes.
They cover the foam ball to create the head, then continue downward to form the ragged skirt/body.
This means you don’t need to sew a separate dress.
Step 1: Prepare the Fabric
Begin by cutting your homespun fabric into narrow strips.
For the standard version:
1/2 inch wide × approximately 4 inches long
Don’t worry if every strip is exactly identical.
Slight differences actually suit the primitive style.
How many strips?
Start with approximately 18 strips.
If the body looks too thin, add additional strips.
A fuller witch may require 22–24 strips.
Helpful cutting method
Instead of measuring every piece individually:
- Cut a long piece of fabric approximately 4 inches wide.
- Make cuts every 1/2 inch.
- Stop before cutting completely through the opposite edge if you want connected fringe.
- Tear or cut the strips apart.
Fabric tearing can create a naturally ragged primitive edge.
Step 2: Cover the Foam Ball
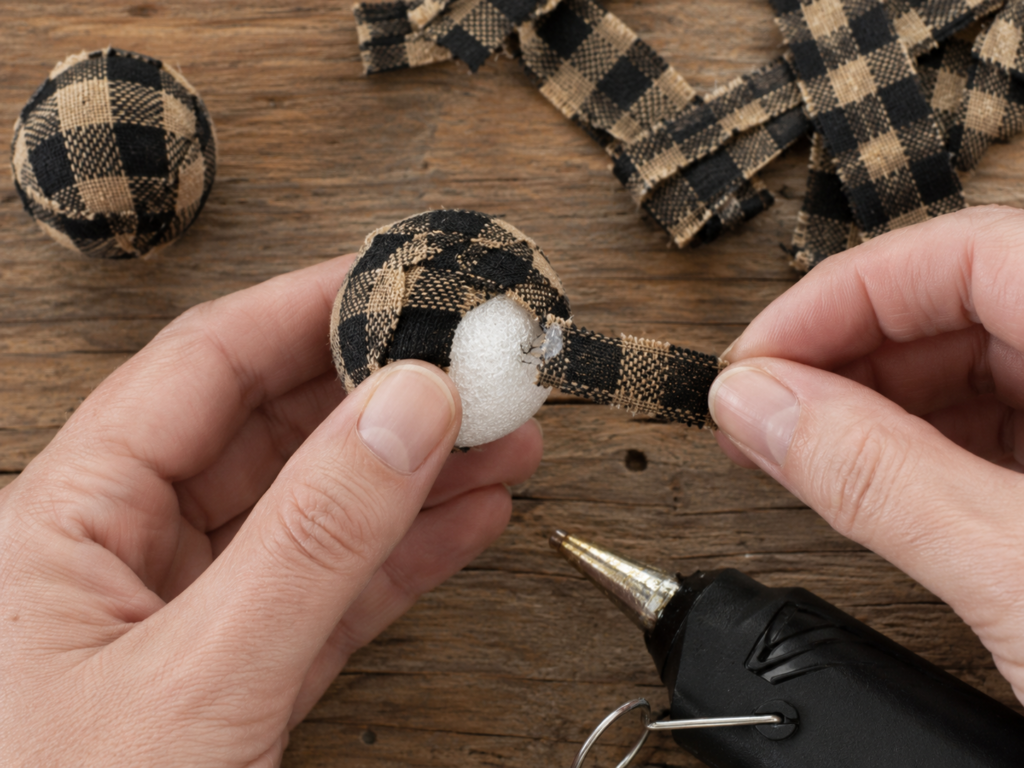
Take the 1-inch foam ball.
Begin placing fabric strips over the ball.
The strips should cross over the surface in different directions so that the foam becomes completely covered.
Basic method
- Add a small amount of hot glue to the top of the foam ball.
- Place the center of one fabric strip onto the glue.
- Press it gently into position.
- Add another strip crossing the first.
- Continue adding strips around the ball.
- Rotate the ball as you work.
- Overlap the fabric where necessary.
- Continue until very little or no foam is visible.
Don’t cover the entire ball with a thick layer of glue.
Too much glue can create hard lumps beneath the fabric.
Step 3: Create the Witch Body
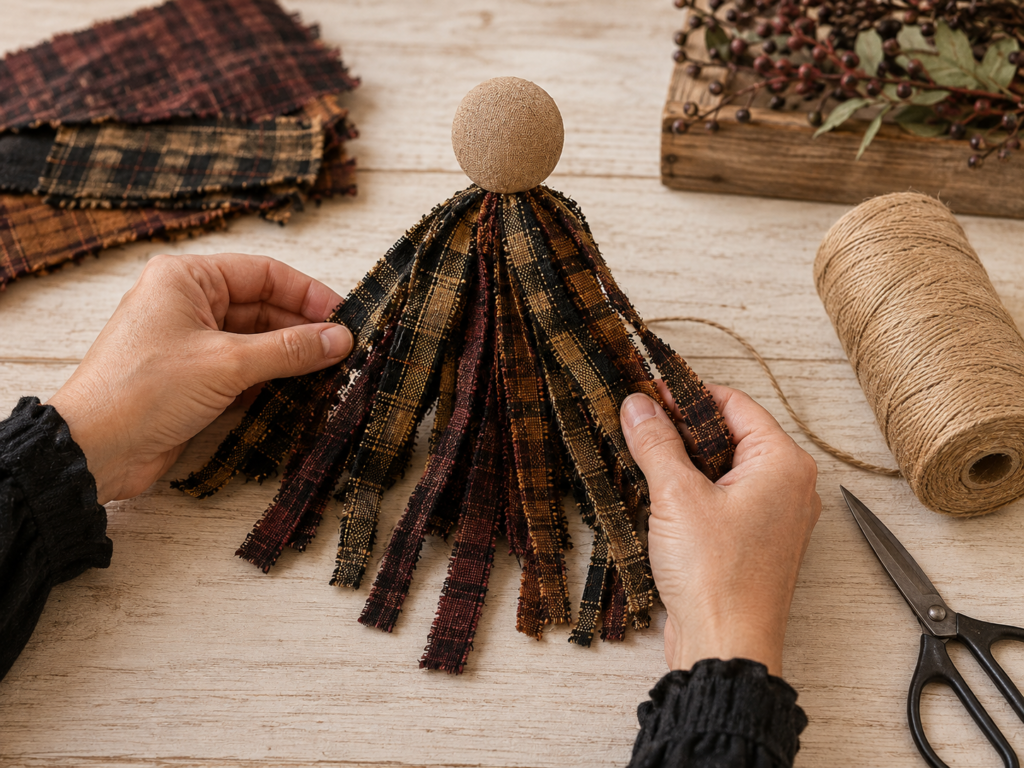
Once the foam ball is covered, allow the fabric strips to hang downward.
These hanging strips become the witch’s skirt.
Arrange the strips evenly around the lower portion of the head.
If the body looks too narrow, add more fabric strips.
If it looks too bulky, remove one or two strips.
Creating the skirt silhouette
The ideal shape is slightly wider toward the bottom.
Don’t try to make every strip perfectly straight.
Some variation gives the witch a handmade, primitive appearance.
Step 4: Secure the Neck
Now gather the fabric beneath the foam head.
Use a piece of jute twine approximately 12–14 inches long.
Wrap it tightly around the gathered fabric.
Tie a knot.
Then create a small bow.
This accomplishes two things:
- It secures the fabric.
- It visually separates the head from the body.
The bow also becomes an important decorative feature.
Tip
Leave enough room around the neck for the fabric to remain slightly loose.
If you tighten the jute excessively, the body can become distorted.
Step 5: Add the Eyes
Choose two small buttons.
Place them approximately level with one another on the front of the head.
Before gluing them permanently:
- Place both buttons temporarily.
- Step back.
- Check the spacing.
- Adjust their position.
- Glue them securely.
A primitive witch doesn’t need a highly detailed face.
In fact, simple buttons often look better than a highly realistic face.
Step 6: Make the Witch Hat
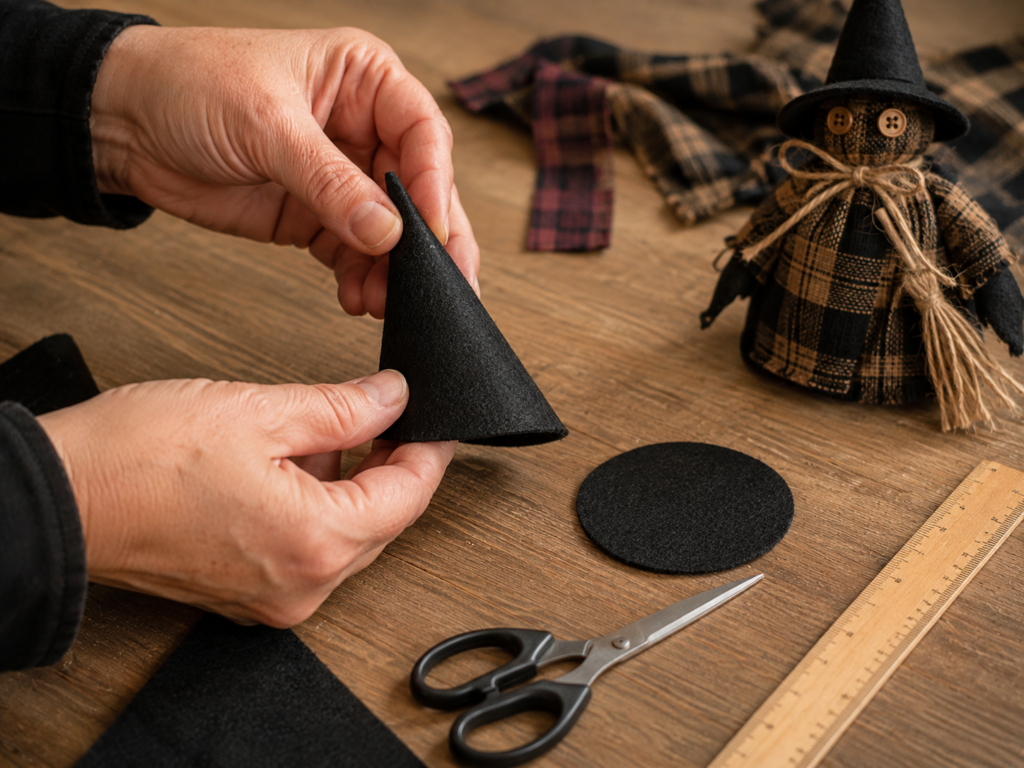
The pointed black hat is one of the defining features of the project.
You can make a simple cone from black felt.
Basic cone pattern
Cut a shape approximately like a large triangle or curved sector.
A practical starting measurement is:
- Height: approximately 4–5 inches
- Base width: approximately 3.5–4 inches
The exact dimensions can be adjusted according to the size of your head.
The cone
- Cut the felt into the desired shape.
- Bring the two straight sides together.
- Overlap them slightly.
- Apply hot glue along the seam.
- Hold until secure.
- Allow the glue to cool.
You should now have a pointed cone.
Step 7: Create the Hat Brim
The hat looks more finished when it has a brim.
Cut a small circle or slightly irregular oval from black felt.
Make a small opening in the center.
Place the cone through the opening.
Glue the cone to the brim from underneath.
Primitive variation
For a more rustic appearance, don’t make the brim perfectly circular.
A slightly uneven brim can look intentional and handmade.
Step 8: Attach the Hat
Place the finished hat over the fabric-covered foam head.
Check the angle before gluing.
A perfectly straight hat looks more formal.
For a whimsical witch, angle it slightly to one side.
Add a small amount of hot glue beneath the brim.
Press gently onto the head.
Hold until secure.
Step 9: Make the Jute Bow
Cut approximately 8–10 inches of jute twine.
Create a simple bow.
For a fuller bow, use two pieces of jute.
Tie the center tightly.
Trim the ends to your preferred length.
You can leave the ends slightly uneven for a primitive look.
Step 10: Add Greenery or Floral Details
This step is completely optional.
For a more decorative witch, tuck a small piece of greenery or dried floral material into one side of the body.
Good choices include:
- Dried lavender
- Small artificial leaves
- Tiny faux berries
- Dried grasses
- Small twigs
- Miniature floral stems
Secure the piece with a small amount of hot glue.
Don’t add too much.
The witch should remain the focal point.
Step 11: Add the Wooden Pick
If you want to use your witch as a Halloween decor pick, insert the wooden skewer or floral pick into the lower portion of the body.
Before attaching it permanently:
- Decide how much of the pick should remain visible.
- Position it behind the fabric.
- Add a small amount of hot glue.
- Insert the pick carefully.
- Hold the fabric around it until secure.
If you are using a sharp wooden skewer, keep the pointed end away from children and pets.
For indoor decorative displays, a blunt floral pick can be a safer alternative.
Step 12: Shape and Finish the Witch
Now examine the finished witch from all sides.
Adjust:
- Fabric strips
- Hat angle
- Button position
- Bow
- Greenery
- Skirt fullness
Trim any excessively long fabric strips if necessary.
However, don’t make the skirt perfectly even.
The uneven edges are part of the primitive design.
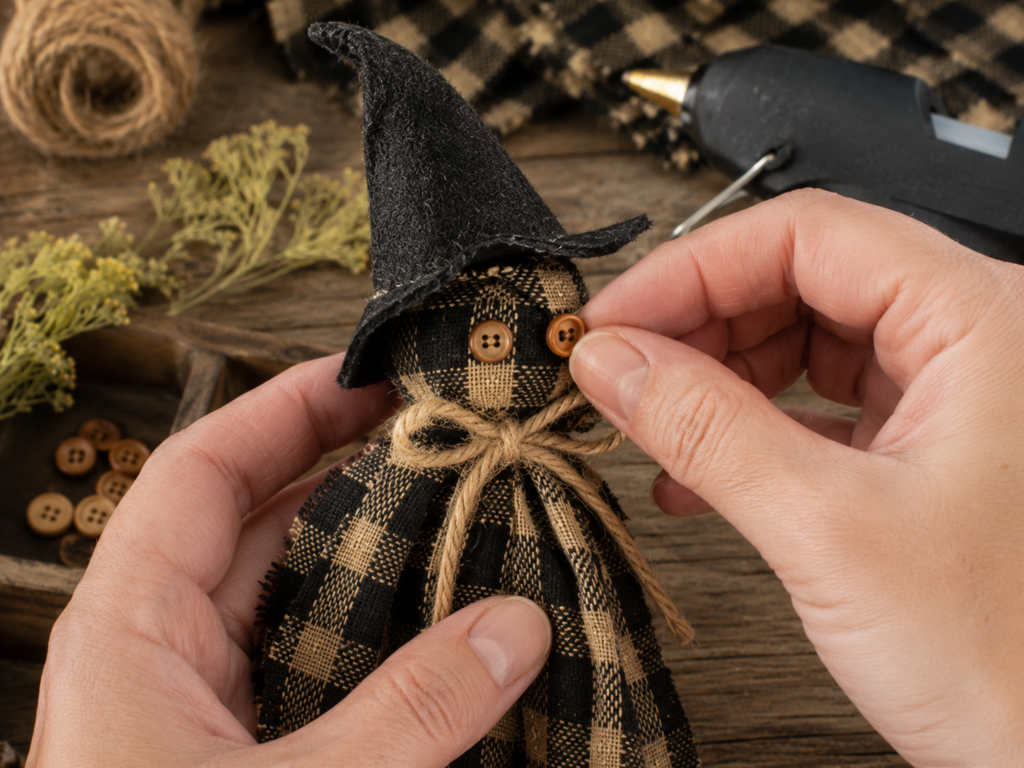
Basic Pattern Summary
For quick reference, here’s the complete construction:
| Step | Action |
|---|---|
| 1 | Cut homespun fabric into 1/2 × 4-inch strips |
| 2 | Prepare a 1-inch foam ball |
| 3 | Glue fabric strips over the foam |
| 4 | Arrange remaining strips downward |
| 5 | Gather fabric beneath the head |
| 6 | Tie with jute |
| 7 | Add two button eyes |
| 8 | Cut and assemble a black felt hat |
| 9 | Attach the hat |
| 10 | Add a jute bow |
| 11 | Add optional greenery |
| 12 | Insert and secure wooden pick |
| 13 | Shape and trim the skirt |
| 14 | Check all glued components |
| 15 | Display |
How to Make Multiple Witch Picks
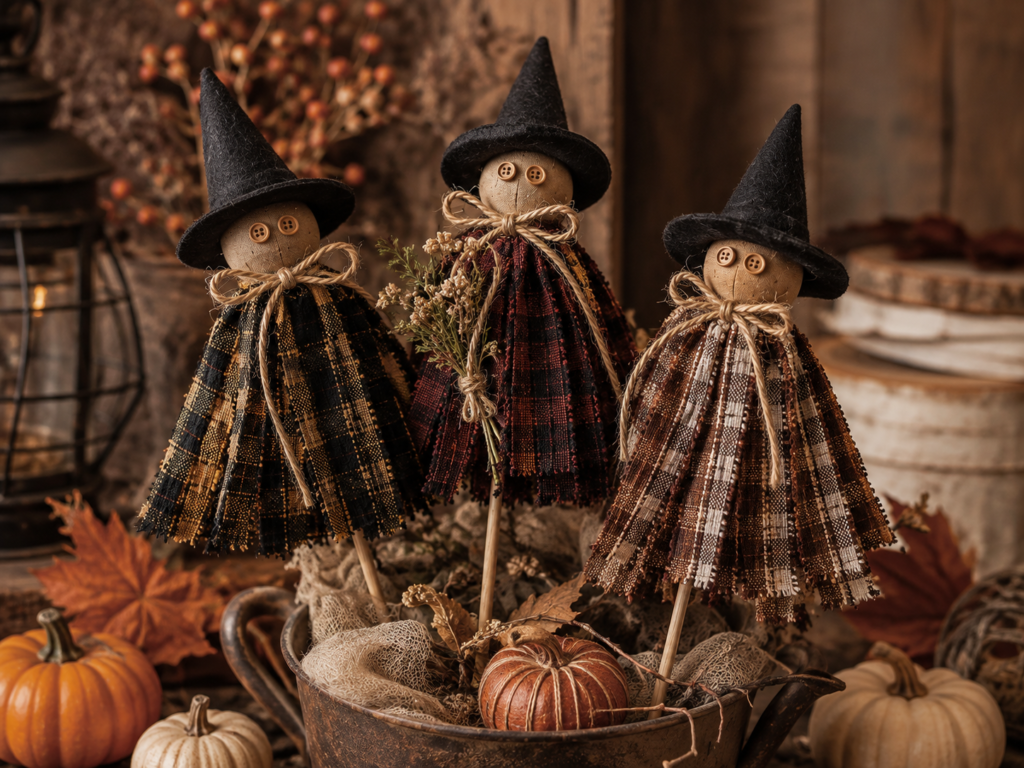
These witches look particularly good when displayed in groups.
Instead of making every witch identical, create a small collection.
Three-Witch Arrangement
Use:
Witch 1: Black and tan plaid
Witch 2: Burgundy and black plaid
Witch 3: Brown and cream plaid
Give each one a slightly different hat angle and skirt shape.
This creates a coordinated but handmade collection.
Color and Fabric Combinations
| Fabric | Hat | Accent | Overall Style |
|---|---|---|---|
| Black plaid | Black | Natural jute | Classic primitive |
| Burgundy plaid | Black | Brown jute | Traditional Halloween |
| Orange plaid | Black | Black jute | More festive |
| Brown plaid | Black | Natural jute | Farmhouse |
| Cream plaid | Black | Burgundy | Soft rustic |
| Mustard plaid | Black | Brown | Autumn-inspired |
| Black and red | Black | Red | Dramatic |
| Green plaid | Black | Natural | Vintage-inspired |
For a cohesive display, keep the hat color consistent while changing the fabric.
How to Make Different Sizes
The 1-inch foam ball creates a miniature witch.
You can easily scale the project.
| Size | Foam Ball | Fabric Strips | Suggested Use |
|---|---|---|---|
| Mini | 1 inch | 12–18 | Bowl filler |
| Small | 1.5 inch | 18–24 | Tiered tray |
| Medium | 2 inch | 24–30 | Shelf decor |
| Large | 3 inch | 30+ | Larger display |
As the head gets larger, increase the hat dimensions proportionally.
Making a Mini Bowl-Filler Version
If you want to place the witches directly inside a bowl rather than use them as picks, simply omit the wooden skewer.
Make the fabric body slightly shorter.
Then finish the bottom with a flat or slightly rounded shape.
This creates a cute primitive Halloween bowl filler.
You can make several small witches and combine them with:
- Mini pumpkins
- Fabric candy corn
- Small faux leaves
- Pinecones
- Wooden beads
- Dried flowers
Making Tiered Tray Witch Decor
For a tiered tray, keep the witch relatively small.
A 1–1.5-inch foam ball works well.
Position the finished witch beside:
- Small pumpkins
- Wooden signs
- Miniature books
- Candles
- Faux greenery
- Small galvanized containers
- Mini Halloween signs
The key is to vary the heights.
Place taller items toward the back and the witch toward the center or front.
Ways to Use Your Witch Picks
These aren’t limited to one type of Halloween display.
Tiered trays
Insert the wooden pick into a small container filled with floral foam.
Floral arrangements
Add one or two witches to an autumn arrangement.
Baskets
Place several witches into a basket filled with seasonal greenery.
Halloween centerpieces
Use three witches of different colors as the focal point.
Bowl fillers
Remove the wooden pick and make smaller versions.
Shelf decor
Place individual witches beside pumpkins and vintage-style Halloween signs.
Mantel decorations
Use a group of three for a simple rustic Halloween display.
Party decorations
Place small witches around a dessert table or craft table.
How to Create a More Primitive Appearance
The primitive style depends heavily on texture and imperfection.
To achieve that look:
Use muted colors
Avoid extremely bright, glossy fabrics.
Mix patterns
Combine plaid, checks and subtle prints.
Keep edges imperfect
Don’t make every fabric strip exactly identical.
Use natural jute
The rough texture contrasts nicely with the fabric.
Choose aged-looking accessories
Wooden buttons and distressed-looking materials work especially well.
Slightly vary the witches
Give each one a different hat angle, fabric and bow.
The goal isn’t factory-perfect symmetry.
How to Make the Project More Halloween-Themed
You can customize the basic witch without changing the construction.
Try adding:
- Tiny orange bows
- Mini faux pumpkins
- Black lace
- Small bells
- Burgundy ribbon
- Rust-colored fabric
- Mini spiders
- Small fabric bats
- Faux dried leaves
- Tiny broomsticks
Keep decorative additions lightweight so they don’t pull the witch out of shape.
Troubleshooting
The foam ball keeps showing through
You need more fabric coverage.
Add another strip over the exposed area and secure it with a small amount of glue.
The fabric keeps moving
Use small dots of glue rather than trying to glue the entire surface at once.
Work in sections.
The head looks too bulky
You may be overlapping too many fabric layers.
Remove unnecessary layers and redistribute the strips.
The skirt looks too thin
Add more fabric strips.
For a fuller skirt, 22–24 strips may work better than 18.
The skirt doesn’t hang evenly
Turn the witch upside down and gently rearrange the strips.
Trim only the longest pieces.
The hat keeps falling off
The hat may not have enough contact with the foam head.
Add a small amount of glue underneath the brim.
Don’t use excessive glue because it can become visible.
The witch looks too modern
Use:
- Muted fabrics
- Plaid
- Natural jute
- Wooden buttons
- Black felt
- Slightly uneven edges
These details help create the primitive farmhouse appearance.
The witch looks too plain
Add one small decorative element such as greenery, a bow, a tiny berry cluster or a small piece of ribbon.
Tips for Working With Hot Glue
Hot glue is extremely useful for this project, but it requires care.
Use small amounts
A little glue is usually enough.
Work in sections
This gives you more control.
Allow glue to cool
Don’t immediately pull on a newly glued piece.
Remove glue strings
After everything has cooled, remove visible glue strands with your fingers or tweezers.
Keep the finished craft away from excessive heat
Hot temperatures can soften some adhesives and cause components to loosen.
How to Make Your Witches Look More Expensive
A few finishing details can dramatically improve the final appearance.
Use coordinated fabrics
Choose three fabrics from the same color family.
Keep the hats consistent
Use the same black felt for each witch.
Vary the body lengths
Small differences make the arrangement more natural.
Add texture
Jute, homespun cotton, felt and dried greenery create a richer visual appearance.
Avoid over-decoration
Primitive crafts generally look better when the materials themselves provide most of the visual interest.
Frequently Asked Questions
What fabric is best for these DIY witch picks?
Homespun cotton, lightweight plaid and flannel are excellent choices. Lightweight fabrics are easier to wrap and glue than very thick materials.
Do I need to know how to sew?
No. The basic version can be completed without sewing. Fabric, felt, buttons and decorative components can be attached using hot glue.
What size foam ball should I use?
A 1-inch foam ball works well for the small version shown in this tutorial.
Can I use fabric scraps?
Yes. This is one of the best uses for small leftover pieces of homespun or plaid fabric.
Can I make these witches without wooden picks?
Yes. Simply omit the skewer and make the witch as a standalone bowl filler or tabletop decoration.
Can I make larger witches?
Absolutely. Use a larger foam ball and increase the fabric-strip quantity and hat dimensions proportionally.
How many fabric strips do I need?
Approximately 18–24 strips usually works for a small witch, depending on fabric thickness and desired fullness.
Can I use buttons for the eyes?
Yes. Small wooden or dark-colored buttons work particularly well for a primitive craft aesthetic.
Can children make this project?
Older children can participate with adult supervision, but hot glue and sharp tools should be handled by an adult or closely supervised.
How should I store the witches after Halloween?
Store them in a clean, dry container away from moisture and excessive heat. Avoid placing heavy decorations on top of them because the fabric and felt can become permanently compressed.
Simple Batch-Making Plan
If you’re making several witches, don’t completely finish one before starting the next.
A faster approach is to work assembly-line style.
Stage 1
Cut all fabric strips.
Stage 2
Prepare all foam balls.
Stage 3
Cover all heads.
Stage 4
Gather and tie all necks.
Stage 5
Add all button eyes.
Stage 6
Cut and assemble all hats.
Stage 7
Add bows and greenery.
Stage 8
Attach wooden picks.
Stage 9
Complete the final shaping.
This method saves time because you aren’t repeatedly switching between different tools and materials.
Quick Materials Checklist
Before starting, make sure you have:
- 1-inch foam balls
- Homespun or plaid fabric
- Black felt
- Small buttons
- Jute twine
- Wooden picks or skewers
- Hot glue gun
- Glue sticks
- Fabric scissors
- Ruler
- Optional greenery
- Optional dried flowers
Final Pattern Card
DIY Homespun Witch Pick
HEAD
1 × 1-inch foam ball
BODY
Approximately 18–24 fabric strips
1/2 inch × 4 inches
NECK
12–14 inches jute twine
FACE
2 small buttons
HAT
Black felt cone + brim
DECORATION
Jute bow + optional greenery
PICK
8–12-inch wooden skewer or floral pick
FINISH
Arrange, trim and shape fabric strips.
Final Thoughts
These DIY homespun fabric witch picks are a simple way to create Halloween decorations that feel handmade rather than mass-produced. The basic construction is inexpensive, adaptable and easy to make in batches, which makes the project especially useful if you like decorating several areas of your home for fall.
The biggest advantage is how customizable the design is. A change in fabric can make the same basic witch look farmhouse, primitive, vintage, rustic or more traditional Halloween.
Start with one small witch to test your preferred fabric and proportions. Once you’re happy with the shape, make two or three more using coordinating fabrics. A group of slightly different witches will usually look more interesting than several identical ones.
Whether you use them as Halloween bowl fillers, tiered tray decorations, floral picks, shelf accents or rustic farmhouse Halloween decor, these little fabric witches are a practical seasonal craft that can be reused year after year.







