
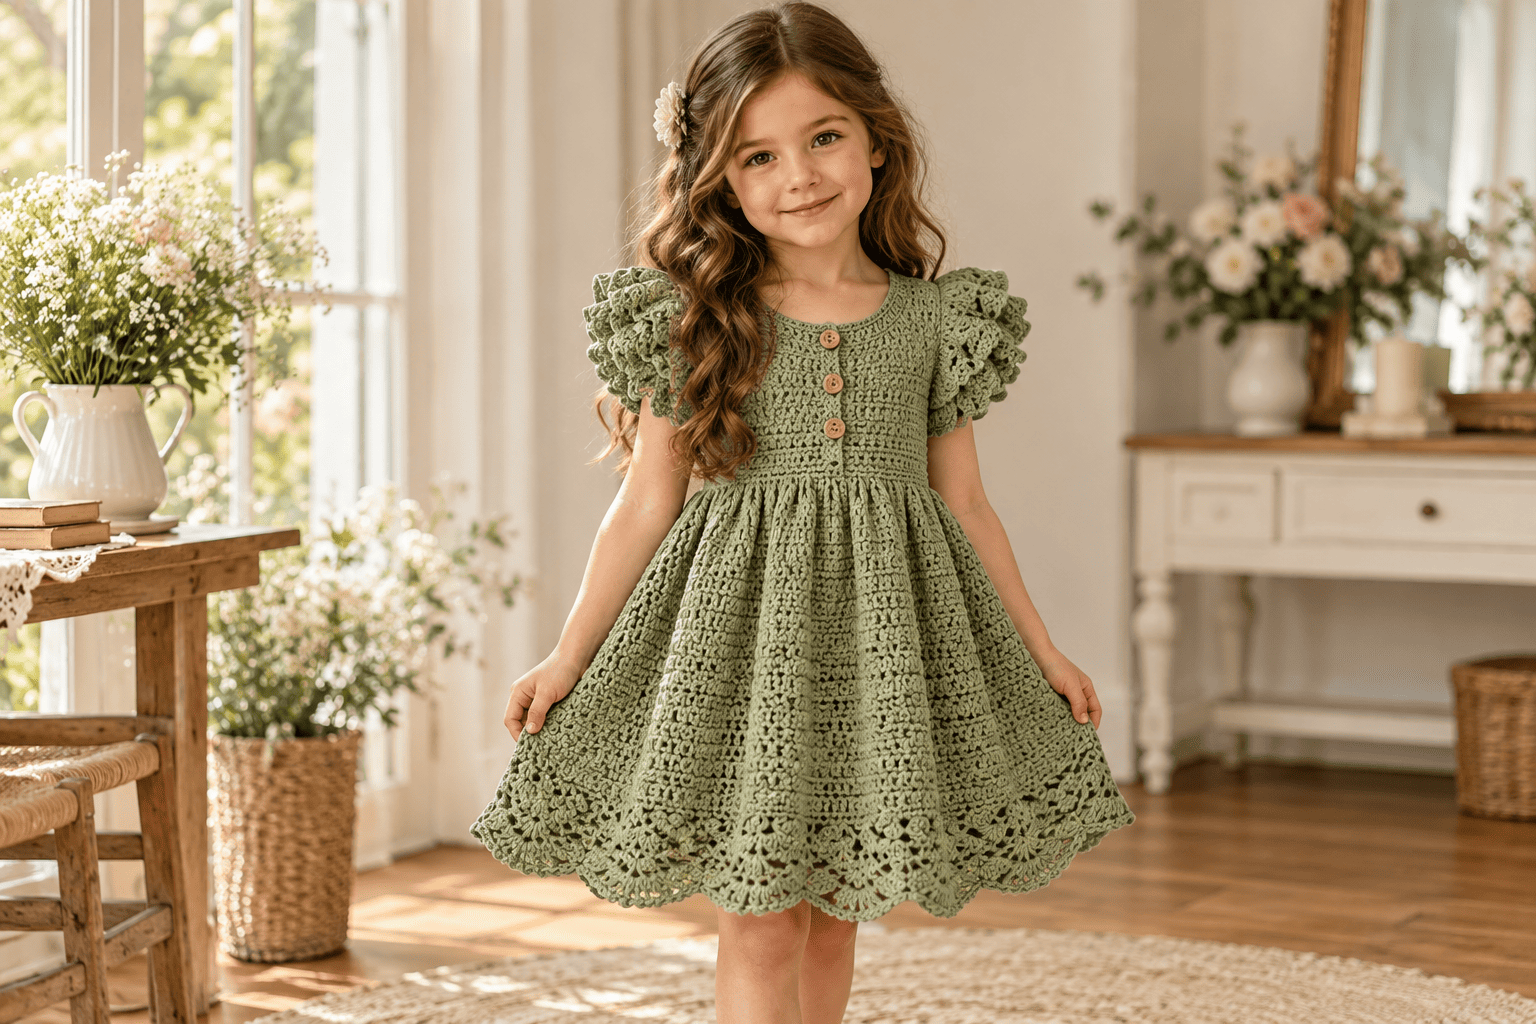
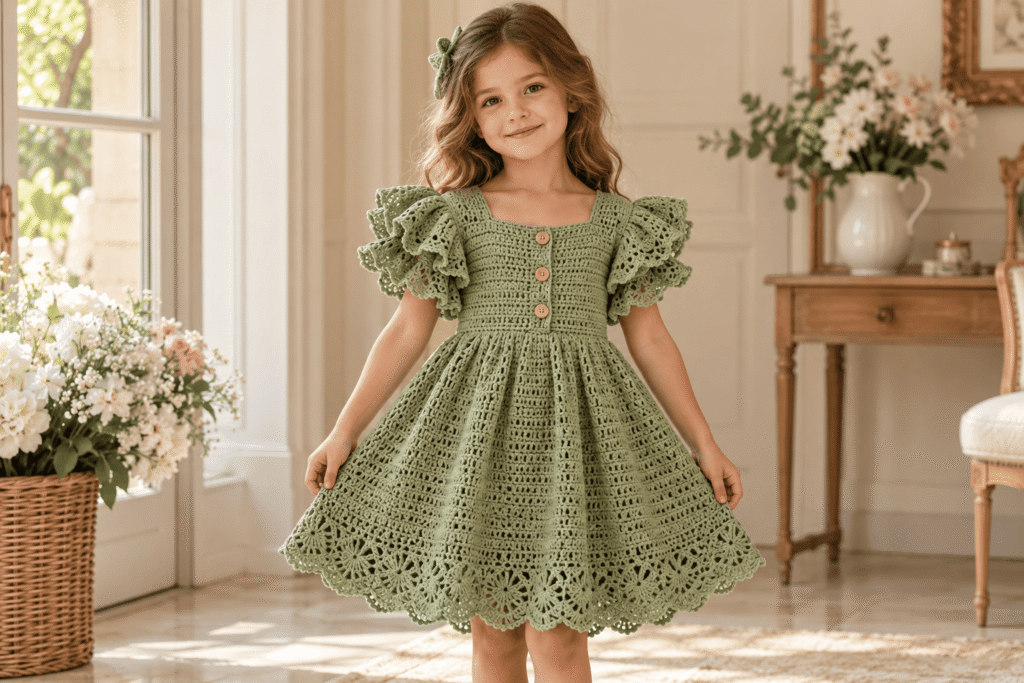
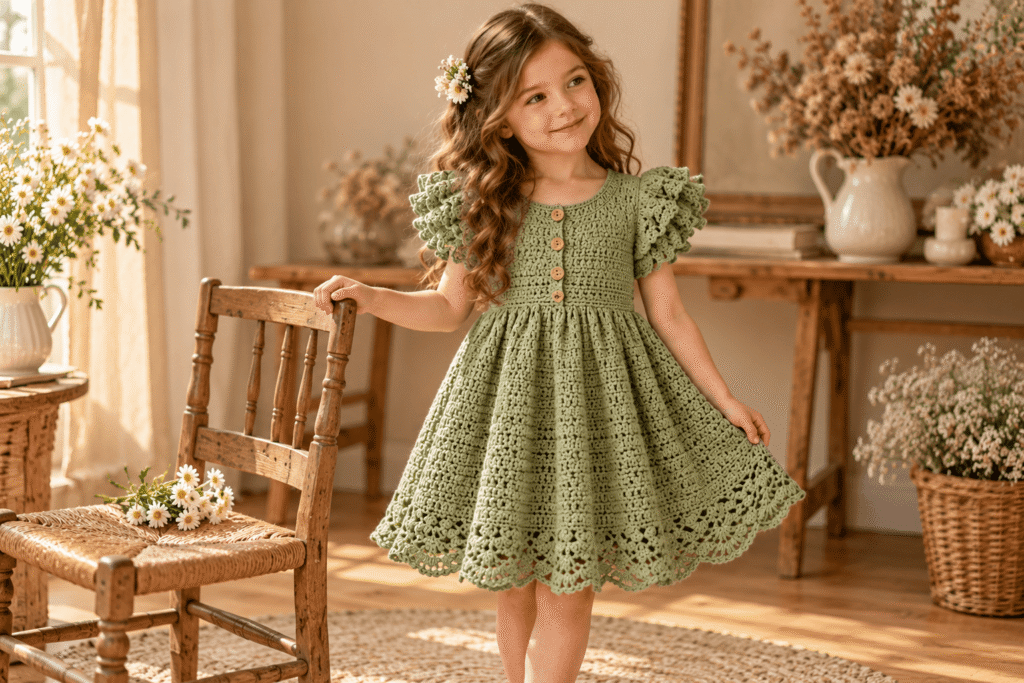
A beautifully handmade crochet dress can turn a simple outfit into something truly special. This green crochet puff-sleeve dress for girls combines a structured bodice, delicate button front, romantic ruffled sleeves, a gently flared skirt, and an elegant scalloped lace hem.
The design in the reference has a vintage-inspired look, but it can easily be adapted into different colors, lengths, sleeve styles, and sizes. In this guide, we’ll build the dress from the top down and cover the materials, measurements, stitch choices, shaping, puff sleeves, skirt construction, decorative hem, finishing, and customization ideas.
Important: The pattern below is an original tutorial inspired by the visual design shown in the reference image. It is not a transcription of another designer’s copyrighted pattern.
What Makes This Crochet Dress Special?
The beauty of this design comes from combining several relatively simple crochet techniques into one polished garment.
The main features are:
- Structured crochet bodice
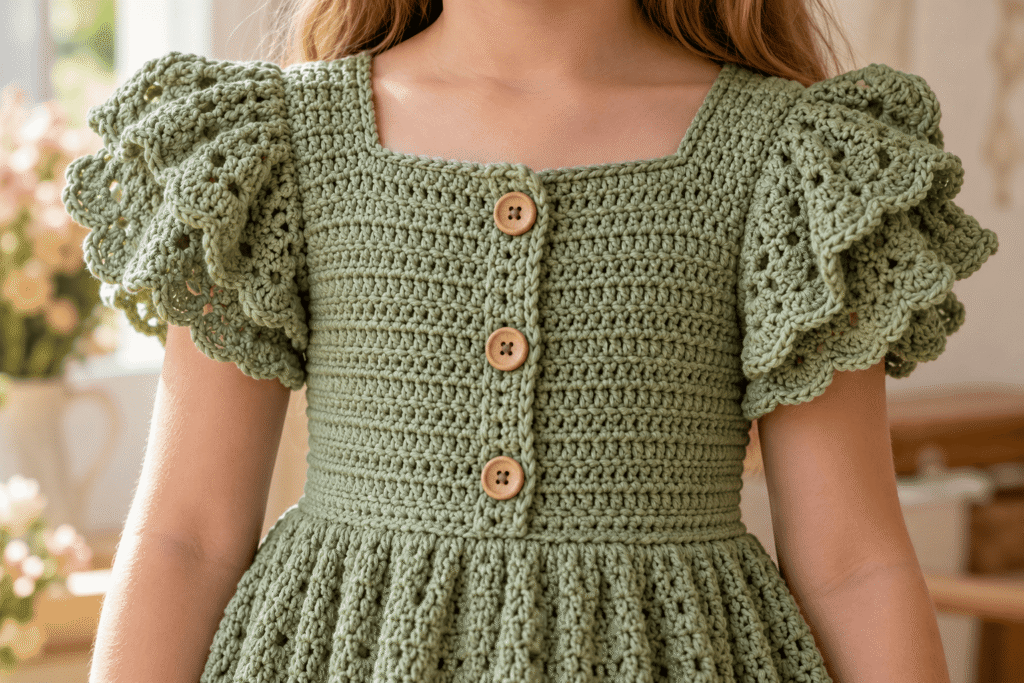
- Round neckline with a small collar effect
- Three or four decorative wooden buttons
- Short puff sleeves
- Ruffled sleeve edges
- Slightly fitted waist
- Full circular or gently flared skirt
- Decorative crochet lace hem
- Scalloped lower edge
- Optional matching hair bow
- Comfortable handmade construction
- Easy color customization
The bodice uses a relatively dense stitch so that it keeps its shape, while the skirt becomes progressively more open and decorative toward the bottom.
Skill Level
Intermediate beginner to intermediate
You should be comfortable with:
- Chain stitch (ch)
- Slip stitch (sl st)
- Single crochet (sc)
- Half double crochet (hdc)
- Double crochet (dc)
- Working in rows
- Working in rounds
- Increasing
- Decreasing
- Basic sewing
- Attaching buttons
The puff sleeve and decorative hem require a little more attention, but you don’t need advanced lace-crochet experience.
Materials You’ll Need
| Material | Recommended amount |
|---|---|
| Main yarn | Approximately 350–650 g |
| Crochet hook | 3.5–4.5 mm |
| Smaller hook | 3.0–3.5 mm |
| Wooden buttons | 3–5 |
| Tapestry needle | 1 |
| Stitch markers | 4–8 |
| Scissors | 1 |
| Measuring tape | 1 |
| Sewing needle | 1 |
| Matching sewing thread | Small amount |
| Optional lining | According to size |
The exact yarn quantity depends heavily on the child’s size, yarn weight, skirt length, and how full you make the skirt.
Recommended Yarn
A soft cotton or cotton-blend yarn is an excellent choice for this project.
Cotton works particularly well because it:
- Holds stitch definition beautifully
- Creates a neat structured bodice
- Works well for warm weather
- Is relatively easy to wash
- Gives the hem good definition
- Doesn’t become excessively fluffy
For a softer autumn or winter dress, you can use a cotton-acrylic blend.
Suggested color palette
The reference uses a muted botanical green, but you can make the same dress in:
- Sage green
- Olive green
- Dusty rose
- Cream
- Lavender
- Burgundy
- Mustard
- Chocolate brown
- Soft blue
- Terracotta
A cream bodice with a sage skirt would also create a beautiful vintage look.
Crochet Abbreviations
| Abbreviation | Meaning |
|---|---|
| ch | Chain |
| sc | Single crochet |
| hdc | Half double crochet |
| dc | Double crochet |
| sl st | Slip stitch |
| st | Stitch |
| sts | Stitches |
| inc | Increase |
| dec | Decrease |
| BLO | Back loop only |
| FLO | Front loop only |
| sk | Skip |
| rep | Repeat |
| RS | Right side |
| WS | Wrong side |
Before You Start: Take Measurements
Don’t choose the size only according to age.
Children grow at different rates, so measurements are much more reliable.
Measure:
- Chest circumference
- Waist circumference
- Shoulder-to-waist length
- Waist-to-hem length
- Arm circumference
- Upper-arm circumference
- Desired skirt length
- Head circumference if making the matching bow or accessory
For the chest and waist, don’t pull the measuring tape tightly.
You want the finished dress to have enough ease for comfortable movement.
Recommended Ease
For the bodice, approximately 2–5 cm of positive ease is generally useful depending on the child’s age and how fitted you want the dress.
For younger children, prioritize comfort over an extremely fitted silhouette.
Gauge
Gauge is one of the most important parts of making a wearable crochet garment.
Make a small swatch before starting.
A practical starting point is:
10 × 10 cm swatch
Using your selected yarn and hook, crochet the same stitch you plan to use for the bodice.
Measure:
- Stitches across 10 cm
- Rows across 10 cm
If your fabric is too loose, use a smaller hook.
If it is too tight, use a larger hook.
Don’t skip this step simply because the dress is for a child. A small gauge difference can become significant around the entire chest.
Construction Overview
This version of the dress is easiest to understand when divided into six major sections:
Part 1: Bodice
Part 2: Neckline and button opening
Part 3: Puff sleeves
Part 4: Waist
Part 5: Flared skirt
Part 6: Decorative scalloped hem
The optional hair bow can then be made separately.
PART 1 — Crochet the Bodice
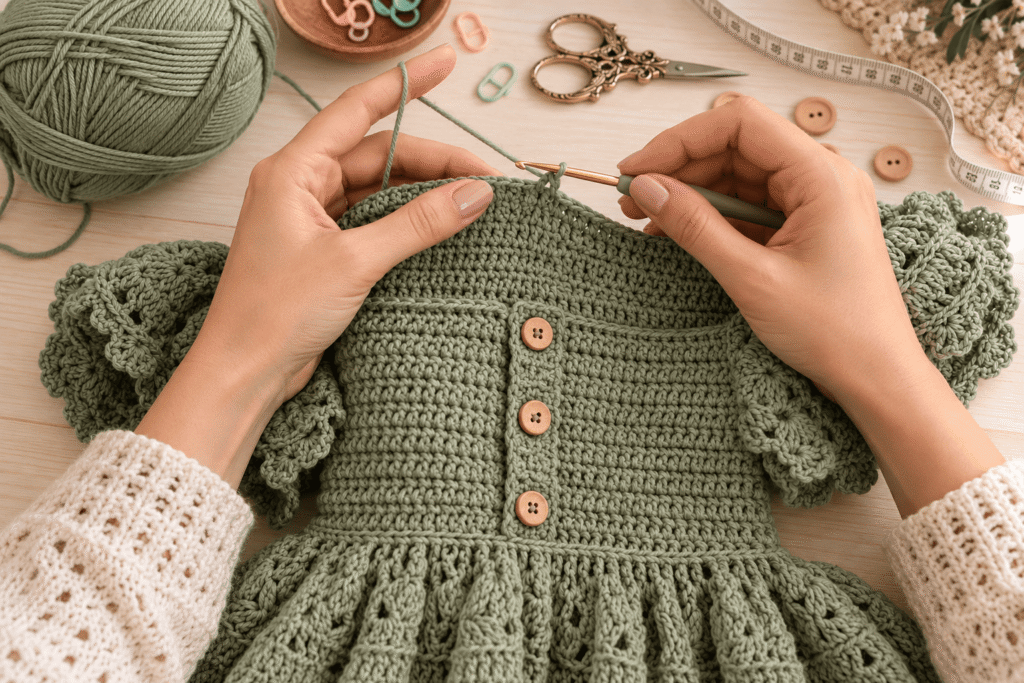
The bodice is designed to sit comfortably around the child’s upper body.
For this tutorial, we’ll use half double crochet because it creates a dense but flexible fabric.
Foundation
Chain enough stitches to approximately match the child’s chest measurement.
Instead of giving one fixed chain count for every child, use this formula:
Required stitches = desired bodice circumference × stitches per cm
For example, if your gauge produces 2.2 stitches per cm and you need a 56 cm finished bodice:
56 × 2.2 = approximately 123 stitches
Adjust the final number according to your stitch repeat.
Row 1
Work one hdc into the second chain from the hook.
Continue working hdc across the foundation chain.
Chain 1 and turn.
Row 2
Work hdc across.
Keep your tension consistent.
Chain 1 and turn.
Rows 3–10
Repeat the hdc rows until you reach the desired bodice height.
The bodice should generally finish around the natural waist.
Don’t worry if it looks slightly plain at this stage.
The sleeves, buttons and skirt will completely transform it later.
Creating the Button Opening
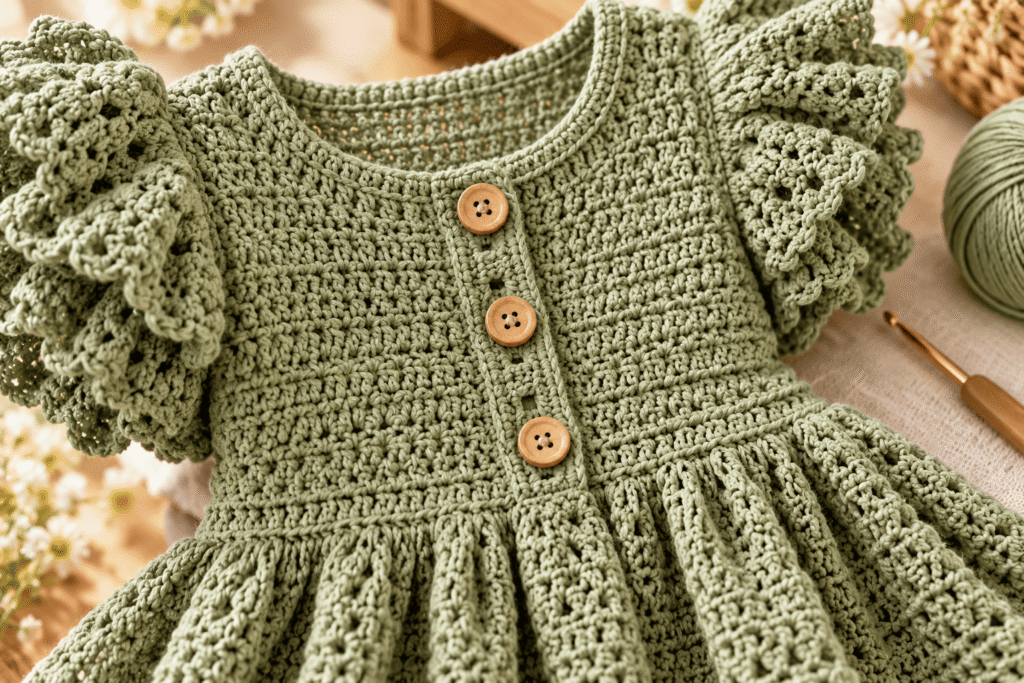
The reference dress has a charming front button detail.
You can create a narrow front opening rather than making the entire bodice open.
Option A — Decorative front opening
Mark the center front.
Create a narrow vertical section using sc stitches.
Add three or four buttons evenly spaced.
Option B — Functional opening
If you want the dress to open completely, divide the bodice into two front panels and create buttonholes on one side.
For a buttonhole:
- Crochet to the desired position.
- Chain 2–3 stitches.
- Skip the same number of stitches.
- Continue crocheting.
- On the following row, crochet into the chain space.
Make the buttonhole slightly larger than the button diameter.
Adding the Neckline
The neckline should be comfortable rather than tight.
Work one round of sc around the neckline.
Then add a second round.
For a subtle decorative collar:
Round 1: sc around neckline.
Round 2: sc around.
Round 3: Work small increases where needed to keep the neckline flat.
For a more pronounced collar, add a final round of:
sc, 3 dc in next stitch, sc
Repeat around the neckline.
This creates tiny scallops.
PART 2 — Creating the Waist
The waist is where the dress begins transitioning from the fitted bodice to the fuller skirt.
This is an important shaping point.
Work one or two rounds of hdc around the lower edge of the bodice.
Then begin increasing.
A simple increase method is:
2 hdc in one stitch, 1 hdc in the next stitch
Repeat around.
The more frequently you increase, the fuller the skirt will become.
For a gently flared dress, increase gradually.
For a princess-style full skirt, increase more frequently.
PART 3 — The Puff Sleeves
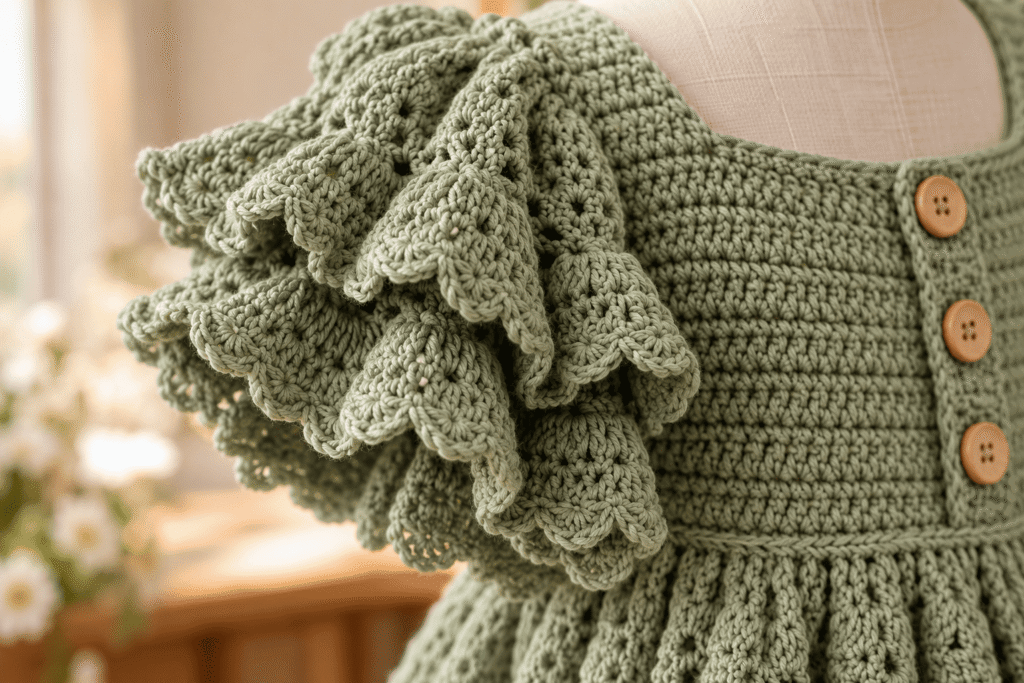
The puff sleeves are one of the defining features of this design.
They create volume around the shoulder while remaining comfortable around the upper arm.
Step 1 — Attach the yarn
Join yarn around the armhole.
Place stitch markers evenly around the armhole opening.
Step 2 — First sleeve round
Work hdc around the armhole.
Do not make the sleeve too tight.
Step 3 — Create the puff
Increase around the upper portion of the sleeve.
A simple sequence is:
hdc in next stitch, 2 hdc in next stitch
Repeat.
This gradually creates fullness.
Step 4 — Add the sleeve length
Continue working rounds of hdc until the sleeve reaches the desired length.
For a short puff sleeve, approximately 8–12 cm may be enough depending on the child.
Creating the Sleeve Ruffle
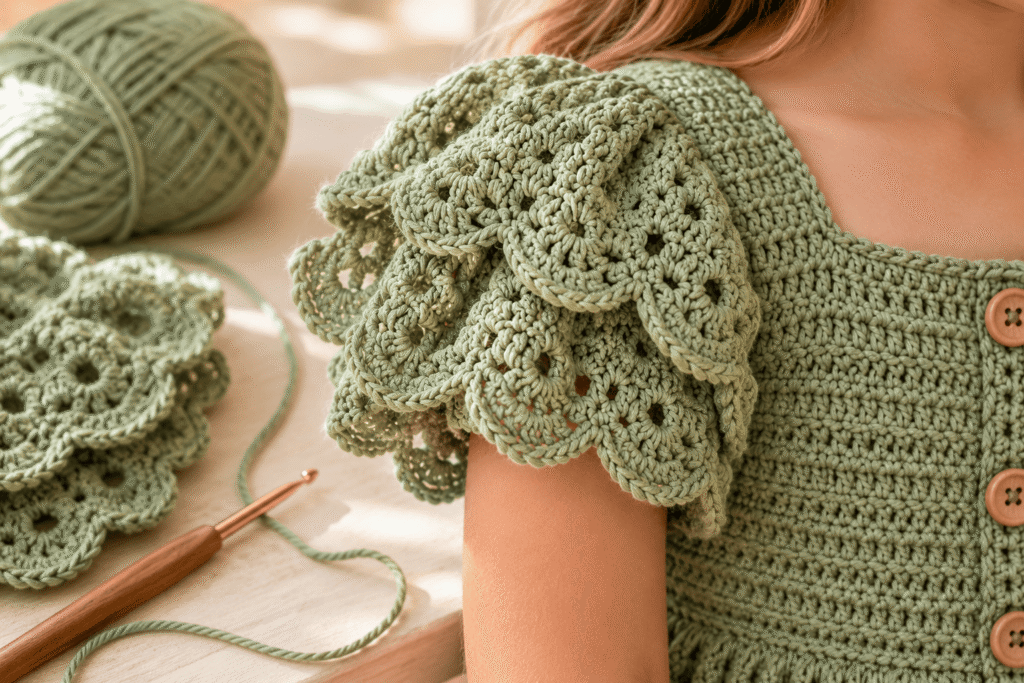
Now comes the decorative part.
Switch to a slightly larger hook if necessary.
Work around the bottom edge of the sleeve.
Ruffle Round 1
Work sc around the sleeve opening.
Ruffle Round 2
Work:
2 dc in each stitch
around.
This creates a dramatic ruffle.
For a smaller ruffle:
1 dc, 2 dc in next stitch
Repeat.
Ruffle Round 3
For a decorative edge:
sc in next stitch, skip 1 stitch, 5 dc in next stitch, skip 1 stitch
Repeat.
This creates small shell-like waves.
Finish with a slip stitch.
Making the Sleeves More Dramatic
If you want the sleeves to resemble the reference more closely, add a second ruffle.
Join yarn above the first ruffle.
Work:
sc, 3 dc in next stitch, sc
Repeat around.
This creates a layered romantic effect.
PART 4 — The Skirt
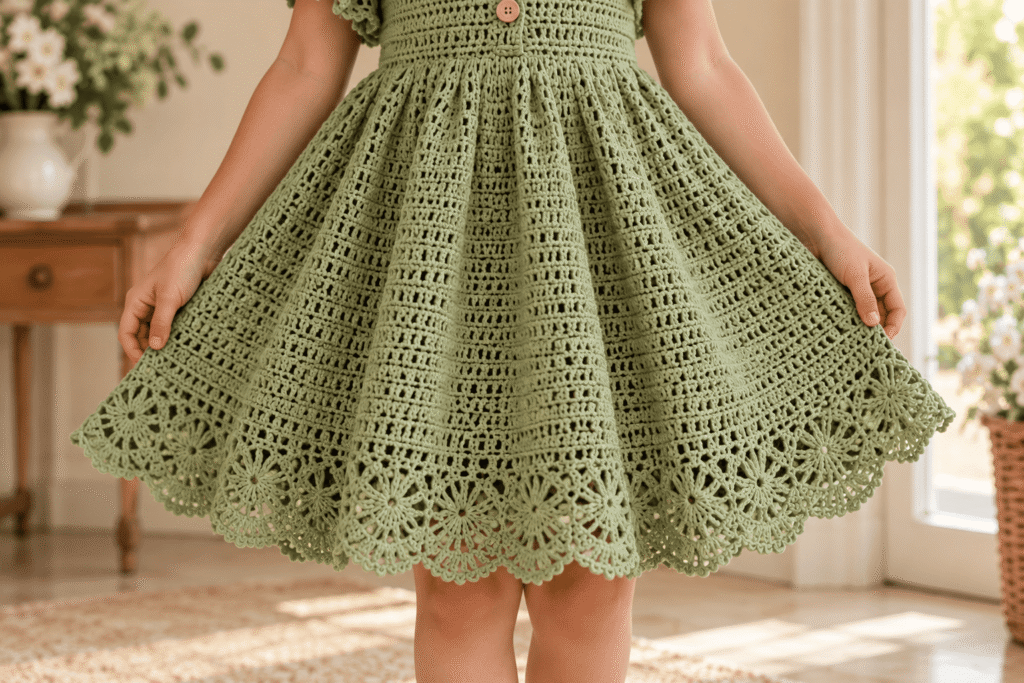
The skirt is where you’ll use most of your yarn.
The simplest construction is to continue directly from the waist.
First Skirt Round
Work hdc around the waist.
Increase evenly around the entire round.
For example:
3 hdc, 2 hdc in next stitch
Repeat.
Join the round.
Second Skirt Round
Work hdc around.
Don’t increase unless the skirt feels too narrow.
Third Skirt Round
Repeat the increase pattern.
The skirt should begin expanding gradually.
Creating the A-Line Shape
For a soft A-line silhouette, increase every few rounds.
For example:
Round A: hdc around
Round B: hdc around
Round C: increase around
Round D: hdc around
Round E: hdc around
Round F: increase around
Continue this rhythm until the skirt reaches the desired length.
This gives you a controlled flare rather than a very circular skirt.
Creating a Fuller Princess Skirt
If you want more volume, increase more frequently.
A fuller version can use:
2 hdc in every 4th stitch
then later:
2 hdc in every 5th stitch
Adjust according to how the fabric behaves.
The skirt should hang naturally without becoming stiff or overly ruffled.
Adding Decorative Texture
The main skirt can remain simple, as in the reference.
However, you can introduce subtle texture.
Try alternating:
Round 1: hdc
Round 2: hdc in BLO
Round 3: hdc
Round 4: hdc in BLO
The BLO rows create subtle horizontal ridges.
This is especially attractive with solid-color yarn.
PART 5 — The Decorative Crochet Hem
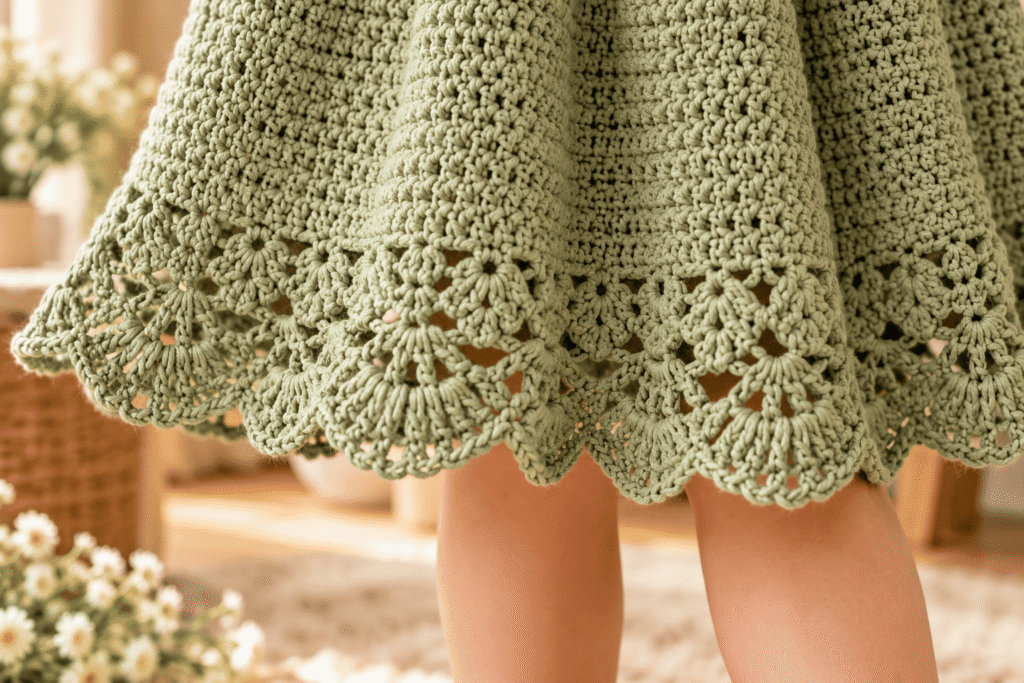
The scalloped bottom is what gives the dress its finished appearance.
Before beginning the lace border, crochet one stabilizing round of sc.
This ensures the final border sits evenly.
Simple Scallop Border
Round 1:
sc around
Round 2:
skip 2 stitches, 5 dc in next stitch, skip 2 stitches, sc in next stitch
Repeat.
This produces a classic shell border.
Smaller Scallops
For a more delicate hem:
skip 1, 3 dc in next stitch, skip 1, sc
Repeat.
Flower-Inspired Border
For a more decorative finish:
sc, hdc, 3 dc, hdc, sc
all worked into the same section.
Repeat around the hem.
This creates rounded petal-like shapes.
Optional Eyelet Row
Between the skirt and lace border, you can add an eyelet round.
Work:
dc, ch 1, skip 1
around.
This creates a delicate openwork line.
It works particularly well if you want the dress to have a vintage handmade appearance.
PART 6 — Finishing the Dress
Once all major sections are complete, don’t immediately sew the buttons.
First:
- Check the neckline.
- Check the sleeve openings.
- Check the waist.
- Check the skirt length.
- Look for uneven increases.
- Weave in loose ends.
- Block the garment if appropriate for your yarn.
Blocking
Blocking can dramatically improve the appearance of crochet clothing.
For cotton yarn:
- Lightly dampen the dress.
- Lay it flat.
- Gently arrange the skirt.
- Shape the scallops.
- Straighten the sleeves.
- Allow it to dry completely.
Avoid stretching the garment excessively.
The goal is to improve the shape, not change the size dramatically.
Adding the Buttons
Choose buttons that complement the yarn.
For the green dress, beautiful choices include:
- Natural wood
- Dark walnut
- Cream
- Beige
- Brass
- Matte brown
Sew each button securely.
Because the dress is intended for children, make sure buttons and other small components are firmly attached and appropriate for the child’s age.
For very young children, consider decorative stitched details instead of detachable small buttons.
Matching Crochet Hair Bow
The reference look also works beautifully with a matching green bow.
Simple Crochet Bow
Chain approximately 18–25 stitches depending on the desired bow width.
Work hdc rows until the rectangle is approximately twice as wide as you want the finished bow.
Fasten off.
Fold the rectangle into the center.
Wrap matching yarn tightly around the middle.
Secure the yarn at the back.
Attach the bow to:
- A fabric-covered hair clip
- A suitable headband
- A sewn hair accessory
Size Adjustment Guide
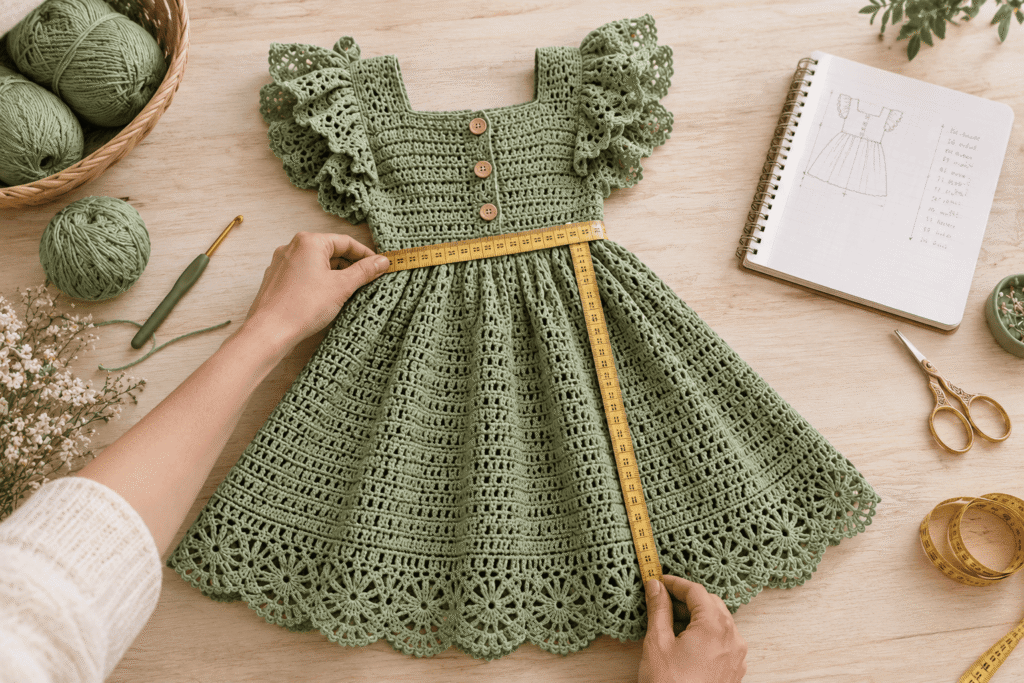
Instead of relying only on age, adjust the pattern using measurements.
| Measurement | What to Measure |
|---|---|
| Chest | Around the fullest part |
| Waist | Natural waist |
| Bodice length | Shoulder to waist |
| Sleeve length | Shoulder to sleeve edge |
| Upper arm | Around the fullest part |
| Skirt length | Waist to desired hem |
| Total length | Shoulder to hem |
How to Make the Dress Larger
To increase the size:
- Use more foundation stitches.
- Add additional bodice rows.
- Increase the skirt gradually.
- Add sleeve stitches.
- Increase sleeve length.
- Add additional rounds to the hem.
How to Make the Dress Smaller
Reduce:
- Foundation stitches
- Bodice rows
- Sleeve stitches
- Skirt increases
Don’t simply remove random rows from the finished garment.
Maintain the proportions between bodice, waist and skirt.
Three Easy Length Options
| Style | Skirt length | Best for |
|---|---|---|
| Mini | Short | Summer / party |
| Knee length | Medium | Everyday wear |
| Midi | Longer | Special occasions |
The knee-length version is particularly practical because it allows the child to move easily.
Yarn Color Ideas
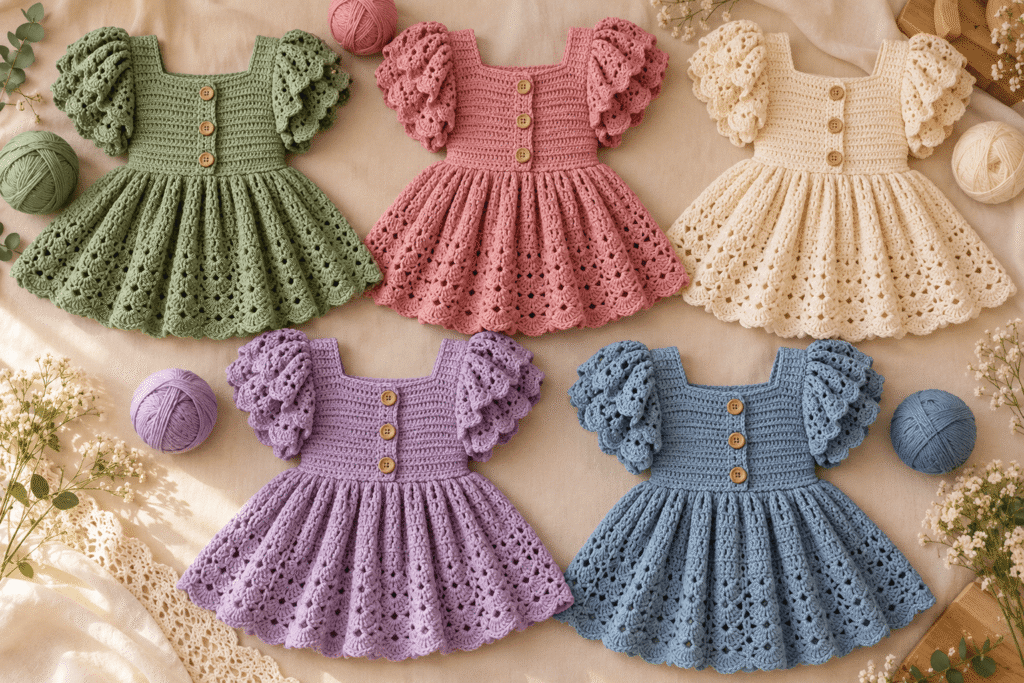
The exact same pattern can look completely different depending on the color.
Sage Green + Natural Wood
Creates the vintage botanical look shown in the reference.
Dusty Pink + Cream
Soft and romantic.
Lavender + White
Perfect for spring and birthday outfits.
Burgundy + Beige
Beautiful for autumn and winter.
Mustard + Cream
Creates a warm retro aesthetic.
Chocolate Brown + Cream
Elegant and particularly suitable for fall.
Ways to Customize the Dress
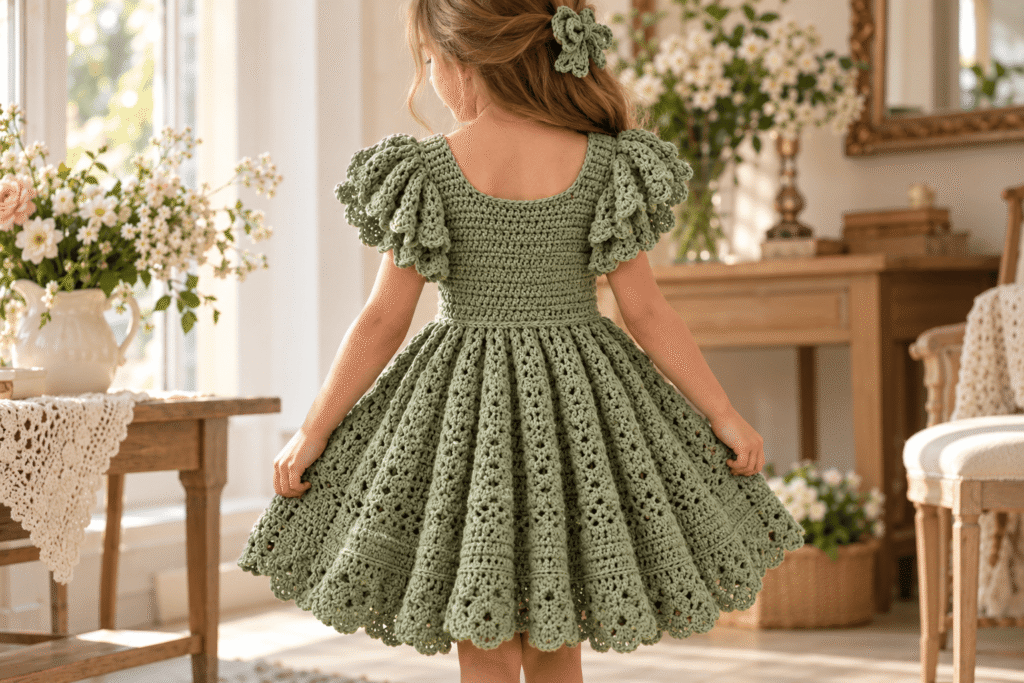
You don’t have to reproduce the exact design.
Add a Peter Pan Collar
Create a wider rounded collar around the neckline.
This gives the dress a classic vintage appearance.
Add a Waist Tie
Crochet a long chain and work several rows of sc over it.
Thread it through the waist and tie a bow at the back.
Add Pockets
Crochet two small rounded or square pockets.
Sew them onto the skirt.
They can be decorated with:
- Flowers
- Hearts
- Leaves
- Small bows
Make Long Sleeves
Instead of stopping after the puff section, continue the sleeve downward.
Finish with a ribbed cuff.
Add Flowers to the Skirt
Crochet small flowers separately and attach them around the lower skirt.
Keep the spacing relatively even for a polished appearance.
Troubleshooting
Why is my skirt curling?
Usually, the skirt needs more increases.
Try adding an additional increase round.
Why is my skirt too wide?
You may be increasing too frequently.
Reduce the number of increases per round.
Why are my sleeves too tight?
Add additional increases around the upper sleeve.
Also check whether your yarn and hook combination is producing a tighter gauge than expected.
Why doesn’t my neckline lie flat?
You may have too few increases.
Add a few evenly spaced increases.
Why does my hem look uneven?
Check your stitch count before beginning the scalloped border.
If necessary, add a preparation round of sc and distribute stitches evenly.
A Simple Construction Checklist
Before calling the dress finished, check:
☐ Bodice fits comfortably
☐ Neckline isn’t too tight
☐ Buttons are secure
☐ Button opening functions correctly
☐ Sleeves allow movement
☐ Puff sleeves have symmetrical volume
☐ Waist sits correctly
☐ Skirt hangs evenly
☐ Hem is symmetrical
☐ All ends are woven in
☐ Decorative elements are secure
☐ Garment has been gently shaped
☐ Final measurements have been checked
Care Instructions
Handmade crochet clothing deserves gentle care.
For cotton:
- Wash gently according to the yarn label.
- Avoid harsh detergents.
- Don’t wring aggressively.
- Reshape while damp.
- Dry flat whenever possible.
- Store folded rather than hanging for long periods.
Hanging a heavy crochet dress for extended periods can stretch the shoulders and distort the shape.
Final Styling Ideas
This dress can be styled in several ways.
For a spring look, pair it with:
- White tights
- Mary Jane shoes
- A matching bow
- A small cardigan
For autumn, try:
- Cream tights
- Brown ankle boots
- A knitted cardigan
- A matching crochet hair bow
For a special occasion, add:
- White ballet flats
- A delicate hair accessory
- A small cardigan
- Simple neutral accessories
Final Thoughts
This green crochet puff-sleeve dress is a beautiful example of how traditional crochet techniques can be transformed into a polished children’s garment.
The structured bodice gives the dress shape, while the puff sleeves introduce volume and personality. The gradually flared skirt keeps the silhouette comfortable, and the scalloped crochet hem provides the decorative finish that makes the whole piece feel special.
The most important part of making a dress like this isn’t rushing through the stitch counts. Take accurate measurements, make a gauge swatch, check the fit as you work, and adjust the increases according to the fabric rather than blindly following a fixed number.
Once you’ve mastered the basic construction, you can turn this one design into dozens of variations by changing the yarn color, sleeve style, skirt length, collar, buttons, flowers and hem.
And that’s what makes this kind of crochet project so rewarding: you’re not just following a pattern—you can use the pattern as a foundation for creating a dress that feels completely your own.







