
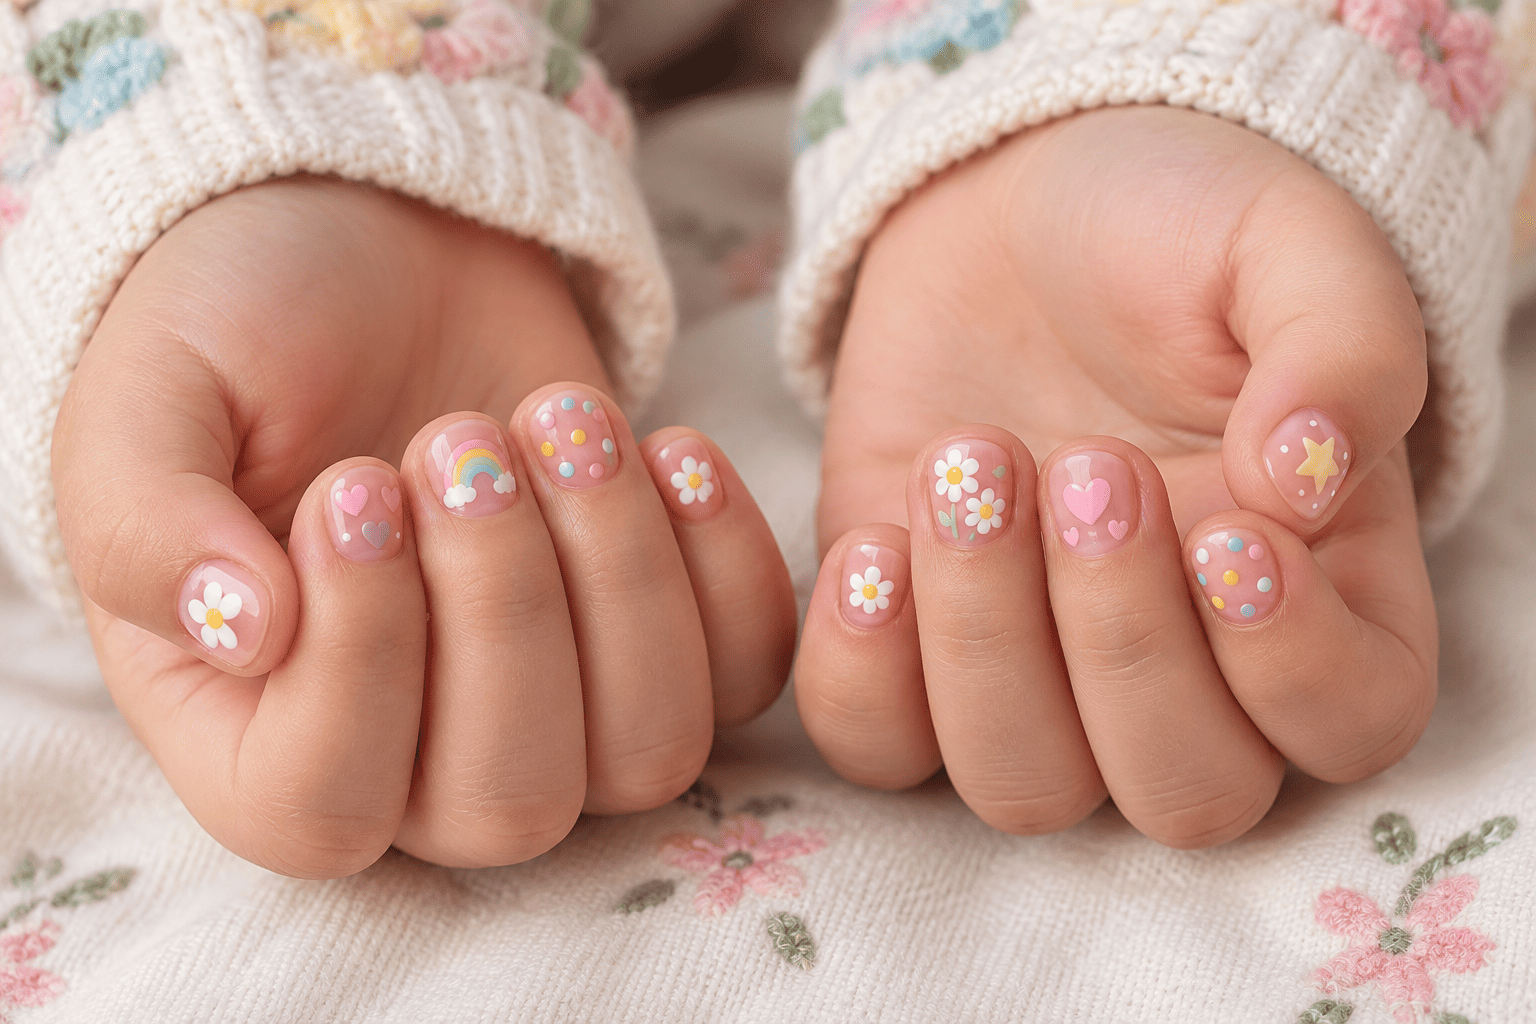
Children’s nail art can be colorful, playful, and surprisingly easy to create at home. You do not need long nails, complicated tools, or professional-level painting skills to make a manicure that looks adorable. Short, rounded nails are actually perfect for tiny flowers, hearts, rainbows, smiley faces, dots, stars, butterflies, and other miniature designs.
The key is to keep the designs simple, comfortable, age-appropriate, and easy to remove. Instead of trying to recreate complicated salon manicures, focus on small details that work with the natural shape and size of a child’s nails.
If you are looking for cute nails for children for a birthday party, school holiday, family celebration, sleepover, or simply a fun afternoon activity, these ideas are a great place to start.
Why Simple Nail Designs Work So Well for Children
Children’s nails are usually smaller than adult nails, which means large or complicated artwork can quickly look crowded. Simple patterns are easier to create and often look even cuter.
A tiny heart on a pastel background can be more effective than an elaborate illustration. A few colorful dots can turn an ordinary manicure into something playful without requiring precision.
Simple nail art also has another advantage: it is easier to recreate.
You can use basic tools such as:
- A small dotting tool
- A fine nail-art brush
- A toothpick for very tiny details
- A small makeup sponge for simple gradients
- Cotton swabs for cleanup
- Regular nail polish suitable for the child
- A clear top coat, if appropriate
- Nail polish remover for eventual removal
The goal is not perfection. Slight variations between nails can actually make a children’s manicure feel more charming and handmade.
Before You Start: A Simple Child-Friendly Nail Routine
Before choosing one of the designs below, spend a few minutes preparing the nails.
Step 1: Wash the hands
Start with clean hands and nails. Wash them gently with soap and water and dry them completely.
Step 2: Check the nails
Look at the nails and surrounding skin before applying anything.
If there are cuts, irritated skin, swelling, open wounds, or other problems around the nail, it is better to skip the manicure until the area has recovered.
Step 3: Keep the nails short
Short, rounded nails are generally the easiest canvas for children’s nail art.
Use a nail file rather than creating sharp corners. Avoid cutting cuticles or aggressively pushing them back.
Step 4: Apply a simple base
Choose a simple base color such as:
- Soft pink
- Milky white
- Lavender
- Baby blue
- Mint green
- Peach
- Pale yellow
- Nude or sheer pink
Let the base dry sufficiently before adding artwork.
Step 5: Add the design
Work slowly and use small amounts of polish. It is much easier to add another small dot than to remove a large blob.
Step 6: Clean around the nail
If polish gets onto the skin, use a small brush or cotton swab with an appropriate remover to tidy the edges.
Step 7: Let everything dry
This is particularly important with children’s manicures because little hands tend to become active immediately.
Quick Guide: Which Design Should You Choose?
| Design | Difficulty | Best Base Colors | Best For |
|---|---|---|---|
| Polka dots | Very easy | Any pastel | Beginners |
| Tiny hearts | Easy | Pink, white, lavender | Valentine’s Day |
| Daisies | Easy | Pink, blue, green | Spring |
| Rainbow | Easy–medium | White, lavender | Summer |
| Smiley faces | Easy | Yellow, pink, blue | Everyday |
| Stars | Easy | Navy, lavender | Parties |
| Butterflies | Medium | Pink, purple, blue | Special occasions |
| Ladybugs | Medium | Red, black, white | Nature themes |
| Animal faces | Medium | Cream, pink, brown | Animal lovers |
| Pastel French tips | Medium | Sheer pink | Elegant occasions |
| Confetti nails | Very easy | White, pink | Birthdays |
| Fruit nails | Medium | Pink, green, yellow | Summer |
| Cloud nails | Easy | Blue, white | Dreamy looks |
| Flower French tips | Medium | Sheer pink | Special occasions |
| Rainbow dots | Very easy | White, pastel colors | Young children |
1. Pink Daisy Nails
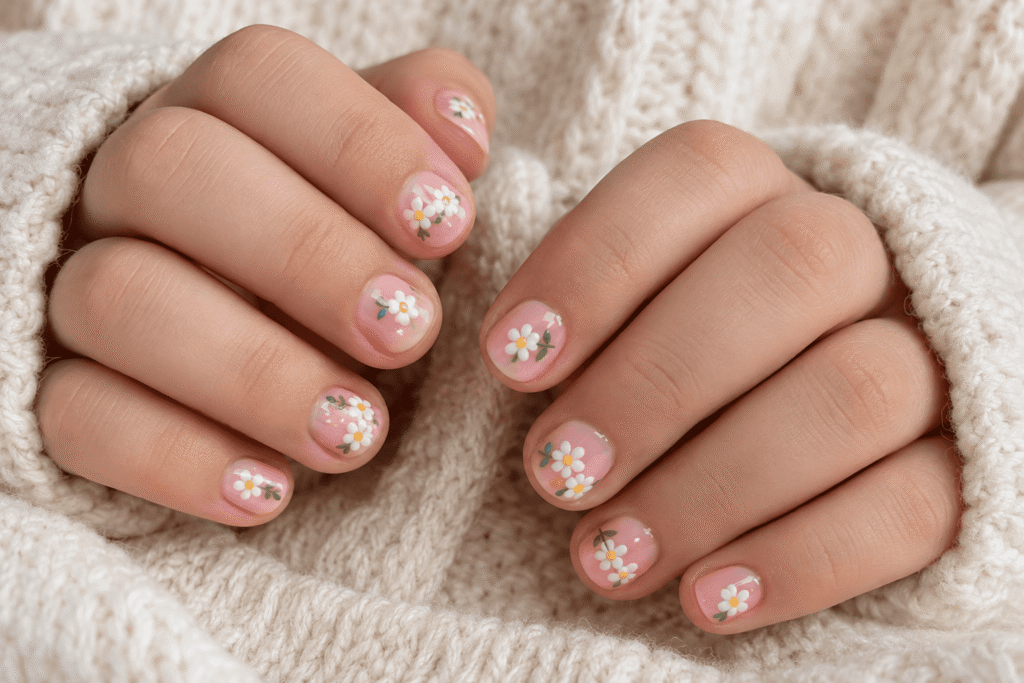
Nothing says cute quite like miniature daisies.
Start with a soft pink or milky base. Once dry, create tiny white dots in a circular arrangement and add a small yellow dot in the center.
How to create them
- Apply two thin coats of pastel pink.
- Let the polish dry.
- Use a dotting tool to create five small white dots.
- Place a tiny yellow dot in the center.
- Repeat on selected nails rather than every nail if you want a more delicate result.
- Finish with a suitable clear top coat once everything is dry.
For very small nails, you can simplify the flower to just three white petals and one yellow center.
2. Tiny Heart Nails
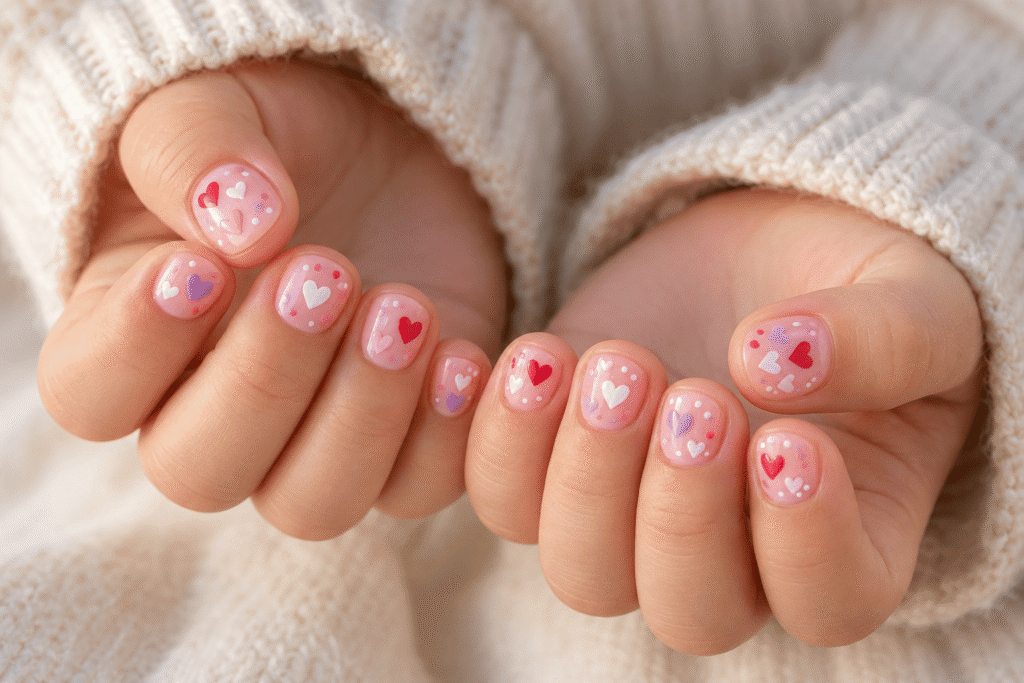
Tiny hearts are one of the easiest designs to customize.
They can be pink on white nails, white on lavender nails, red on pale pink nails, or multicolored across the entire manicure.
Easy heart technique
Make two tiny dots next to each other.
Then gently drag the bottom of each dot toward a central point.
You should end up with a miniature heart.
For younger children, you can make the hearts slightly larger rather than trying to create extremely tiny ones.
Color combinations
| Base | Heart Color |
|---|---|
| Milky white | Pink |
| Pale pink | Red |
| Lavender | White |
| Baby blue | Pink |
| Mint | Yellow |
| Peach | White |
3. Pastel Rainbow Nails
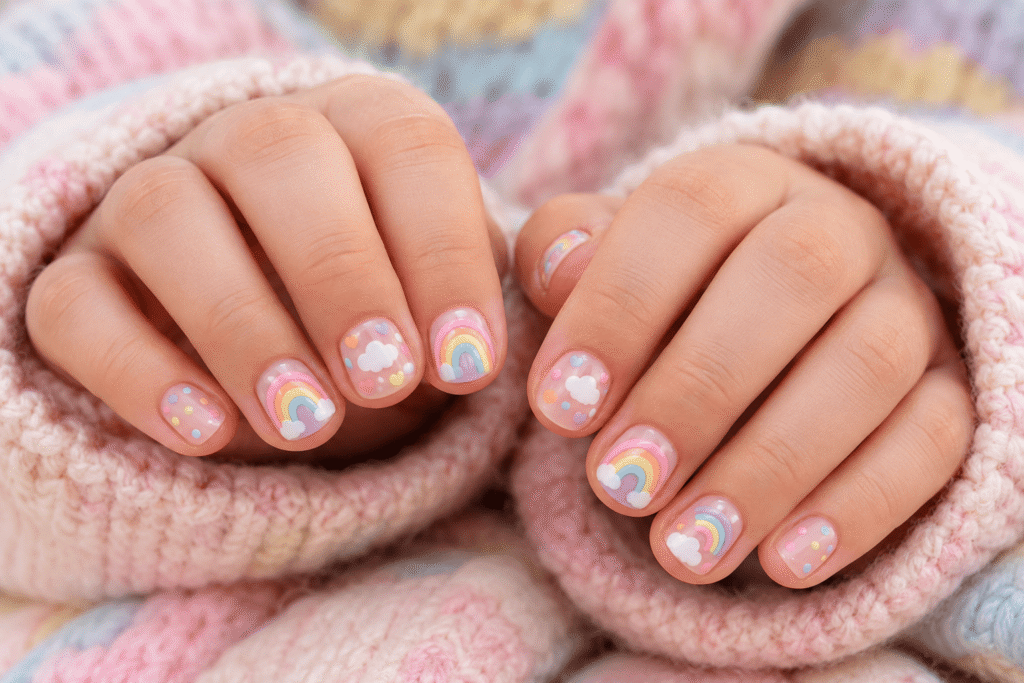
Rainbow nails are especially fun because every nail can look slightly different.
A simple version does not require painting a complete rainbow.
Instead, create two or three curved lines in pastel colors.
Step-by-step
- Apply a white or very pale pink base.
- Let it dry completely.
- Use a thin brush to create a small curved line.
- Add a second curve beside it.
- Add a third color if there is enough space.
- Finish with a tiny white cloud if desired.
Pink, yellow, lavender, blue and mint work beautifully together.
4. Rainbow Accent Nails
If painting a complete rainbow feels difficult, create just one rainbow accent nail.
Paint the remaining nails in a simple pastel shade and dedicate one or two nails to the rainbow.
This gives you the colorful effect without making the manicure overly busy.
5. Polka Dot Nails
Polka dots are probably one of the easiest children’s nail-art designs.
You can use a dotting tool, the rounded end of a small nail-art tool, or another clean tool designed for nail art.
Three easy variations
Single-color dots:
Use white dots over a pink base.
Rainbow dots:
Use pink, yellow, blue, green and lavender.
French dot design:
Place tiny dots only along the tip of the nail.
The dots do not have to be perfectly identical. Different sizes can make the design look more playful.
6. Cute Smiley Face Nails
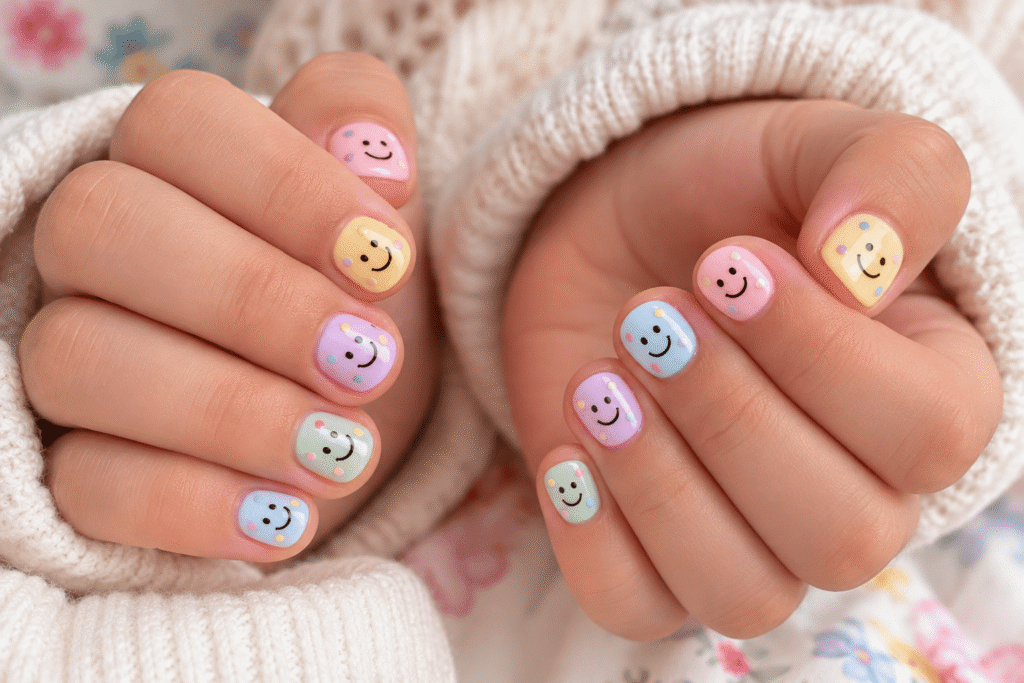
Smiley faces are perfect for a cheerful manicure.
Start with a pale yellow, pink, lavender or blue background.
Create two tiny dots for the eyes and a small curved line for the smile.
For extremely short nails, simplify the design to just two eyes and a tiny smile.
Fun variation
Create one smiley face on the thumb and use tiny dots or stars on the remaining nails.
This makes the manicure much easier to recreate.
7. Pastel French Tips
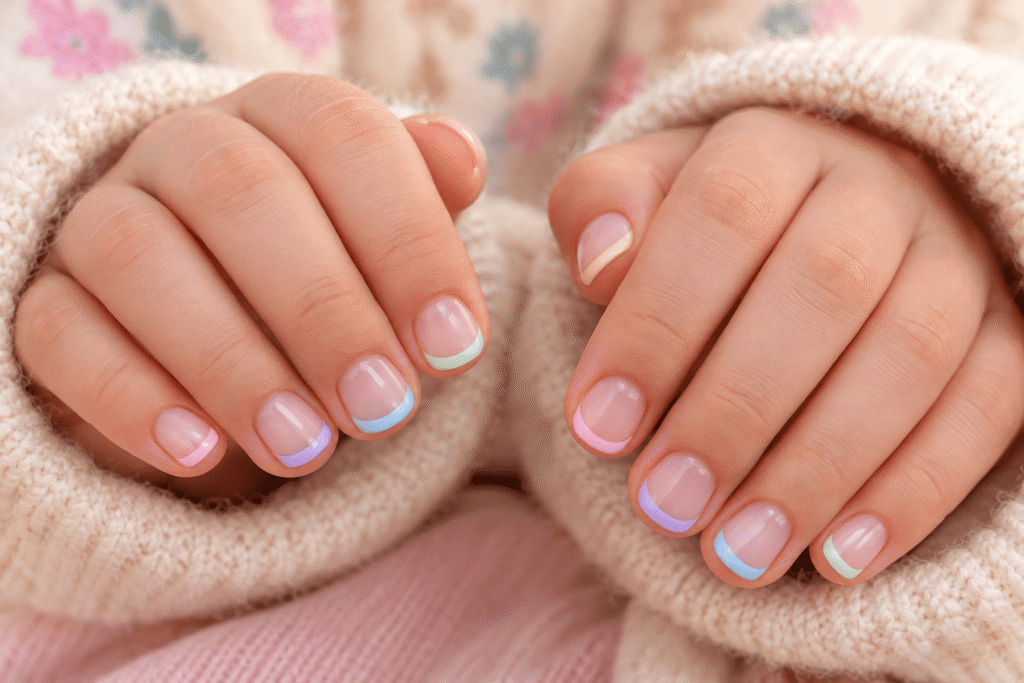
French tips do not have to be white.
For children’s nails, pastel French tips can look much more playful.
Try:
- Pink tips
- Lavender tips
- Baby blue tips
- Mint tips
- Yellow tips
- Rainbow tips
How to create a simple French tip
- Apply a sheer pink or milky base.
- Allow it to dry.
- Use a thin brush to paint the colored tip.
- Keep the line relatively thin.
- Correct the edges with a small cleanup brush.
- Allow the polish to dry before applying a finishing layer.
For a less precise approach, use a sponge technique to create a soft tip.
8. Tiny Star Nails
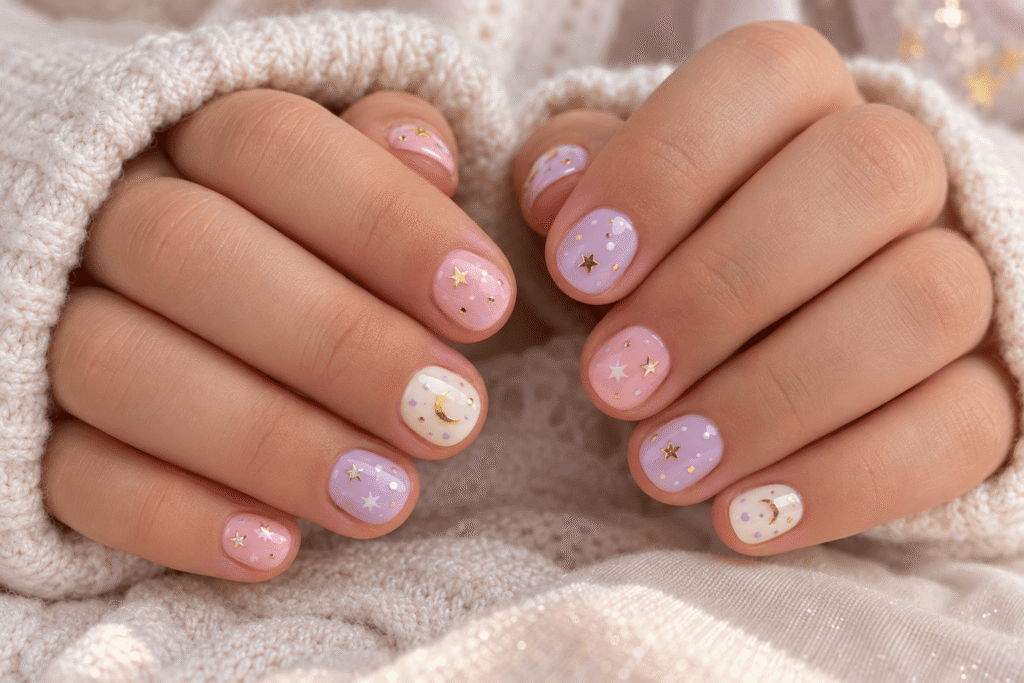
Stars are perfect when you want something slightly more magical.
A simple five-point star can be difficult on very small nails, so beginners can use four-point stars.
Easy star method
Create two crossing lines to form a tiny sparkle.
Add a second smaller sparkle beside it.
This gives the impression of stars without requiring detailed artwork.
Lavender, navy, pink and silver-inspired shades work especially well.
9. Butterfly Nail Designs
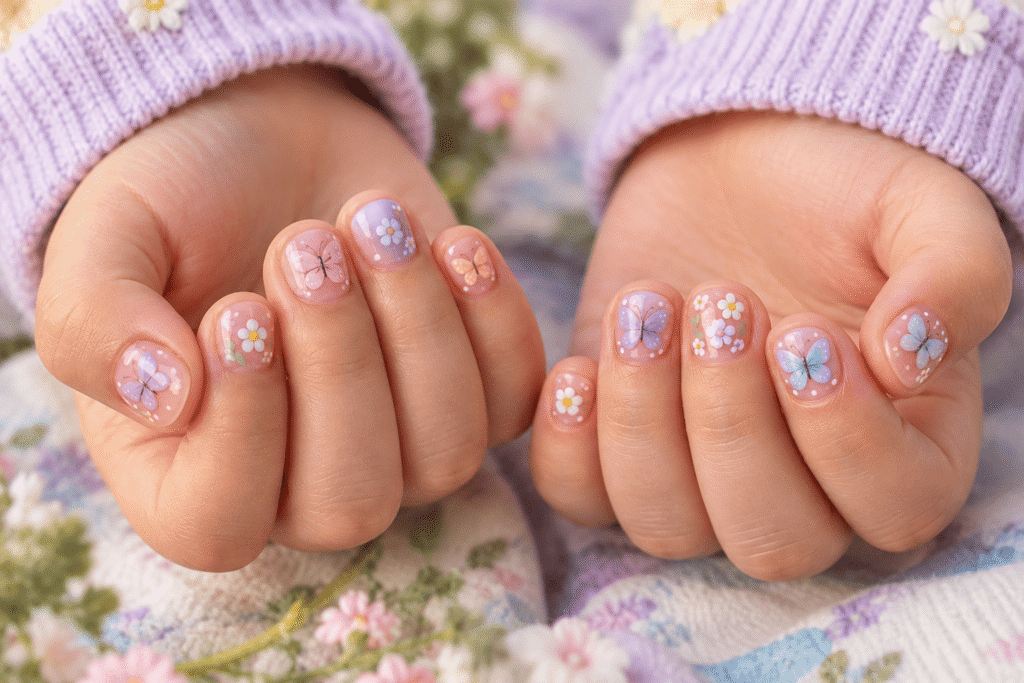
Butterflies can look complicated, but you can create a very simplified version.
Use two small dots or rounded shapes for the wings and add a tiny dark line through the center.
Suggested color combinations
- Pink + white
- Purple + lavender
- Blue + mint
- Yellow + peach
- Rainbow pastel wings
A single butterfly on the ring finger can become the focal point of the manicure.
10. Cute Animal Nails
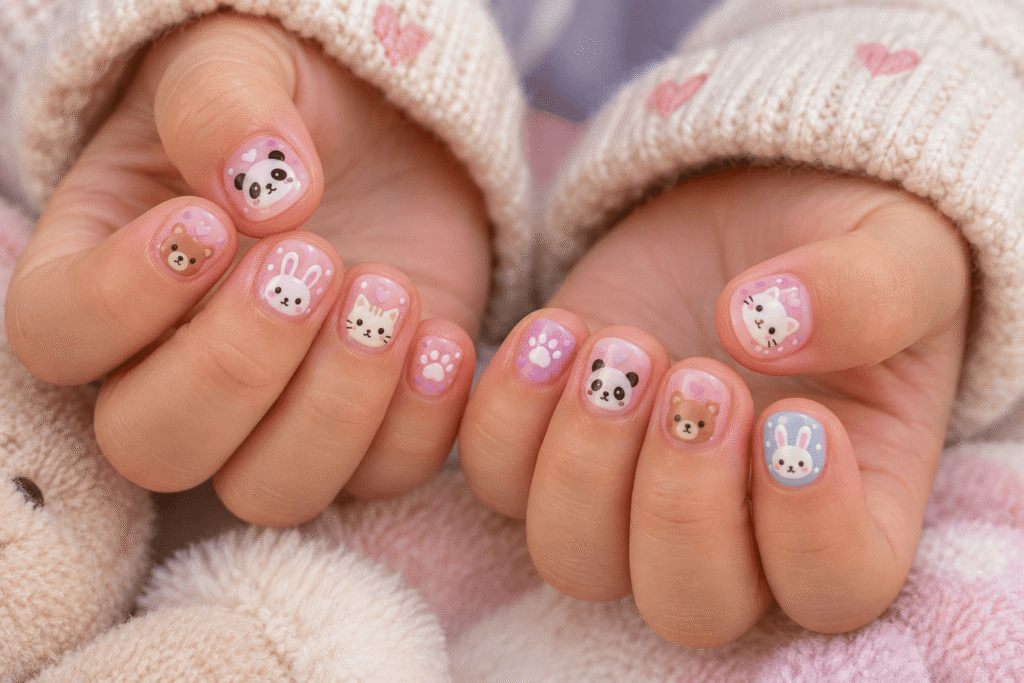
Animal nail art is especially fun for children who have a favorite animal.
You can create extremely simple versions of:
- Cats
- Pandas
- Bunnies
- Bears
- Puppies
- Ladybugs
- Frogs
- Bees
The trick is to avoid trying to paint an entire realistic animal.
Instead, use recognizable details.
For a cat, two small triangular ears and two dots for eyes may be enough.
For a panda, create two black ears, two dark eye patches and a tiny nose.
For a bunny, two long ears can immediately communicate the idea.
11. Flower French Tips
Combine two classic ideas: French tips and flowers.
Start with a sheer pink or milky base.
Paint a thin pastel French tip, then add one or two tiny flowers along the edge.
This design is especially attractive for birthdays, weddings, family celebrations, or photographs.
12. Confetti Birthday Nails
For a birthday manicure, create a white or pastel base and add tiny colorful dots.
Use several colors to imitate confetti.
You can also add:
- Tiny stars
- Small hearts
- Mini balloons
- Sparkles
- Number accents
The easiest version is simply a white base with pink, blue, yellow and purple dots.
13. Rainbow Polka Dots
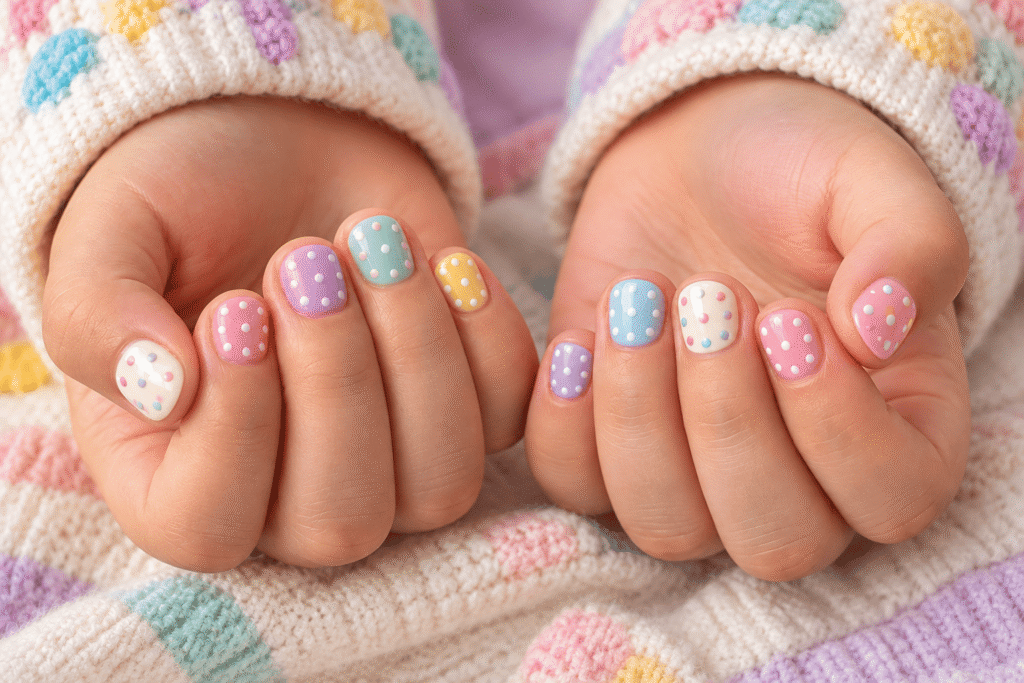
This is a perfect option when you want something colorful but extremely easy.
Instead of painting detailed rainbows, use small dots in rainbow colors.
Create rows or scattered dots.
Suggested color order
Pink → orange → yellow → green → blue → lavender
You can use the same pattern on every nail or change the arrangement.
14. Cloud and Sky Nails
Create a soft blue base and add tiny white clouds.
The clouds do not need to be perfectly shaped.
Use three or four small white dots placed next to each other and gently connect them.
For an extra detail, add tiny yellow stars or pastel rainbows.
This design works particularly well for spring and summer.
15. Fruit-Inspired Nails
Fruit nail art can make a manicure look colorful without being overly complicated.
Try:
- Tiny strawberries
- Cherries
- Watermelon slices
- Lemons
- Small oranges
- Blueberries
For a very simple version, paint the nails in alternating pastel colors and add tiny dots or leaves to just one or two nails.
16. Cute Ladybug Nails
Ladybugs are another excellent nature-inspired option.
Use a red base on one accent nail.
Add a small black semicircle near the tip, followed by a thin black center line and a few tiny black dots.
For a simpler version, paint only a red nail and add two or three black dots.
17. Mix-and-Match Pastel Nails
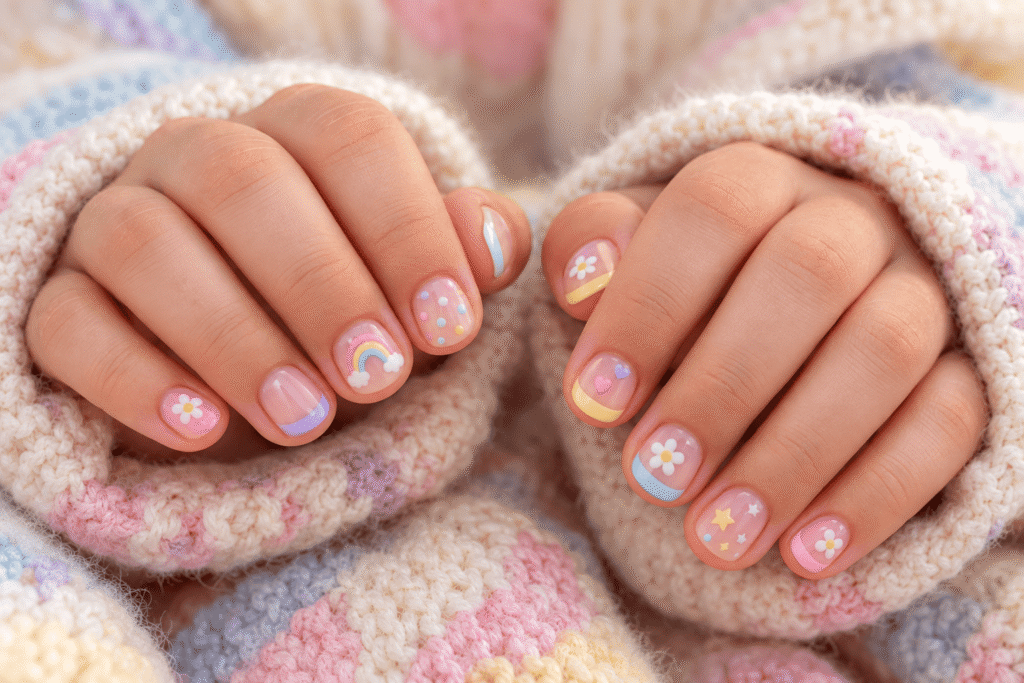
If you cannot decide on one design, do not choose one.
Use a different simple design on each nail.
For example:
| Nail | Design |
|---|---|
| Thumb | Pink hearts |
| Index | Pastel dots |
| Middle | Daisy |
| Ring | Rainbow |
| Little finger | Stars |
The secret to making a mix-and-match manicure look intentional is using a consistent color palette.
Choose four or five colors and repeat them throughout the manicure.
How to Make Children’s Nail Art Look More Professional
You do not need professional equipment, but a few techniques can make a huge difference.
Use thin coats
Thick polish takes longer to dry and is more likely to smudge.
Two thin coats usually give a cleaner result than one very thick coat.
Keep the designs small
Children’s nails are small canvases.
Trying to squeeze a large illustration onto a tiny nail can make the design look crowded.
Think miniature rather than detailed.
Choose a color palette first
Instead of choosing random colors as you go, select a palette before starting.
For example:
Sweet pastel palette: pink + lavender + white + yellow
Rainbow palette: pink + yellow + blue + green + purple
Soft floral palette: sage + cream + peach + pink
Ocean palette: blue + mint + white + lavender
Use accent nails
You do not need every nail to have a complicated design.
A particularly effective formula is:
3 simple nails + 1 detailed nail + 1 accent nail
For example:
- Three pastel nails
- One floral nail
- One rainbow nail
This gives you a visually interesting manicure without spending hours painting.
Simple Nail-Art Tools for Beginners
You can create many of these designs with only a few basic tools.
| Tool | What It Does |
|---|---|
| Dotting tool | Flowers, dots and eyes |
| Fine brush | Lines and French tips |
| Cleanup brush | Cleaning polish around edges |
| Nail file | Shaping short nails |
| Cotton swabs | Quick cleanup |
| Small palette | Mixing tiny amounts of polish |
| Makeup sponge | Gradients and soft effects |
A dedicated nail-art dotting tool is particularly useful because so many children’s designs are based on dots.
How to Create a Five-Petal Flower
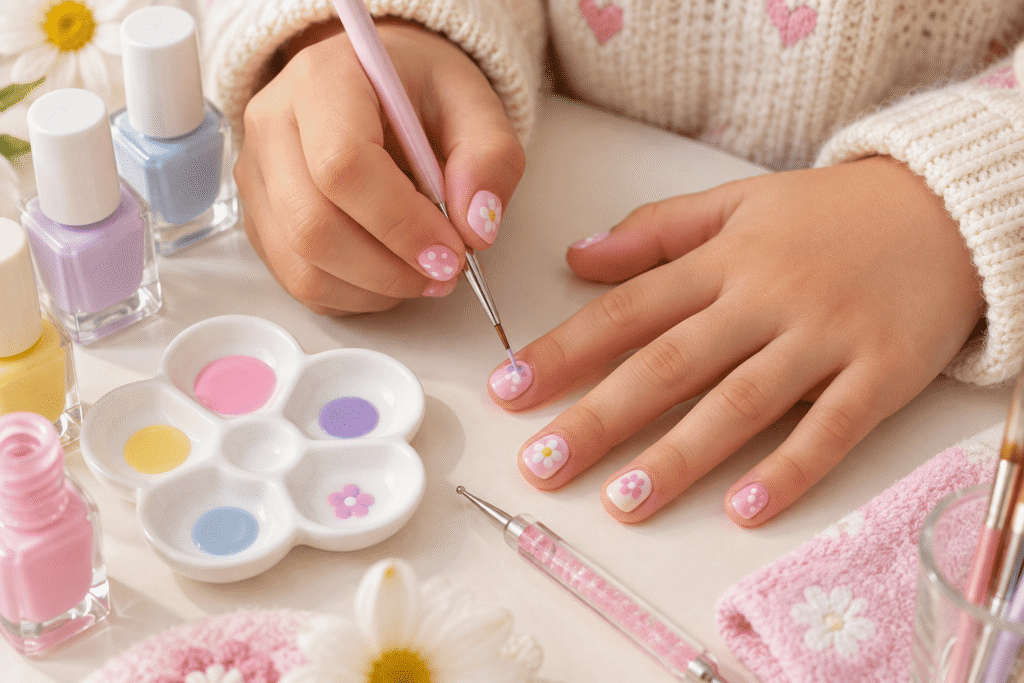
This technique can be used for several of the designs above.
Step 1
Place one small dot in the center.
Step 2
Create a second dot beside it.
Step 3
Continue around the center until you have five petals.
Step 4
Add a tiny contrasting dot in the middle.
Step 5
Allow the flower to dry.
This technique is much easier than trying to paint individual petals with a brush.
How to Create Tiny Hearts
The two-dot method is one of the easiest techniques.
Step 1
Place two small dots next to each other.
Step 2
Use a fine brush or dotting tool to pull the bottom of the dots downward.
Step 3
Join the two sides into a point.
Step 4
Let the design dry before adding a finishing layer.
Practice the technique on paper first if you are new to nail art.
How to Create Simple Rainbow Nails
A complete rainbow can be difficult on tiny nails, so use a simplified version.
Step 1
Start with a pale base.
Step 2
Create one curved line.
Step 3
Add a second curve following the first.
Step 4
Add one or two additional colors.
Step 5
Finish with tiny clouds if desired.
Do not worry if the curves are not perfectly symmetrical.
How to Make a Children’s Manicure Last Longer
Children naturally use their hands a lot, so polish may chip faster than it does on an adult.
A few simple habits can help.
Allow sufficient drying time
Do not immediately move from painting to playing.
Keep layers thin
Thinner layers tend to dry more effectively.
Protect the nail edge
When applying polish, lightly cover the free edge of the nail rather than leaving a thick buildup.
Avoid picking at chips
Once polish begins to lift, picking can make the manicure look worse and may irritate the surrounding area.
Instead, remove the polish properly and start again.
Safety Tips for Children’s Nail Art
Cute nails should always come second to comfort and safety.
Choose products according to the child’s age and follow the manufacturer’s instructions. Keep nail products away from the eyes and mouth, and supervise younger children throughout the activity.
Avoid using nail products on irritated or damaged skin.
Do not cut cuticles aggressively. The surrounding skin provides an important protective barrier.
For younger children, it can also be helpful to keep the manicure very simple and avoid small loose accessories that could become a choking hazard.
Always make sure the room is appropriately ventilated when using nail products with noticeable fumes.
And remember: nail polish should never be treated as a toy.
Choosing the Right Design for Different Occasions
| Occasion | Best Designs |
|---|---|
| Birthday party | Confetti, balloons, hearts |
| School holiday | Rainbows, flowers, animals |
| Summer | Fruit, rainbows, flowers |
| Spring | Daisies, butterflies, pastel colors |
| Sleepover | Smiley faces, stars, hearts |
| Family celebration | Pastel French tips |
| Everyday | Dots, simple hearts, single-color nails |
| Halloween | Ghosts, pumpkins, spiders |
| Christmas | Stars, candy-inspired colors, snowflakes |
Cute Nail Color Combinations for Children
Sometimes the hardest part is deciding which colors belong together.
Here are several combinations that are easy to recreate.
Soft Pink Dream
Pink + white + lavender + pale yellow
Rainbow Pastel
Pink + blue + yellow + mint + lavender
Garden Party
Sage green + pink + cream + yellow
Sweet Candy
Peach + pink + lavender + baby blue
Ocean
Baby blue + turquoise + white + mint
Sunshine
Yellow + peach + white + pink
5 Easy Manicure Formulas You Can Recreate at Home
Formula 1: The 5-Minute Manicure
Apply one pastel color to all nails.
Add two or three tiny white dots to each nail.
Finish with a clear layer once dry.
Formula 2: The Flower Manicure
Use a pink base.
Add one small daisy to every other nail.
Keep the remaining nails plain.
Formula 3: The Rainbow Manicure
Paint each nail a different pastel color.
Add tiny white clouds to two accent nails.
Formula 4: The Birthday Manicure
Use a milky white base.
Add colorful dots resembling confetti.
Add one tiny star or heart to the thumb.
Formula 5: The Mix-and-Match Manicure
Use five complementary pastel colors.
Give every nail a different simple pattern.
Keep the color palette consistent so the finished manicure still looks cohesive.
How Parents Can Turn Nail Art Into a Fun Activity
Doing children’s nails does not have to be a rushed beauty routine.
It can become a creative activity.
Let the child choose the color palette.
Then let them select three favorite designs from a list.
You can even create a small “nail menu”:
Flowers
Rainbows
Hearts
Stars
Animals
Smiley faces
Polka dots
The child can choose one design for each nail.
This makes the experience interactive and gives them a sense of creative control.
The Best Designs for Very Short Nails
If the nails are particularly short, prioritize designs that rely on small details rather than large illustrations.
The best choices include:
- Tiny dots
- Small hearts
- Mini flowers
- French tips
- Stars
- Simple smiley faces
- Small rainbow curves
- Single-color accent nails
- Tiny animal ears
- Confetti patterns
Avoid trying to create overly detailed scenes on extremely small nails.
Common Mistakes to Avoid
Using too much polish
A thick layer can take longer to dry and may become uneven.
Making every nail complicated
Five completely different detailed designs can become visually overwhelming.
Choosing too many colors
A rainbow manicure can work beautifully, but random colors without a consistent palette may look messy.
Painting before the base is dry
This can cause colors to blend unintentionally.
Trying to achieve perfection
Children’s nail art should be fun. Tiny imperfections are completely normal.
Frequently Asked Questions
What are the easiest nail designs for children?
Polka dots, hearts, simple flowers, stars, smiley faces and pastel French tips are among the easiest designs for beginners.
What nail shape works best for kids?
Short, rounded or softly squared nails are practical choices for children’s nail art and provide enough surface for simple designs.
Can you do nail art on very short nails?
Absolutely. In fact, many designs such as dots, hearts, flowers and French tips look especially cute on short nails.
How can I make nail art easier?
Choose simple patterns, work with thin layers, use a dotting tool, and limit the color palette to three to five complementary shades.
What is the best design for a birthday?
Confetti, colorful dots, hearts, stars, balloons and pastel rainbow designs are excellent choices for a birthday manicure.
What if I am not good at drawing?
Start with dot-based designs. Flowers, hearts, smiley faces and many animal designs can be created using simple dots rather than detailed brushwork.
Final Thoughts
Cute nails for children do not need to be complicated to be memorable. The best designs are often the simplest ones: a few tiny flowers, colorful dots, miniature hearts, a little rainbow, or a cheerful smiley face.
Start with short, clean nails and a small selection of colors, then choose one or two techniques that feel comfortable. Once you become confident with dots and simple lines, you can experiment with butterflies, animals, fruit, clouds and other creative designs.
The biggest advantage of children’s nail art is that there are almost no rules. You can mix colors, combine patterns and create a different manicure every time.
Whether you choose soft pink daisies, colorful rainbows, tiny hearts, cute animals or a mix-and-match pastel manicure, the goal is the same: keep it simple, playful and fun.
And if you’re choosing just one idea to start with, try the pastel mix-and-match manicure: five short rounded nails, five coordinated pastel colors, and one tiny design on each. It’s easy enough for a beginner while still looking incredibly cute in photographs.







