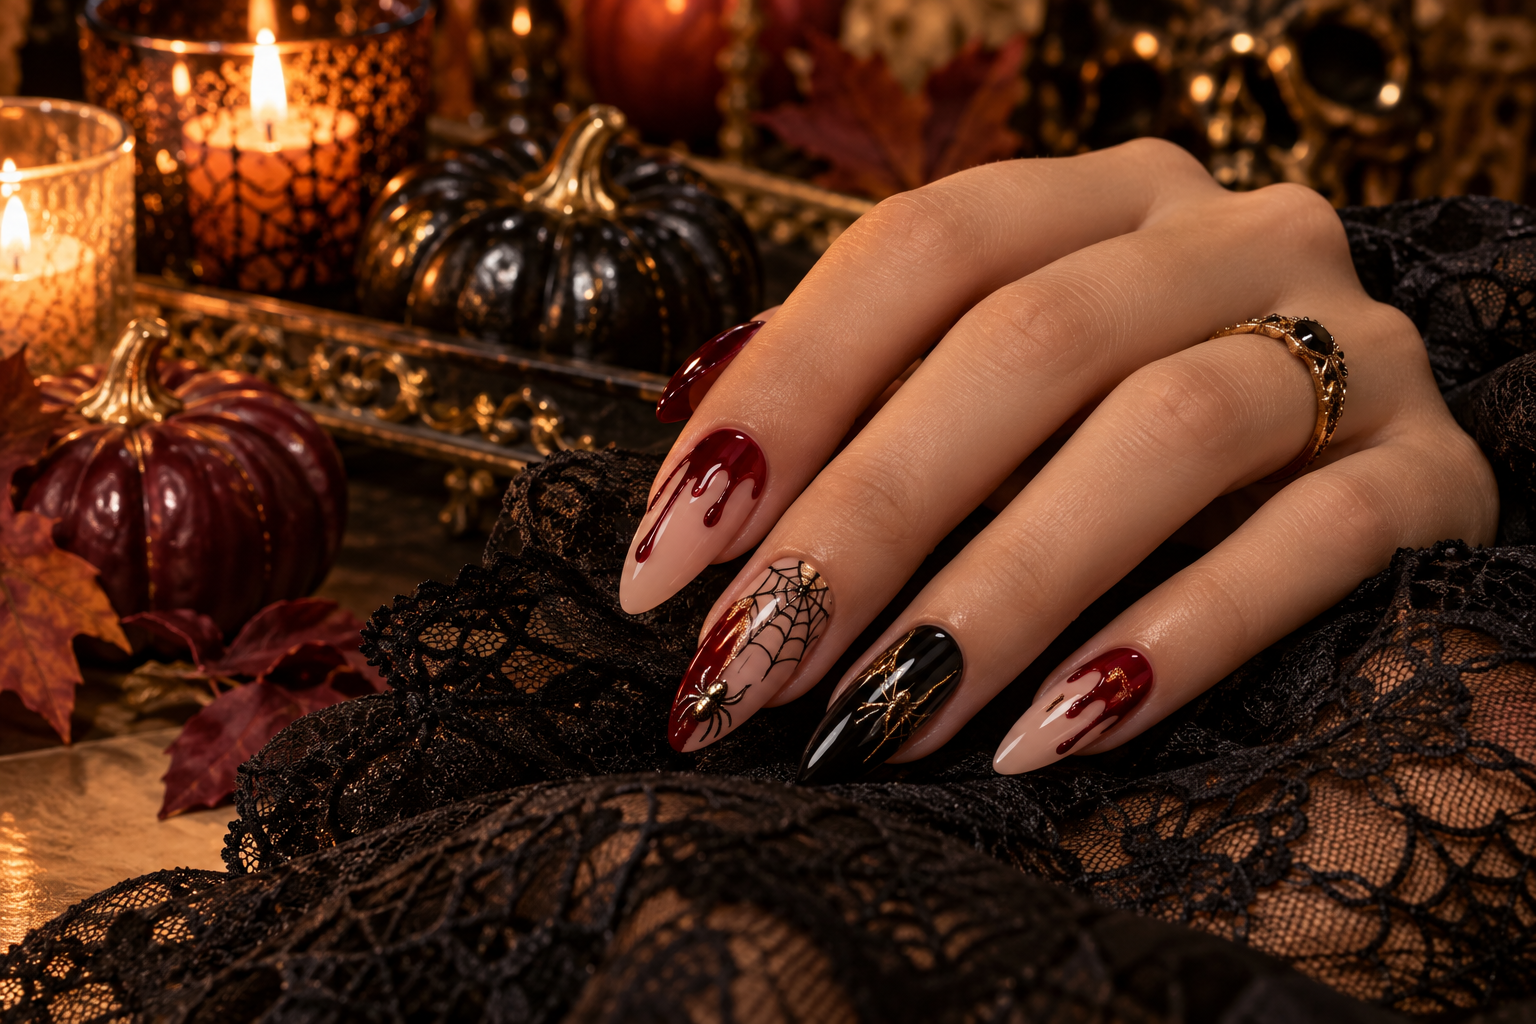
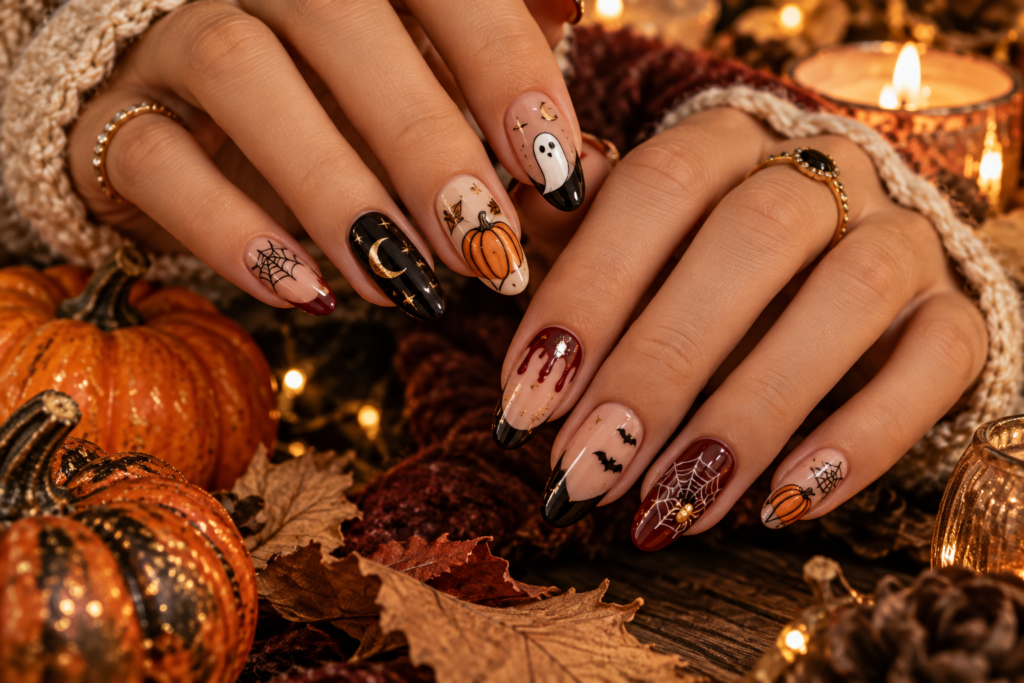
Halloween nails are one of the easiest ways to bring a little spooky personality into your look without committing to a full costume. From tiny ghosts and spiderwebs to bloody red details, black chrome, pumpkins, bats, and creepy-cute characters, there is a Halloween manicure for practically every mood.
The best part is that Halloween nail art does not have to mean covering every nail with complicated artwork. A simple nude manicure with one tiny ghost can look just as striking as an elaborate set filled with pumpkins, webs, and dripping blood.
This guide brings together 35 Halloween nail ideas, plus practical color combinations, nail-shape recommendations, placement guides, DIY patterns, step-by-step tutorials, and tips for making Halloween nail art last longer.
Why Halloween Nail Art Is So Popular
Halloween gives you much more freedom than everyday nail styling. You can experiment with colors, textures, symbols, finishes, and unusual combinations without worrying about keeping everything minimalist.
A Halloween manicure can be:
- Cute and playful
- Dark and gothic
- Elegant and sophisticated
- Creepy and dramatic
- Minimalist
- Glamorous
- Funny
- Witchy
- Romantic
- Easy enough for beginners
You also do not need to decorate every nail. One of the most wearable approaches is to combine solid-color nails with a few statement nails.
For example, four glossy black nails paired with one nude nail featuring a tiny white ghost can create a Halloween-inspired look without becoming overwhelming.
Quick Halloween Nail Style Guide
| Style | Main Colors | Best Symbols | Difficulty |
|---|---|---|---|
| Cute Halloween | Orange, white, black | Ghosts, pumpkins, bats | Easy |
| Gothic | Black, burgundy, dark purple | Crosses, webs, roses | Medium |
| Bloody | Nude, red, black | Drips, splatters, claws | Easy |
| Witchy | Black, purple, green | Moons, stars, witch hats | Medium |
| Elegant Halloween | Nude, black, gold | Minimal moons, stars, webs | Easy |
| Spooky | Black, white, red | Eyes, ghosts, skulls | Medium |
| Pumpkin Theme | Orange, brown, black | Pumpkins, leaves | Easy |
| Dark Glam | Burgundy, black, chrome | Gems, metallic details | Medium |
| Minimalist | Nude, black, white | Tiny bats, dots, ghosts | Easy |
| Creepy-Cute | Pastel + black | Ghosts, spiders, monsters | Medium |
1. Classic Black Halloween Nails
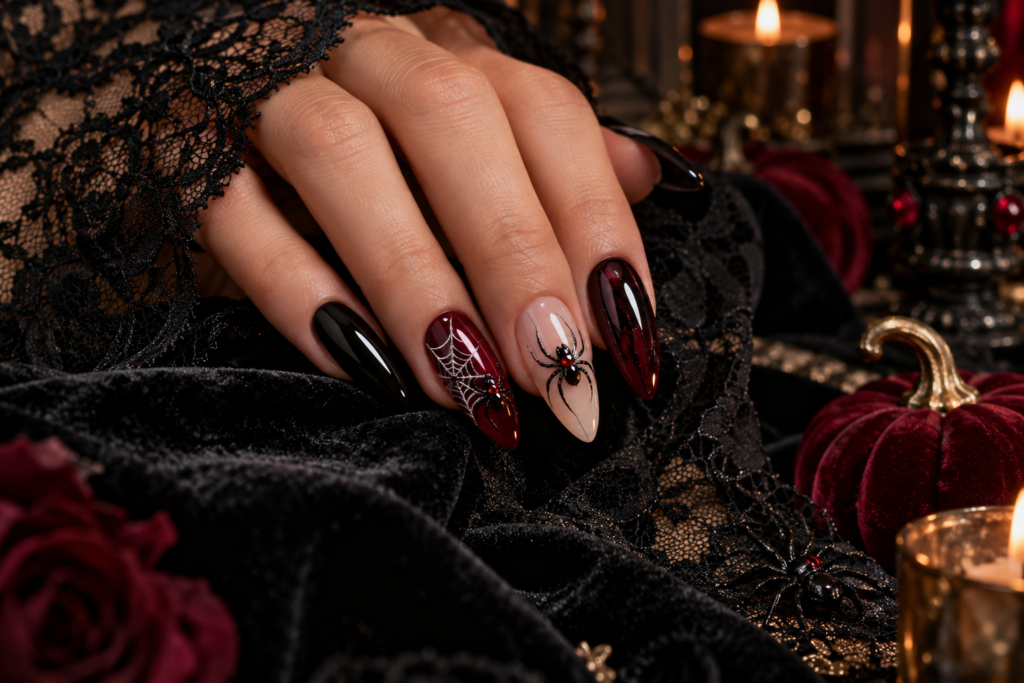
Black is the easiest starting point for Halloween nail art.
A glossy black manicure instantly creates a darker atmosphere, and it works particularly well with almond, coffin, stiletto, and square nails.
Pattern
Use:
- 4–5 glossy black nails
- One accent nail with a tiny white ghost
- Optional silver or red details
Step by step
- Shape and buff your nails.
- Apply a base coat.
- Apply two thin coats of black polish.
- Allow each layer to dry properly.
- Add a tiny Halloween symbol to one accent nail.
- Finish with a glossy top coat.
Best for
Medium to long nails, especially almond and coffin shapes.
2. Bloody Drip Halloween Nails
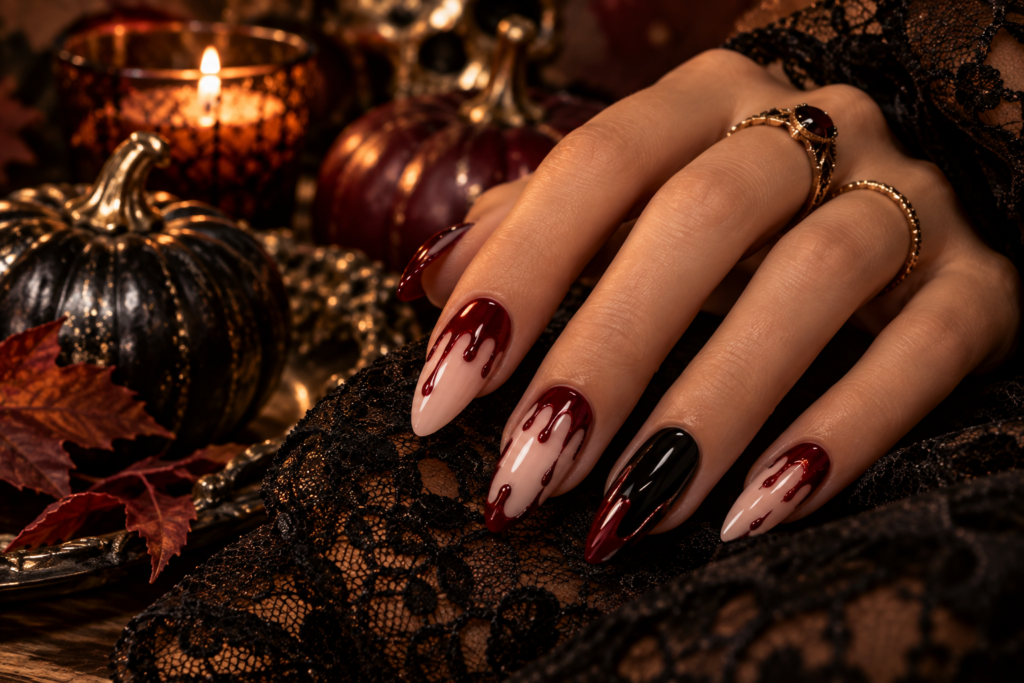
The red-drip design in the reference inspiration is one of the most dramatic Halloween patterns because the design looks complicated while the actual technique is relatively simple.
Color palette
- Sheer nude
- Deep blood red
- Black
- Glossy top coat
Pattern
Create elongated red drops beginning near the tip and pulling slightly upward toward the nail bed.
Step by step
- Apply a nude or milky-pink base.
- Let it dry completely.
- Using a fine nail-art brush, place small red dots near the tip.
- Pull each dot upward into a narrow drip.
- Vary the length of the drips.
- Add a few tiny red dots beside the main drips.
- Outline selected areas with black if you want a more dramatic effect.
- Seal everything with top coat.
Pro tip
Do not make every drip identical. Different lengths make the pattern look much more natural.
3. Candy Corn Ombre Nails
Candy corn is practically a Halloween color palette by itself.
Create a gradient moving from:
Yellow → Orange → White
DIY technique
- Apply a pale yellow base.
- Put yellow, orange, and white polish next to each other on a makeup sponge.
- Gently press the sponge onto the nail.
- Repeat until the gradient becomes opaque.
- Clean the surrounding skin.
- Add a glossy top coat.
This design works especially well on almond and coffin nails.
4. Tiny Ghost Nails
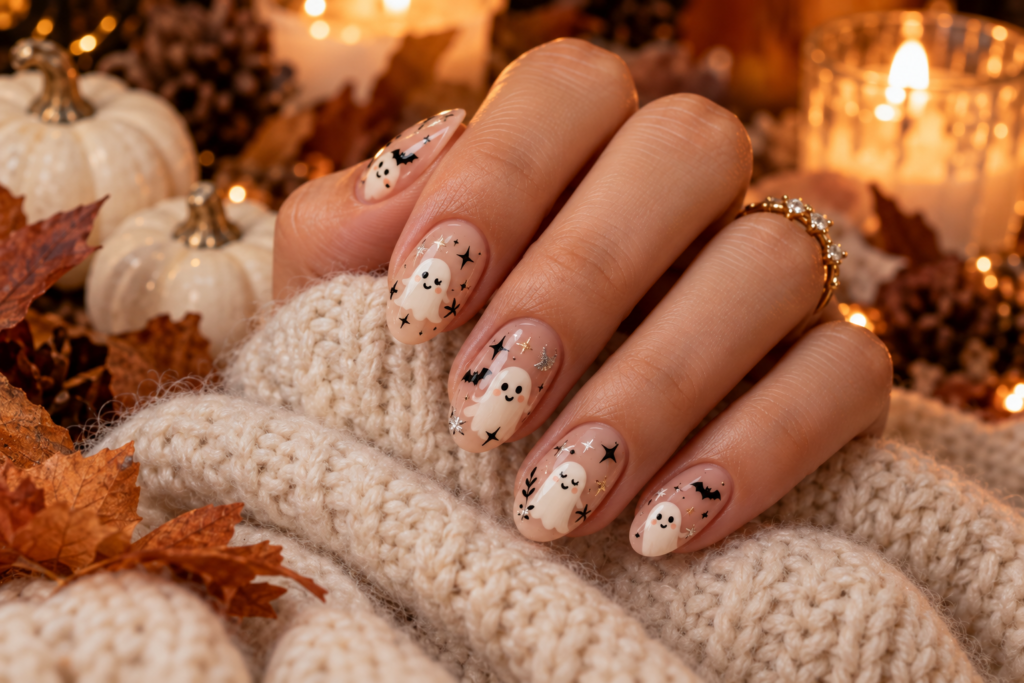
Ghosts are perfect if you want Halloween nails that look cute rather than frightening.
Pattern
Use a nude or pale pink base and paint tiny white ghost silhouettes.
Step by step
- Apply a nude base.
- Use a small dotting tool to create the head.
- Pull the white polish downward to create the body.
- Add two tiny black eyes.
- Add a small black mouth if desired.
- Finish with top coat.
For an even easier version, paint only two ghost faces rather than full ghost bodies.
5. Black Spiderweb Nails
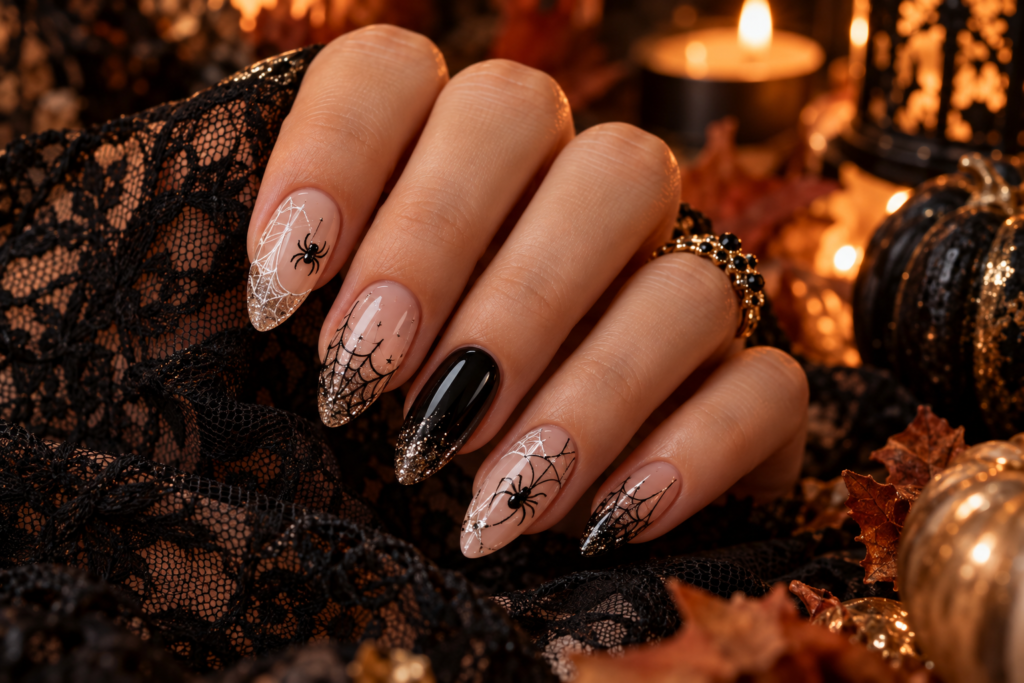
Spiderwebs are one of the most recognizable Halloween nail patterns.
Pattern structure
Think of the design as:
Center point → radial lines → curved connecting lines
Step by step
- Apply a black, nude, purple, or white base.
- Draw 4–6 thin lines from one corner.
- Connect them with small curved lines.
- Keep the lines increasingly wider as they move outward.
- Add a tiny spider if desired.
- Seal with top coat.
Best placement
Spiderwebs look especially good in the upper corner of the nail, rather than covering the entire nail.
6. Red and Black Vampire Nails
For a darker Halloween aesthetic, combine deep red with black.
Try:
- Black French tips
- Burgundy accent nails
- Red drips
- Tiny vampire-inspired details
The combination feels more sophisticated than bright orange Halloween nails and works beautifully with evening outfits.
7. Halloween French Tips
You do not have to abandon the French manicure for Halloween.
Replace the traditional white tip with:
- Black
- Orange
- Burgundy
- Deep purple
- Metallic silver
- Blood red
Simple pattern
Nude base + black French tip + tiny spiderweb accent
This is one of the easiest ways to make Halloween nails wearable beyond October 31.
8. Pumpkin Patch Nails
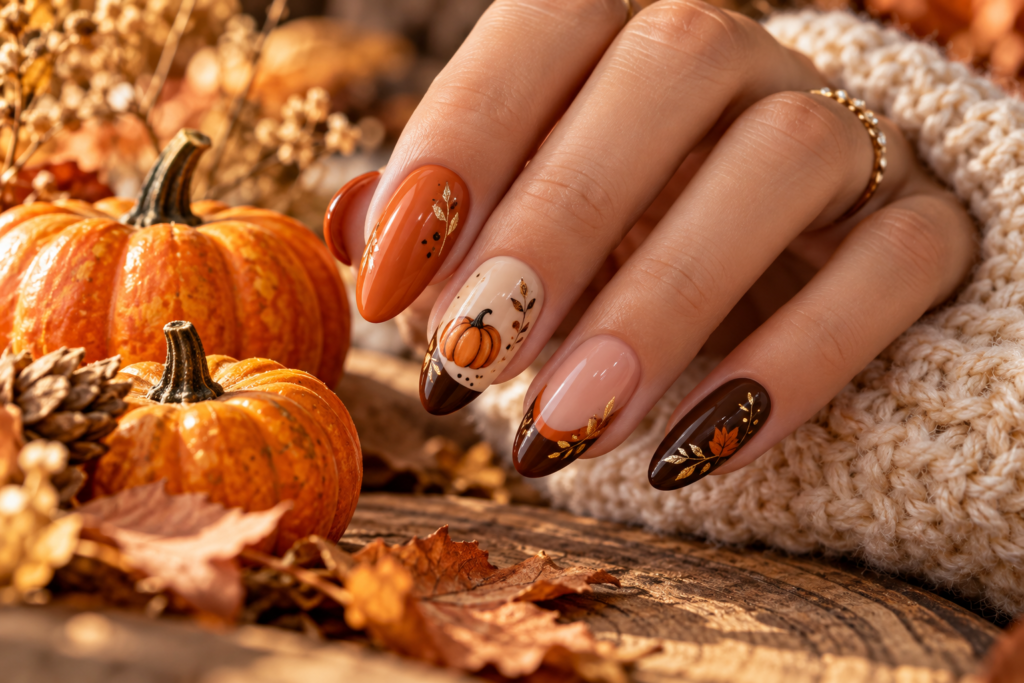
Pumpkins can be created using only a few simple shapes.
Pumpkin pattern
- Draw an orange oval.
- Add 2–3 curved vertical lines.
- Add a small green or brown stem.
- Add a tiny leaf if desired.
You can put one pumpkin on the ring finger while keeping the remaining nails orange, nude, or brown.
9. Cute Pumpkin Nails
For a softer manicure, create tiny pumpkin faces.
Use:
- Orange pumpkin
- Black eyes
- Black smile
- Green stem
Easy face pattern
Triangle eyes + tiny triangle nose + curved smile.
This design is beginner-friendly because the imperfections can actually make the pumpkins look cuter.
10. Black Cat Halloween Nails
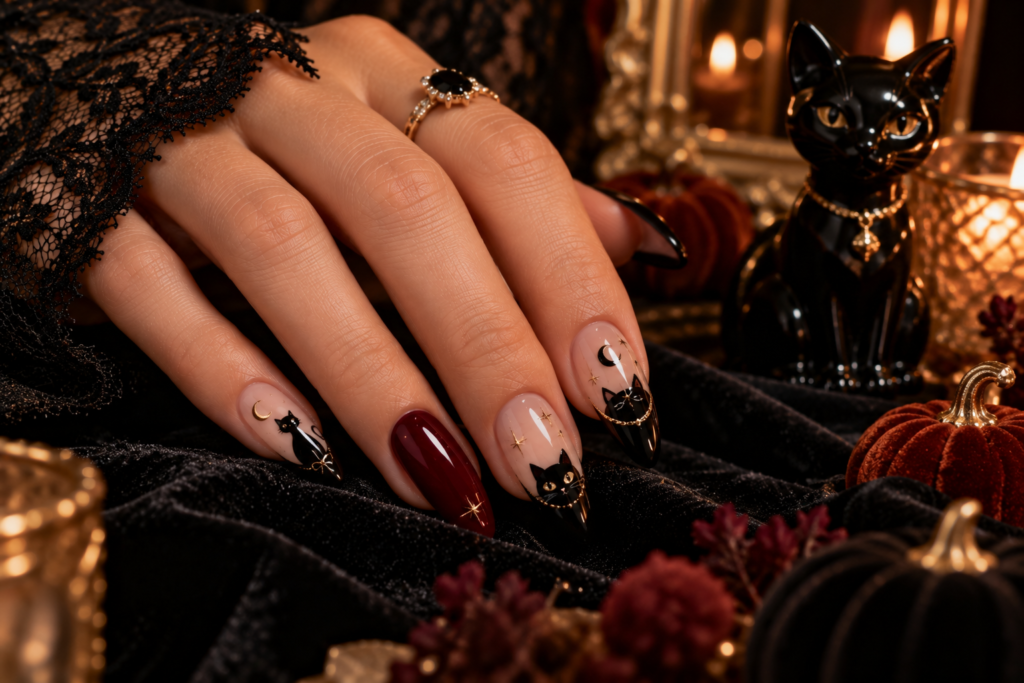
Black cats are perfect for witchy Halloween manicures.
Pattern
Paint a small black cat silhouette with:
- Pointed ears
- Curved back
- Long tail
Add two tiny gold or white eyes.
Placement
The cat looks particularly good on:
- Ring finger
- Middle finger
- Side of a nude nail
11. Halloween Moon & Stars
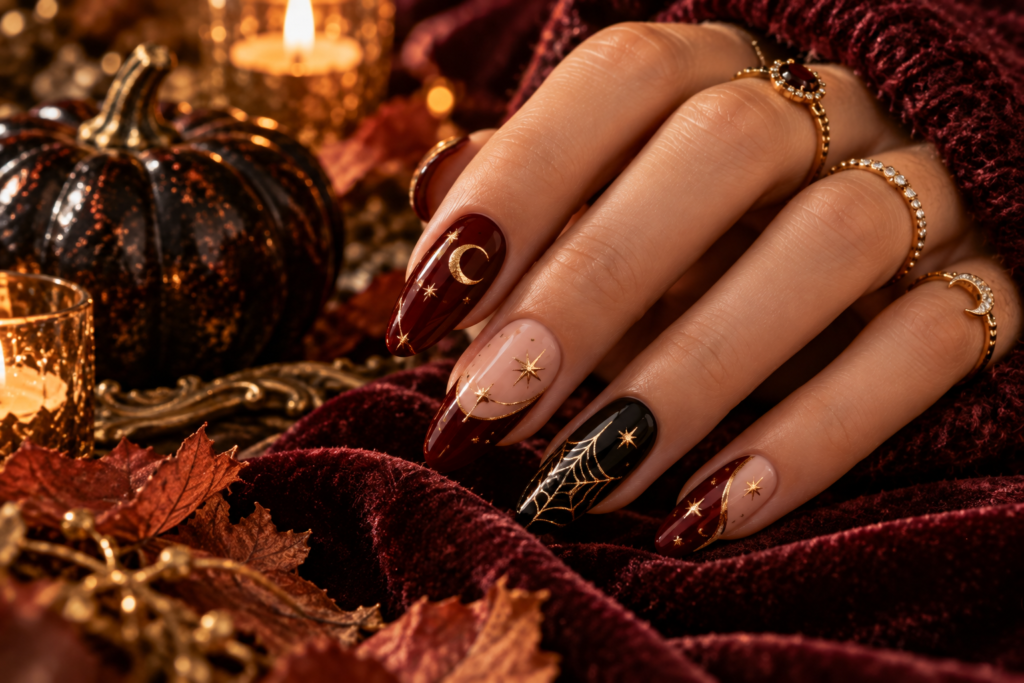
For an elegant witchy manicure, use celestial elements instead of traditional pumpkins.
Color combination
Sheer nude + black + gold
Add:
- Crescent moons
- Tiny stars
- Dots
- Fine celestial lines
This style is especially beautiful on long almond nails.
12. Witch Hat Nails
A tiny witch hat can become the focal point of one nail.
Step by step
- Paint a small black triangle.
- Add a wider curved line underneath.
- Add a purple, orange, or gold band.
- Add a tiny buckle.
- Finish with glossy top coat.
Keep the hat small. Large cartoon shapes can make the manicure look less refined.
13. Spooky Eye Nails
Eyes create an instantly creepy effect.
Pattern
Use a nude, white, or gray base.
Draw:
- White oval
- Black pupil
- Red veins
- Optional black outline
For a minimalist version, use only a tiny black pupil surrounded by white.
14. Halloween Skull Nails
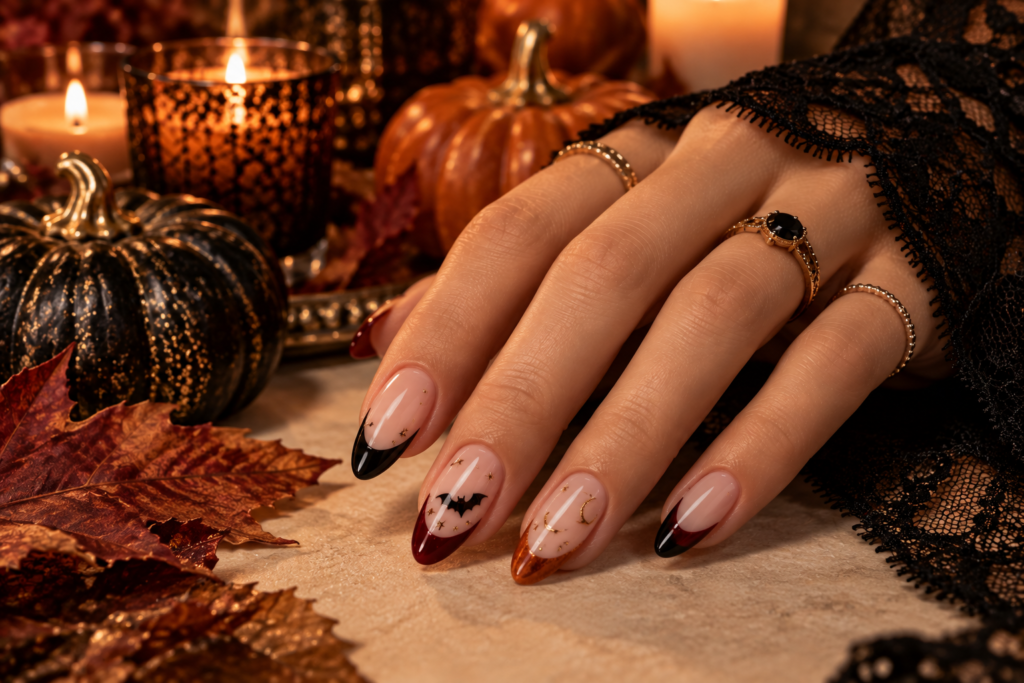
Skulls can range from cartoon-cute to gothic.
Beginner version
Paint:
- White oval skull
- Two black eye sockets
- Small nose
- Three or four tiny teeth
Advanced version
Add:
- Cracks
- Shadows
- Crossbones
- Black outlines
15. Spider Accent Nail
You do not need a spider on every nail.
Create a nude manicure with one black spider.
Pattern
The spider consists of:
- One small oval body
- One smaller head
- Four legs on each side
Use an ultra-fine brush for the legs.
16. Black & Orange Checkerboard
Checkerboard nails are ideal if you want something graphic rather than character-based.
Colors
- Black
- Pumpkin orange
Technique
- Paint the entire nail orange.
- Allow it to dry.
- Use a thin brush to create vertical lines.
- Add horizontal lines.
- Fill alternating squares black.
- Seal with top coat.
17. Haunted House Nails
This is more detailed but creates a fantastic statement nail.
Use a black silhouette against:
- Orange
- Purple
- Deep red
- Nude
Add:
- Tiny house
- Moon
- Bats
- Bare tree
- Flying birds
Because the design contains several elements, use it on only one or two nails.
18. Bat French Tips
Create tiny black bats along a French tip.
Simple bat pattern
Think of the bat as:
Two wings + small body
Use a dotting tool for the body and a fine brush for the wings.
19. Bloody French Tips
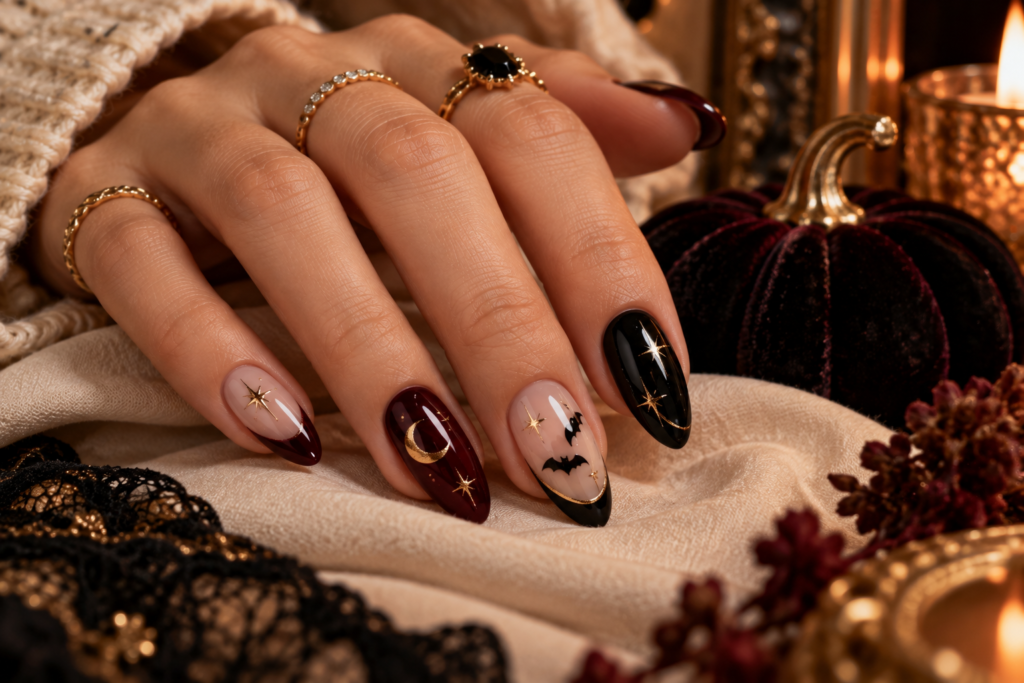
Instead of painting ordinary red French tips, make the red edge irregular.
Pattern
The tip should look as though red polish is dripping downward.
Combine it with a nude base for a cleaner contrast.
20. Gothic Lace Nails
Black lace is perfect for an elegant Halloween manicure.
Use:
- Nude base
- Black lace pattern
- Burgundy accents
- Tiny gold details
The key is to keep the lace lines extremely thin.
21. Matte Black Halloween Nails
Matte black completely changes the appearance of Halloween designs.
Try:
Matte black base + glossy black spiderweb
The contrast between the matte and shiny finishes creates dimension without requiring additional colors.
22. Black & Burgundy Vampire Nails
This combination is ideal for a sophisticated Halloween manicure.
Suggested arrangement
| Nail | Design |
|---|---|
| Thumb | Burgundy |
| Index | Black |
| Middle | Nude + blood drips |
| Ring | Burgundy |
| Pinky | Black |
Add tiny gold jewelry-inspired details for a luxury finish.
23. Ghost French Tips
Instead of drawing ghosts in the middle of the nail, position tiny ghosts along the French tip.
This creates a playful border.
Use:
- Milky nude base
- White ghosts
- Black eyes
- Black mouth
24. Pumpkin + Spiderweb Combination
Mix two classic Halloween symbols.
For example:
- Thumb: orange
- Index: spiderweb
- Middle: nude + pumpkin
- Ring: black
- Pinky: orange French tip
This creates a coordinated set without making every nail identical.
25. Halloween Confetti Nails
Use tiny Halloween symbols like confetti.
Scatter:
- Stars
- Bats
- Dots
- Tiny pumpkins
- Moons
Keep the base sheer pink or nude.
This is a great choice for people who want subtle Halloween nails.
26. Red Chrome Halloween Nails
Chrome finishes can make a traditional Halloween palette look much more dramatic.
Try:
Deep red chrome + black accent nail
For extra dimension, add small glossy black drips.
27. Poison Green Halloween Nails
Green is often overlooked in Halloween nail art, but it works beautifully with black.
Use:
- Acid green
- Black
- Nude
- Metallic silver
Add a tiny bubbling potion bottle or witch-inspired symbols.
28. Purple Witchy Nails
Purple creates a magical Halloween aesthetic without relying on orange.
Try:
Lavender + deep purple + black + silver
Add moons, stars, witch hats, or tiny sparkles.
29. Creepy Smile Nails
Paint a nude or white base and add a black creepy smile.
For a more dramatic version, add red around the edges.
This works particularly well on long stiletto nails.
30. Black Flame Halloween Nails
Black flame designs are excellent for longer nails.
Create pointed flame shapes extending from the tip toward the center.
Try:
Nude base + black flames + burgundy inner flames
31. Haunted Graveyard Nails
Create a tiny nighttime landscape.
Include:
- Black graveyard
- White or orange moon
- Bare tree
- Tiny bats
- Small stars
This is best used as an accent nail because the pattern contains many details.
32. Halloween Polka Dots
For beginners, Halloween polka dots are almost impossible to mess up.
Use:
- Orange
- Black
- White
- Burgundy
Create random-sized dots over a nude or black base.
Finish with a glossy top coat.
33. Minimalist Tiny Bats
For a sophisticated manicure, use tiny black bats on a sheer nude base.
Place one or two bats on each nail rather than filling the entire surface.
This design is particularly suitable for short nails.
34. Red Dripping Claw Nails
For a dramatic look inspired by the reference style, combine a pointed nail shape with red dripping details.
Pattern
Sheer nude → deep red tip → elongated red drips → black accents
Use varying drip lengths so the manicure feels organic.
35. Mixed Halloween Nail Art
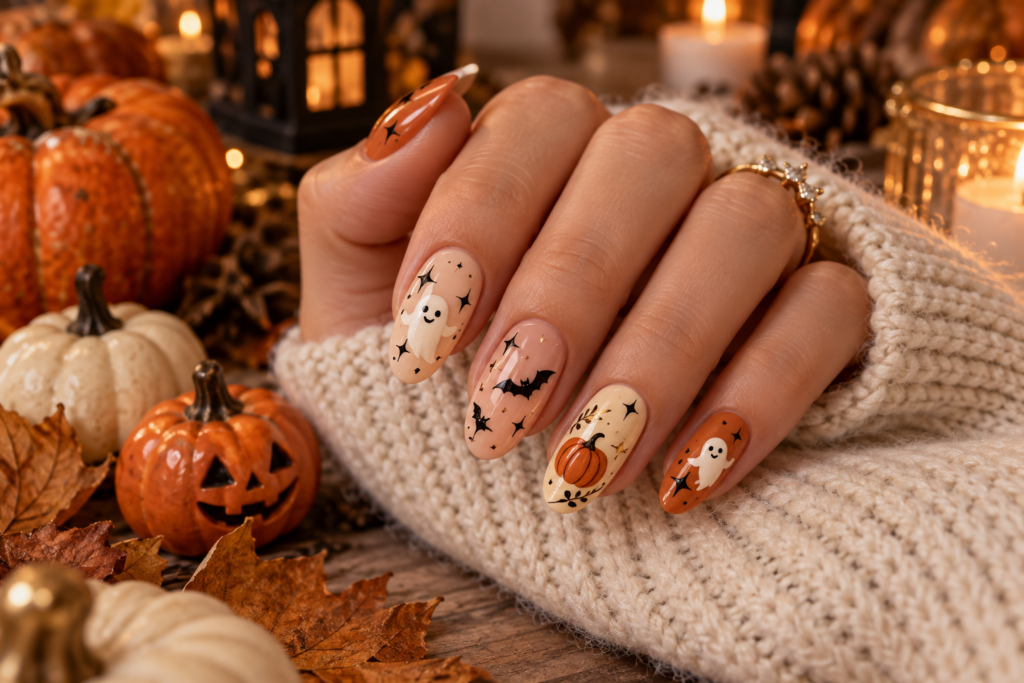
If you cannot choose just one theme, create a different Halloween motif on every nail.
A balanced set could look like this:
| Nail | Design |
|---|---|
| Thumb | Black French tip |
| Index | Tiny ghost |
| Middle | Bloody drips |
| Ring | Spiderweb |
| Pinky | Mini pumpkin |
The secret is to use the same color palette throughout the entire set.
Halloween Nail Color Combinations
| Palette | Colors | Overall Effect |
|---|---|---|
| Classic Halloween | Orange + black + white | Playful |
| Vampire | Burgundy + black + nude | Dramatic |
| Witchy | Purple + black + silver | Magical |
| Elegant | Nude + black + gold | Sophisticated |
| Ghostly | White + nude + black | Cute |
| Pumpkin | Orange + brown + cream | Warm |
| Gothic | Black + burgundy + dark purple | Dark |
| Candy Corn | Yellow + orange + white | Fun |
| Haunted | Black + gray + white | Creepy |
| Dark Glam | Black + red + chrome | Luxurious |
Halloween Nail Art Placement Guide
Placement can make a bigger difference than the actual design.
| Design | Best Placement |
|---|---|
| Ghost | Center or lower third |
| Spiderweb | Upper corner |
| Spider | Center |
| Moon | Upper third |
| Pumpkin | Center |
| Bat | Side or tip |
| Blood drips | Tip moving upward |
| French design | Free edge |
| Skull | Center |
| Witch hat | Lower third |
| Stars | Around focal design |
| Tiny dots | Empty spaces |
The Rule of Visual Balance
If one nail has a complicated design, keep the neighboring nails simpler.
For example:
Detailed spiderweb → solid black → tiny spider → solid nude → detailed web
This prevents the manicure from looking crowded.
How to Choose the Right Halloween Design for Your Nail Shape
| Nail Shape | Designs That Work Well |
|---|---|
| Almond | Blood drips, flames, moons, ghosts |
| Stiletto | Vampire, claws, flames, dripping designs |
| Coffin | Checkerboard, pumpkins, skulls |
| Square | French tips, spiderwebs, geometric designs |
| Oval | Minimal ghosts, moons, tiny bats |
| Short Round | Dots, tiny pumpkins, simple ghosts |
| Squoval | French tips, minimalist Halloween symbols |
Step-by-Step DIY Halloween Manicure
Before creating detailed nail art, prepare the nails properly.
Step 1: Shape the Nails
Choose your desired shape and file the edges gently.
Avoid aggressive back-and-forth filing because it can weaken the free edge.
Step 2: Prepare the Cuticles
Gently push back the cuticles and remove only loose dead skin.
Do not cut healthy living tissue.
Step 3: Clean the Nail Plate
Remove oil and residue with an appropriate nail cleanser.
This helps polish adhere better.
Step 4: Apply Base Coat
A thin base coat creates a smoother surface and can help protect the natural nail from staining.
Step 5: Apply Your Base Color
Use two thin coats rather than one thick coat.
Allow enough drying time between layers.
Step 6: Create the Halloween Pattern
Use the appropriate tool:
| Tool | Best For |
|---|---|
| Dotting tool | Eyes, dots, pumpkins |
| Fine liner brush | Webs, drips, outlines |
| Detail brush | Ghosts, skulls |
| Sponge | Ombre |
| Striping brush | French tips and lines |
| Stamping plate | Repeated patterns |
Step 7: Correct Mistakes
Dip a small cleanup brush into nail polish remover and carefully clean around the design.
Step 8: Add Top Coat
Once the artwork has dried sufficiently, apply a generous but controlled layer of top coat.
Avoid dragging the brush aggressively across detailed artwork.
Easy Halloween Nail Art Patterns for Beginners
If you’re new to nail art, start with patterns made from simple shapes.
Pattern 1: Ghost
Oval → body → two dots → mouth
Pattern 2: Pumpkin
Oval → curved lines → stem
Pattern 3: Spider
Two dots → eight thin legs
Pattern 4: Bat
Small body → two wings
Pattern 5: Blood Drip
Dots → elongated lines → rounded ends
Pattern 6: Spiderweb
One point → straight lines → curved connectors
These patterns can be practiced on paper before applying them to the nails.
How to Make Halloween Nail Art Look More Professional
One of the biggest differences between amateur and professional nail art is line control.
Instead of pressing hard with the brush, use light pressure.
For very thin lines:
- Load a small amount of polish onto the brush.
- Place the brush near the starting point.
- Pull it smoothly across the nail.
- Avoid repeatedly going over the same line.
- Allow the line to dry before adding another layer.
Another important rule is consistency.
If you use black outlines, keep them approximately the same thickness throughout the manicure.
How to Create the Bloody Drip Effect
The bloody-drip manicure deserves special attention because it is both dramatic and relatively easy.
Materials
- Nude polish
- Deep red polish
- Fine detail brush
- Dotting tool
- Glossy top coat
Technique
- Apply two coats of nude.
- Let the surface dry.
- Place several red dots near the tip.
- Pull some dots toward the middle of the nail.
- Keep some dots small and round.
- Make two or three drips longer than the others.
- Add a few tiny red droplets.
- Clean the edges.
- Apply glossy top coat.
Design formula
70% clean nude space + 30% red detail
Keeping some negative space makes the manicure more sophisticated.
How to Create a Halloween Spiderweb
A spiderweb looks complicated, but it is essentially a series of lines.
Step 1
Choose a corner of the nail.
Step 2
Draw 4–6 thin lines outward from that point.
Step 3
Connect the lines using small curved strokes.
Step 4
Gradually increase the size of the curved sections as you move outward.
Step 5
Add a tiny spider if desired.
Do not worry about making the web mathematically perfect. Slight irregularities can make it look more natural.
Halloween Nail Art Ideas by Difficulty
| Difficulty | Recommended Designs |
|---|---|
| Beginner | Dots, French tips, pumpkins |
| Beginner | Ghost faces, polka dots |
| Beginner | Blood drips |
| Intermediate | Spiderwebs |
| Intermediate | Bats |
| Intermediate | Skulls |
| Intermediate | Checkerboard |
| Advanced | Haunted landscapes |
| Advanced | Detailed portraits |
| Advanced | Multi-character designs |
Halloween Nail Ideas by Time Available
| Available Time | Best Option |
|---|---|
| 5 minutes | Black French tips |
| 10 minutes | Tiny ghosts |
| 15 minutes | Blood drips |
| 20 minutes | Spiderweb accents |
| 30 minutes | Pumpkin + ghost set |
| 45 minutes | Mixed Halloween manicure |
| 60+ minutes | Detailed haunted scene |
How to Choose Between Cute and Creepy Halloween Nails
Your color palette can completely change the mood.
For cute Halloween nails
Use:
- Pastel orange
- Cream
- White
- Lavender
- Soft pink
Choose ghosts, pumpkins, stars, bats, and tiny cats.
For creepy Halloween nails
Use:
- Burgundy
- Black
- Deep red
- Dark purple
Choose blood drips, spiders, skulls, claws, and haunted designs.
For elegant Halloween nails
Use:
- Nude
- Black
- Gold
- Burgundy
Keep the symbols small and leave plenty of negative space.
Halloween Nail Ideas for Short Nails
Short nails can absolutely have Halloween nail art.
The key is to simplify the pattern.
Instead of painting an entire haunted house, try:
- Tiny ghost faces
- Small bats
- Black French tips
- Orange dots
- Mini pumpkins
- Crescent moons
- One spiderweb corner
Avoid putting too many details into a small area because they can visually merge together.
Halloween Nail Ideas for Long Nails
Long nails give you more space for elaborate artwork.
Try:
- Bloody claws
- Spiderwebs
- Flames
- Haunted houses
- Graveyards
- Long French tips
- Dripping designs
- Gothic lace
- Vampire-inspired nails
Stiletto nails are especially dramatic for red-and-black Halloween designs.
Matte vs Glossy Halloween Nails
The finish can completely change the same design.
| Finish | Effect |
|---|---|
| Glossy | Wet, dramatic, polished |
| Matte | Gothic, sophisticated |
| Chrome | Futuristic, glamorous |
| Glitter | Festive |
| Velvet | Luxurious |
| Matte + glossy | High contrast |
One particularly effective technique is to paint a matte black base with glossy black spiderwebs.
The design becomes visible through the difference in reflection rather than through contrasting colors.
How to Make Your Halloween Manicure Last
Good nail art begins with preparation.
Before polishing
Avoid applying heavy oils immediately before your manicure.
During application
Use thin coats.
After finishing
Give the top coat enough time to cure or dry according to the product instructions.
Daily care
Apply cuticle oil regularly and avoid using your nails as tools.
If you’re using gel products, follow the manufacturer’s curing instructions carefully and avoid getting uncured product on the surrounding skin.
Halloween Nail Design Planning Formula
If you want to design your own set, use this simple formula:
2 solid nails + 2 simple designs + 1 statement nail
For example:
- Thumb: black
- Index: black French
- Middle: nude + ghost
- Ring: bloody drip statement nail
- Pinky: burgundy
This gives you a coordinated manicure without making every nail compete for attention.
10 Ready-to-Copy Halloween Nail Sets
Set 1: Vampire
Black + nude + burgundy + blood drips.
Set 2: Witchy
Black + purple + gold + moons + stars.
Set 3: Cute Ghost
Milky white + nude + black + tiny ghosts.
Set 4: Pumpkin Patch
Orange + cream + brown + mini pumpkins.
Set 5: Spiderweb
Black + nude + white + spiders.
Set 6: Gothic Glam
Black + burgundy + gold + chrome.
Set 7: Candy Corn
Yellow + orange + white.
Set 8: Haunted Night
Black + gray + white + moon + bats.
Set 9: Bloody Claws
Nude + deep red + black.
Set 10: Minimal Halloween
Sheer nude + tiny black bats + tiny stars.
Halloween Nail Art Mistakes to Avoid
Making every nail equally complicated
This can make the manicure look visually chaotic.
Using too much polish
Thick artwork takes longer to dry and is more likely to smudge.
Making every symbol identical
Slight variations can make handmade nail art look more natural.
Ignoring negative space
Empty areas help complicated designs breathe.
Choosing too many colors
A controlled palette usually looks more intentional.
Forgetting the nail shape
Some designs work better with elongated nails, while others are perfect for short nails.
Final Halloween Nail Inspiration Formula
If you want a manicure that looks impressive without requiring professional-level painting skills, try this combination:
Sheer nude base + deep red dripping tips + black accents + one statement spiderweb + glossy finish.
For something softer:
Milky nude + tiny white ghosts + black bats + orange French tips.
For something more elegant:
Nude + black French tips + burgundy accents + tiny gold moons.
And for maximum Halloween drama:
Stiletto nails + nude base + blood-red claws + black glossy accents.
Final Thoughts
Halloween nail art does not have to be complicated to be memorable. The strongest designs usually have one clear visual idea, a controlled color palette, and enough negative space to keep the manicure from looking crowded.
Whether you prefer cute ghosts, classic pumpkins, creepy spiderwebs, bloody red drips, witchy moons, gothic black nails, or dramatic vampire-inspired claws, the trick is to adapt the design to your nail shape, skill level, and personal style.
For beginners, start with simple patterns such as dots, pumpkins, ghosts, French tips, and blood drips. Once you are comfortable with a fine liner brush, move into spiderwebs, bats, skulls, and more detailed Halloween scenes.
And if you want that instantly recognizable Halloween effect, remember the easiest formula:
black + red + nude + one spooky symbol = an effortless Halloween manicure.