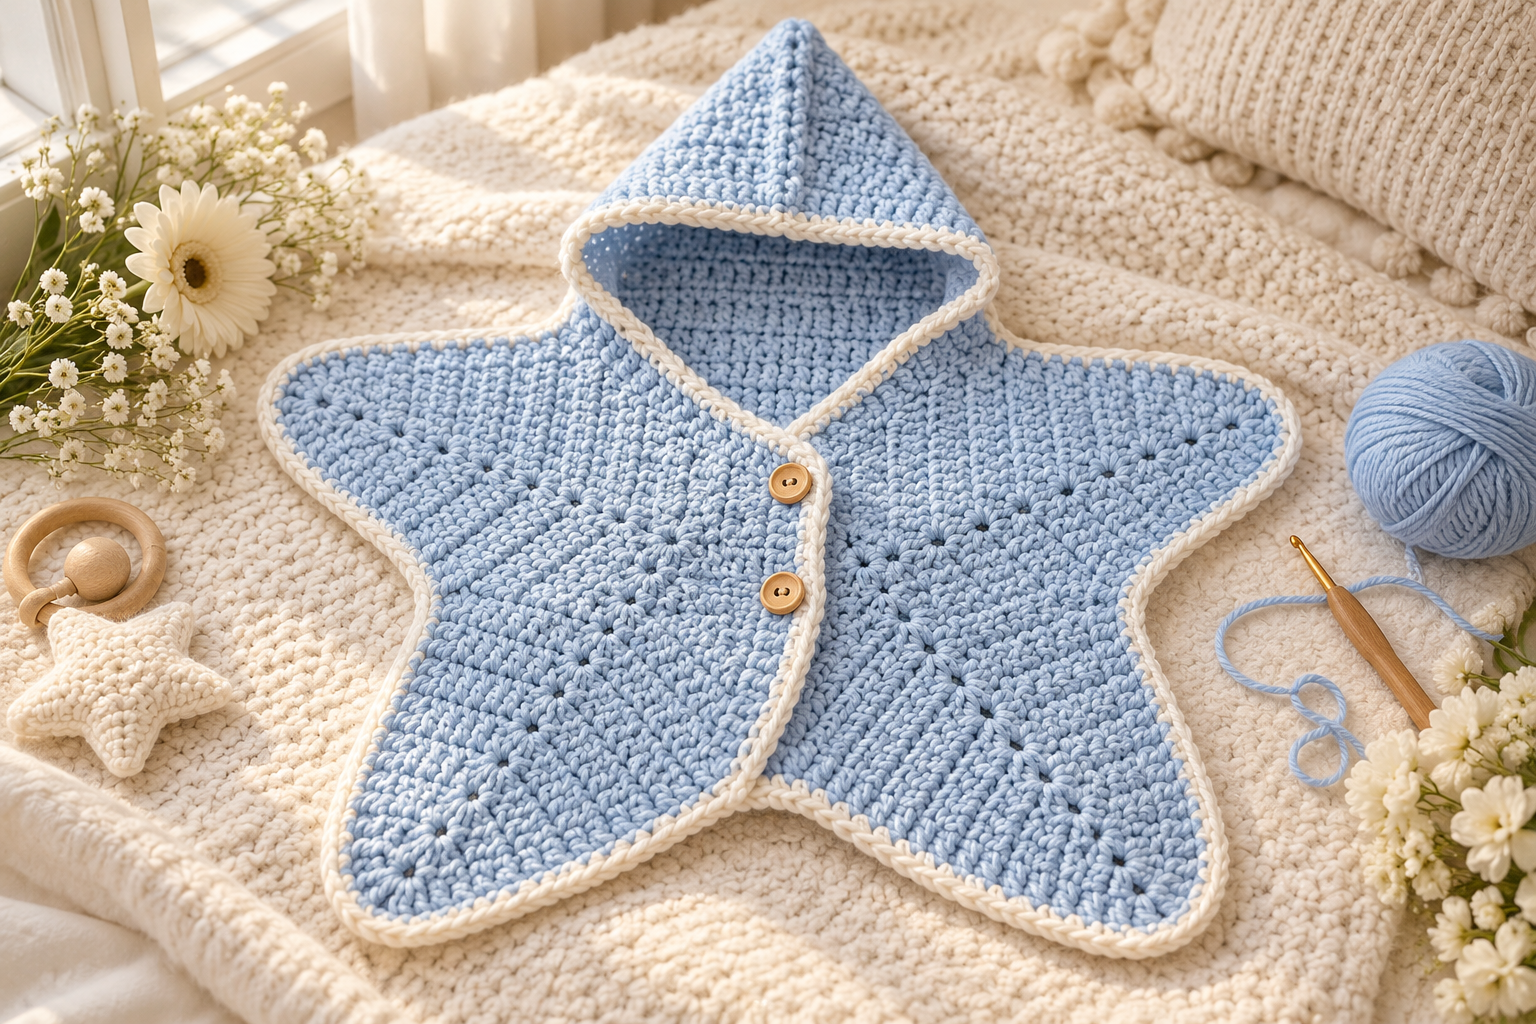
A handmade baby wrap can be one of those crochet projects that feels special before you even finish it. This Baby Blue Star Crochet Wrap combines the cozy shape of a hooded baby blanket with the practical fit of a wearable wrap.
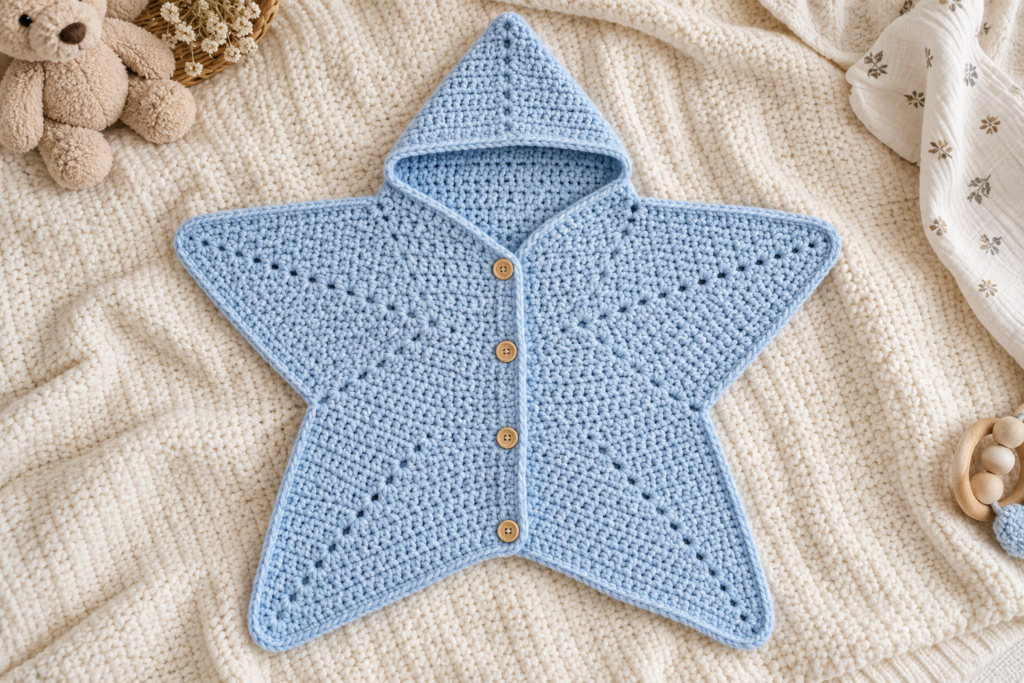
The design is inspired by the uploaded reference: a soft blue star-shaped wrap with a pointed hood, broad arm/side points, a front opening and simple wooden-button details. The pattern below is written as an original crochet construction inspired by that visual, rather than copied from a commercial pattern.
The result is a cozy piece that works beautifully as a newborn photo prop, baby-shower gift, stroller wrap or special handmade keepsake.
Important: Because this is a wearable baby item, always check the finished piece carefully for loose yarn, loose buttons, long cords or detachable decorations. For babies and very young children, embroidered or securely sewn details are preferable to small detachable embellishments.
What Makes This Star Crochet Wrap Special?
Unlike a conventional rectangular baby blanket, this design is shaped around the baby.
The star points create:
- A cozy hood
- Wide side panels
- A wrapped front
- Extra coverage around the legs
- A distinctive handmade silhouette
The design is also highly customizable.
You can make it:
- Newborn size
- 0–3 months
- 3–6 months
- 6–12 months
- Longer for stroller use
- Wider for a blanket-style wrap
- With or without a hood
- With buttons or a tie closure
- In solid colors or stripes
Finished Size Guide
The measurements below are approximate because crochet tension can change the final dimensions.
| Size | Approx. Baby Age | Approx. Length | Approx. Width | Yarn |
|---|---|---|---|---|
| Newborn | 0–3 months | 50–55 cm | 55–60 cm | 250–300 g |
| Small | 3–6 months | 55–60 cm | 60–65 cm | 300–350 g |
| Medium | 6–12 months | 60–67 cm | 65–72 cm | 350–425 g |
| Large | 12–18 months | 67–75 cm | 72–80 cm | 425–500 g |
These measurements describe the overall wrap rather than the baby’s body measurements.
For a wearable item, always compare the finished dimensions with the baby-size measurements you are targeting.
Materials
| Material | Recommendation |
|---|---|
| Main yarn | DK or light worsted baby yarn |
| Color | Baby blue |
| Hook | 4.0 mm–4.5 mm |
| Tapestry needle | 1 |
| Stitch markers | 5–8 |
| Scissors | 1 |
| Measuring tape | 1 |
| Buttons | Optional; use securely sewn, appropriately sized buttons |
| Stuffing | None required |
| Blocking pins | Optional |
For the reference-inspired look, a soft baby blue works beautifully.
Other excellent options include:
- Cream
- Dusty pink
- Sage green
- Lavender
- Soft gray
- Butter yellow
- Oatmeal
- Powder blue
Choosing the Yarn
Baby garments should feel soft against delicate skin.
Look for yarn that is:
- Soft
- Smooth
- Washable
- Not scratchy
- Comfortable against the skin
- Easy to care for
Cotton blends can produce excellent stitch definition.
A soft acrylic or acrylic-blend baby yarn can also be practical because it is generally easy to wash and maintain.
Avoid very fuzzy yarn for this particular design because the texture can make the stitch pattern difficult to see.
Recommended Yarn Weight
For a wrap with the structure shown in the reference, DK or light worsted yarn is a practical choice.
| Yarn | Result |
|---|---|
| Sport | Lightweight, delicate |
| DK | Balanced and comfortable |
| Light worsted | Warmer and thicker |
| Worsted | Chunkier, heavier |
| Bulky | Usually too thick for a newborn wrap |
For the closest balance between warmth and drape, start with DK yarn and a 4 mm hook.
Crochet Abbreviations
The pattern uses US terminology.
| Abbreviation | Meaning |
|---|---|
| MR | Magic ring |
| ch | Chain |
| sc | Single crochet |
| hdc | Half double crochet |
| dc | Double crochet |
| sl st | Slip stitch |
| st | Stitch |
| sts | Stitches |
| inc | Increase |
| dec | Decrease |
| BLO | Back loop only |
| FLO | Front loop only |
| sk | Skip |
| rep | Repeat |
| FO | Fasten off |
Gauge
Gauge is particularly important when making a baby garment.
Make a small swatch before beginning.
A useful starting gauge is approximately:
16–18 stitches × 12–14 rows = 10 × 10 cm
using:
4 mm hook + DK yarn
Your gauge does not have to match this exact number if you are using the finished measurements as your guide, but maintaining a consistent tension is important.
How to Check Your Gauge
Make approximately:
22 chains
Work several rows of your chosen stitch.
Measure a central 10 × 10 cm section.
If your stitches are too large:
Use a smaller hook.
If your stitches are too small:
Use a larger hook.
Construction Overview
This pattern is easier to understand if you think of it as five sections.
| Section | Purpose |
|---|---|
| Center | Main body |
| Upper point | Hood |
| Left point | Side coverage |
| Right point | Side coverage |
| Lower point | Leg/blanket coverage |
| Front edge | Closure and finishing |
The star shape comes from strategically increasing at the point sections.
Pattern Overview
The basic construction is:
Central panel → star points → hood → edging → closure
You will work the main wrap first.
The hood is then created separately and attached to the upper section.
PART 1 — Main Star Wrap
The easiest way to create a clean star silhouette is to construct the main wrap in sections rather than trying to force the entire shape into one complicated round.
The body consists of a central panel and five pointed extensions.
Central Panel
Begin with baby-blue yarn.
Foundation
Chain:
ch 31
For a larger size, add chains in multiples of 2.
Row 1
Hdc in the 2nd chain from hook.
Hdc across.
You should have:
30 hdc
Row 2
Ch 1.
Turn.
Hdc across.
Rows 3–8
Repeat Row 2.
You now have a small rectangular center.
For a larger size, continue for additional rows until your central section measures approximately:
20–25 cm wide
Creating the Star Points
The next step is to create the characteristic pointed silhouette.
Each point is worked outward from one side of the central section.
We’ll create five major sections:
- Hood point
- Left point
- Right point
- Lower-left point
- Lower-right point
This creates the visual impression of the five-point star seen in the reference.
POINT 1 — Upper Hood Section
Attach blue yarn to the center of the upper edge.
Row 1
Ch 2.
Hdc across approximately half of the upper edge.
Row 2
Ch 1.
Turn.
Hdc across.
Row 3
Ch 1.
Turn.
Hdc2tog.
Hdc across until 2 sts remain.
Hdc2tog.
This decreases by two stitches.
Row 4
Repeat Row 3.
Continue decreasing at both sides.
The fabric gradually narrows.
When approximately 6–8 stitches remain, continue decreasing until you have:
2–3 stitches
Fasten off.
This produces a pointed upper section that will later become part of the hood.
POINT 2 — Left Side
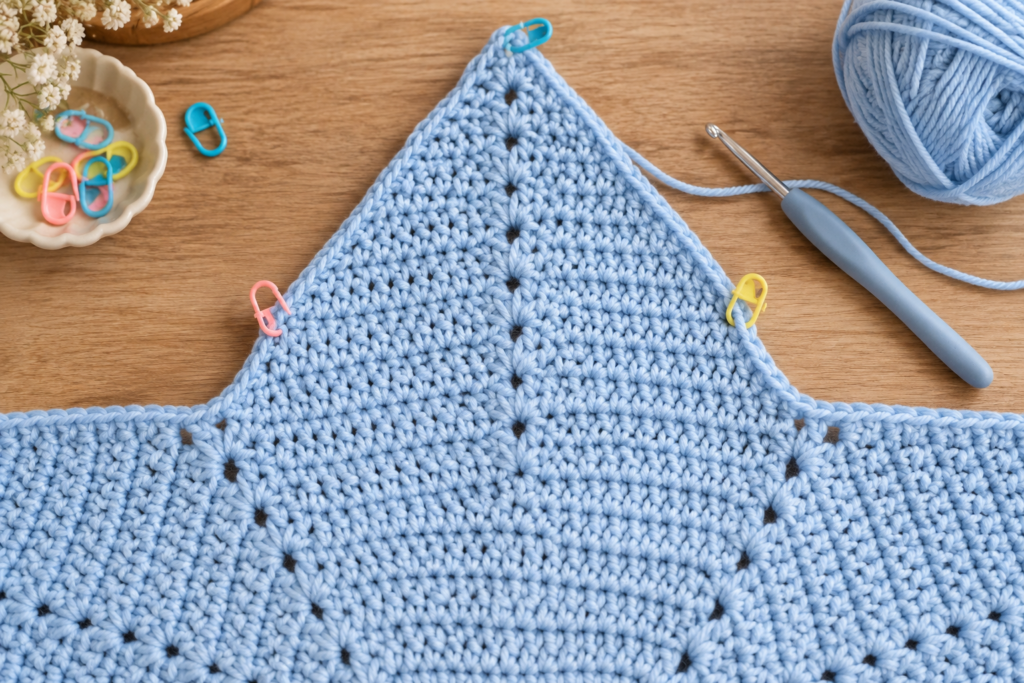
Attach yarn to the left side of the center panel.
Work several rows of hdc.
At the outer edge, gradually decrease toward a point.
Basic shaping
Row 1:
Hdc across.
Row 2:
Hdc2tog at beginning and end.
Repeat the decrease rows until the section forms a long triangular point.
Fasten off.
POINT 3 — Right Side
Repeat the same construction on the opposite side.
Make sure the number of rows matches the left side.
This symmetry is important.
Compare the two sides before continuing.
POINT 4 — Lower-Left Section
Attach yarn to the lower-left portion of the center.
Work hdc rows.
Decrease gradually at the outer edge.
Continue until you create a longer triangular point.
POINT 5 — Lower-Right Section
Repeat the same process on the opposite side.
The result should resemble a soft five-point star.
How the Shape Should Look
Before adding the hood, lay the project flat.
You should see something similar to:
- One upper point
- Two side points
- Two lower points
- A central body
The points do not need to be mathematically identical.
For a baby wrap, slightly rounded points are preferable to extremely sharp corners.
Creating Rounded Star Points
If you want a softer baby-friendly shape, replace the final pointed rows with:
sc, hdc, sc
This rounds the tip slightly.
You can also work:
sl st around the final edge
to smooth the silhouette.
PART 2 — Hood
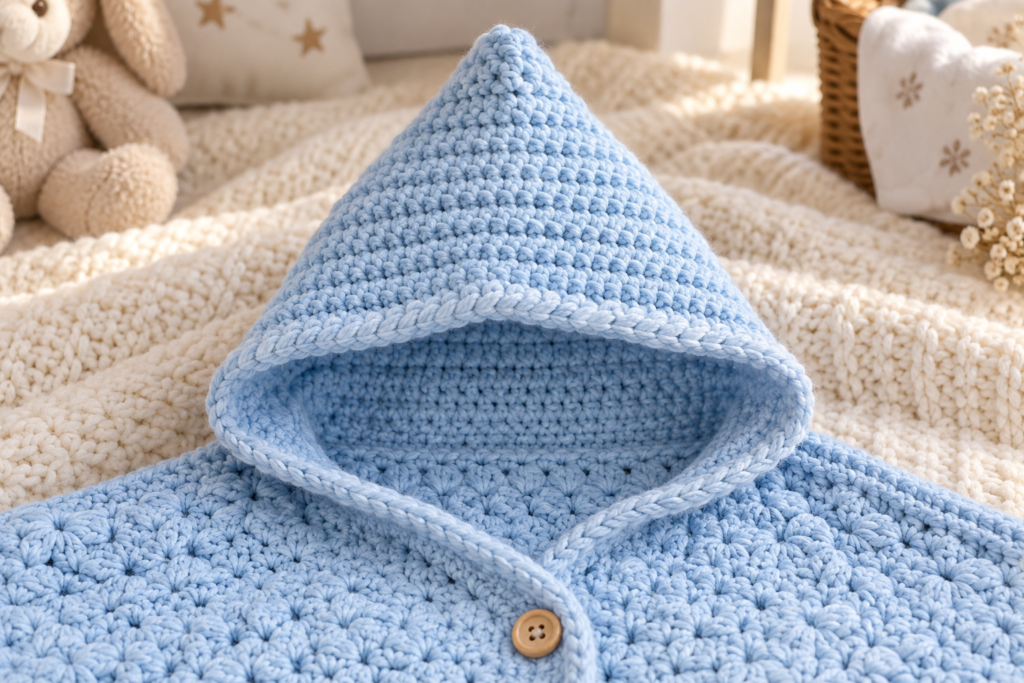
The hood is what gives the reference its distinctive cozy appearance.
The hood can be constructed as a simple triangular piece folded and sewn at the back.
Hood Pattern
Chain:
ch 32
Row 1
Hdc in the 2nd chain from hook.
Hdc across.
Row 2
Ch 1.
Turn.
Hdc across.
Row 3
Ch 1.
Turn.
Hdc2tog.
Hdc across.
Row 4
Ch 1.
Turn.
Hdc across until 2 stitches remain.
Hdc2tog.
Continue decreasing one stitch at each side on alternating rows.
Continue until approximately:
6 stitches remain.
Then decrease toward the top.
Fasten off.
Folding the Hood
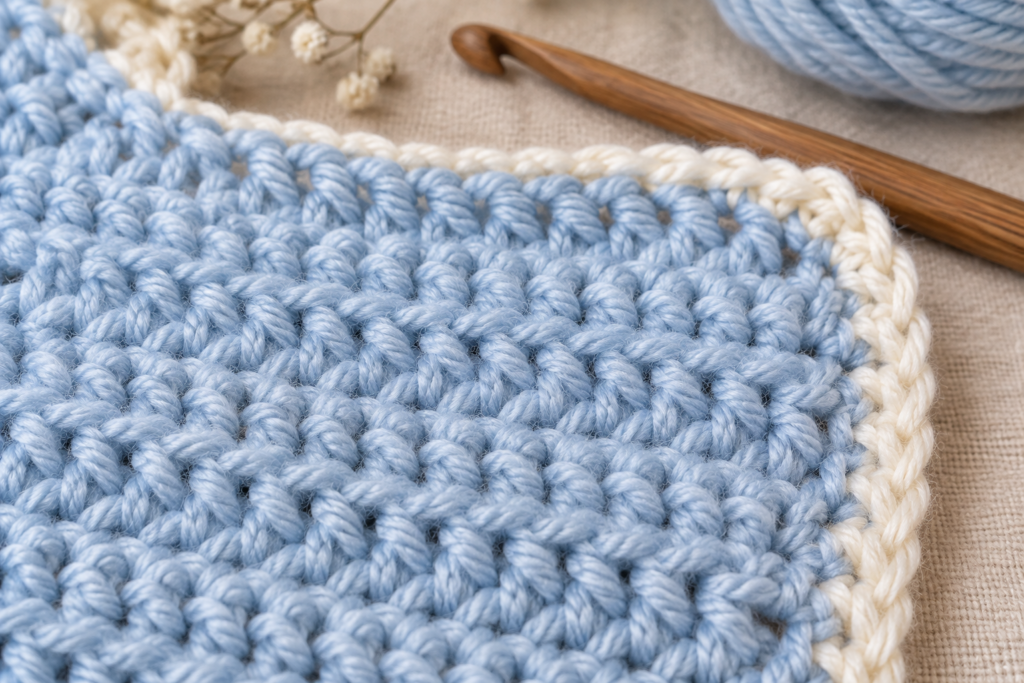
Place the hood flat.
Fold it so the two upper side edges meet.
Sew the back seam using mattress stitch or whip stitch.
Don’t sew the bottom edge.
That remains open and becomes the neckline.
Attaching the Hood
Position the hood at the upper point of the wrap.
Center it carefully.
Pin it in place.
Sew along the neckline.
Take small secure stitches through the corresponding crochet stitches.
Check that the hood sits upright.
Hood Edging
Attach blue yarn around the face opening.
Work:
sc around
for one round.
For a slightly more decorative edge:
sc, ch 1, sc
repeated around.
Finish with a final slip-stitch round.
Optional Hood Border
For a more polished look, add a contrasting border.
Good combinations include:
| Main Color | Border |
|---|---|
| Baby blue | White |
| Cream | Sage |
| Pink | Cream |
| Lavender | White |
| Sage | Oatmeal |
| Gray | Dusty blue |
PART 3 — Front Opening
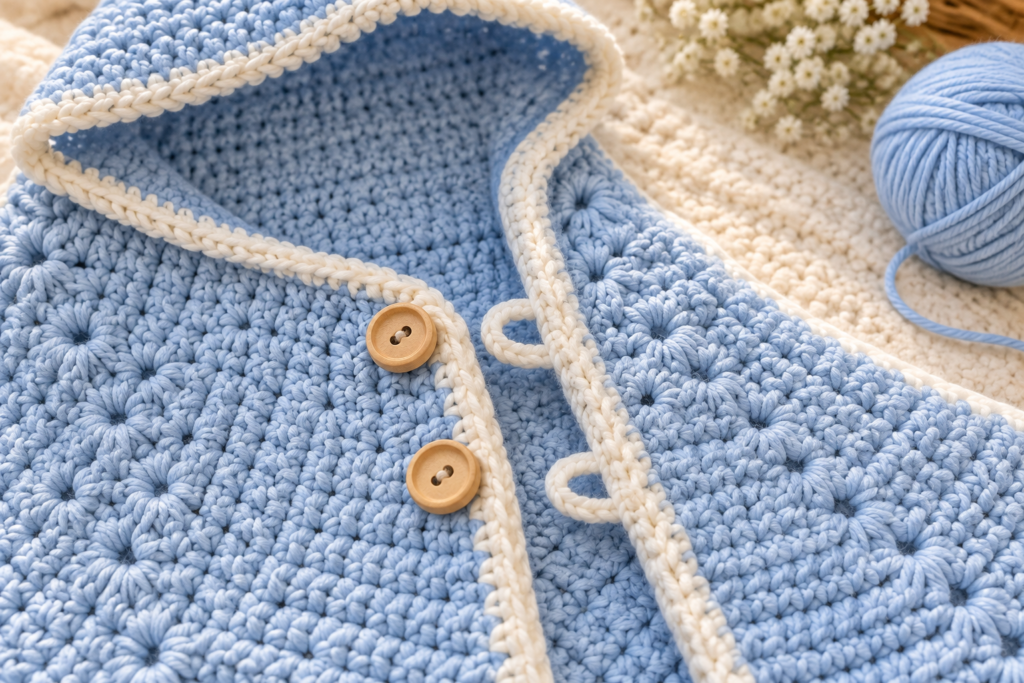
The front opening allows the wrap to be placed around the baby easily.
Lay the wrap flat.
Identify the two front edges.
Work one or two rows of single crochet along both edges.
This strengthens the opening.
Front Edge
Attach yarn at the lower front corner.
Work:
sc evenly across the edge.
At the hood area, continue carefully around the neckline.
Fasten off.
Repeat on the opposite side.
PART 4 — Button Closure
The reference uses wooden buttons.
You can recreate the appearance with securely attached buttons, but for baby items, make sure any button is firmly sewn and regularly inspected.
For a very young baby, you may prefer:
- Crochet ties
- A sewn fabric closure
- No closure
- An adult-supervised decorative button detail
Crochet Button Loop
Instead of sewing a buttonhole into the fabric, make a small loop.
Attach yarn near the front edge.
Chain:
ch 6–8
Slip stitch into the same area.
Fasten off.
Adjust the chain length according to your button size.
Button Placement
For the newborn version, one or two closures are usually enough to keep the wrap positioned.
A simple arrangement is:
Upper chest + middle chest
Avoid placing excessive hardware on a baby garment.
PART 5 — Decorative Button Details
If you want the same visual style as the reference, choose natural wooden buttons.
For safety, however:
- Sew them extremely securely.
- Check them before every use.
- Don’t use cracked buttons.
- Avoid very small buttons on items intended for infants.
- Consider replacing them with embroidered circles for a completely soft construction.
PART 6 — Border
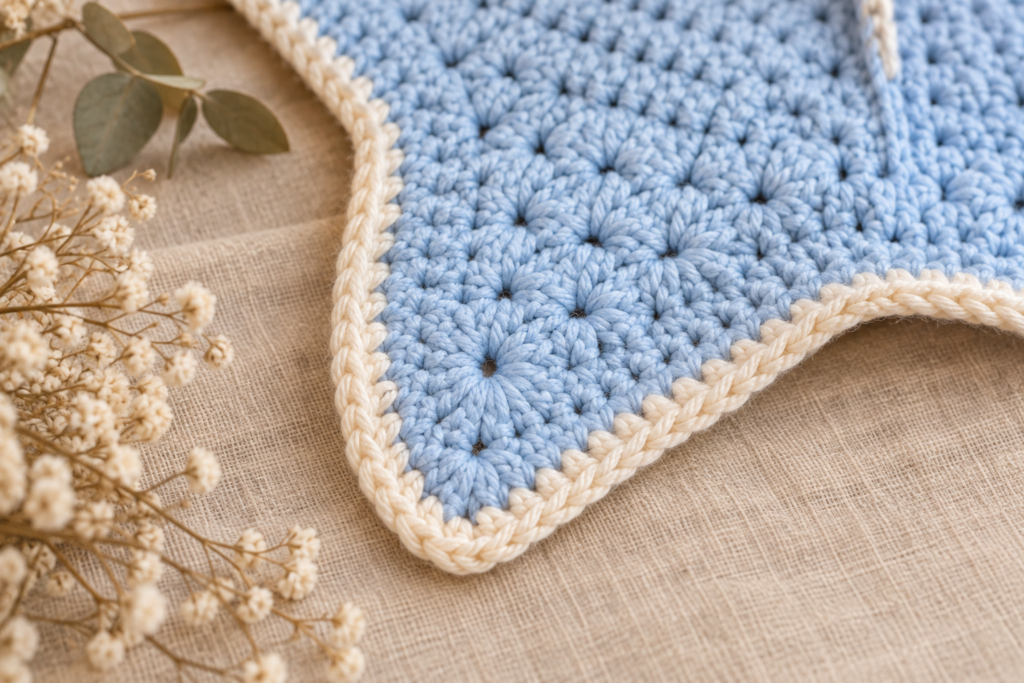
The border makes the entire project look finished.
Attach contrasting white yarn.
Work one round of:
sc around the entire outer edge.
At each point:
3 sc in the tip
This prevents the point from curling.
Second Border
For a more decorative finish:
Round 2
sc, 2 sc in next st
Repeat where appropriate.
At the points:
3 sc in center tip stitch
This creates a slightly more pronounced edge.
Simple Baby-Friendly Border
If you want a minimalist design, use:
one round of single crochet
in white.
This creates the cleanest look.
Three Border Options
| Border | Style |
|---|---|
| Single SC | Minimal |
| White SC + SC | Classic |
| Shell edge | Decorative |
Simple Shell Border
Try:
5 dc in one stitch, skip 2, sl st in next
Repeat.
For a baby wrap, keep the shells relatively small so the edge doesn’t become overly heavy.
Color-Block Version
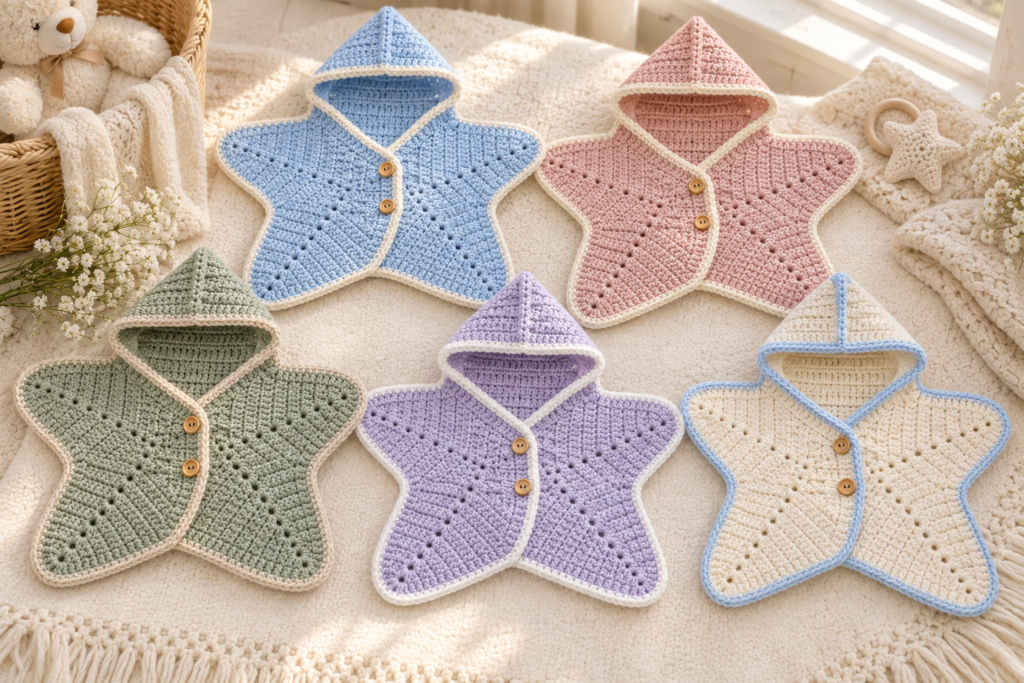
You don’t have to make the entire wrap blue.
Try:
Body: Baby blue
Border: Cream
Hood: Baby blue
Buttons: Natural wood
Or:
Body: Cream
Points: Baby blue
Border: White
Striped Version
For a striped wrap:
| Rows | Color |
|---|---|
| 1–4 | Baby blue |
| 5–8 | White |
| 9–12 | Baby blue |
| 13–16 | White |
| 17–20 | Baby blue |
Continue the same sequence.
For a newborn wrap, narrow stripes tend to look particularly delicate.
Size Adjustment Table
If you’re adapting the design to a different baby size, change the dimensions rather than simply adding random rounds.
| Size | Central Width | Approx. Overall Width |
|---|---|---|
| Newborn | 20 cm | 55–60 cm |
| 0–3 months | 22 cm | 60–65 cm |
| 3–6 months | 24 cm | 65–70 cm |
| 6–12 months | 27 cm | 70–75 cm |
| 12–18 months | 30 cm | 75–80 cm |
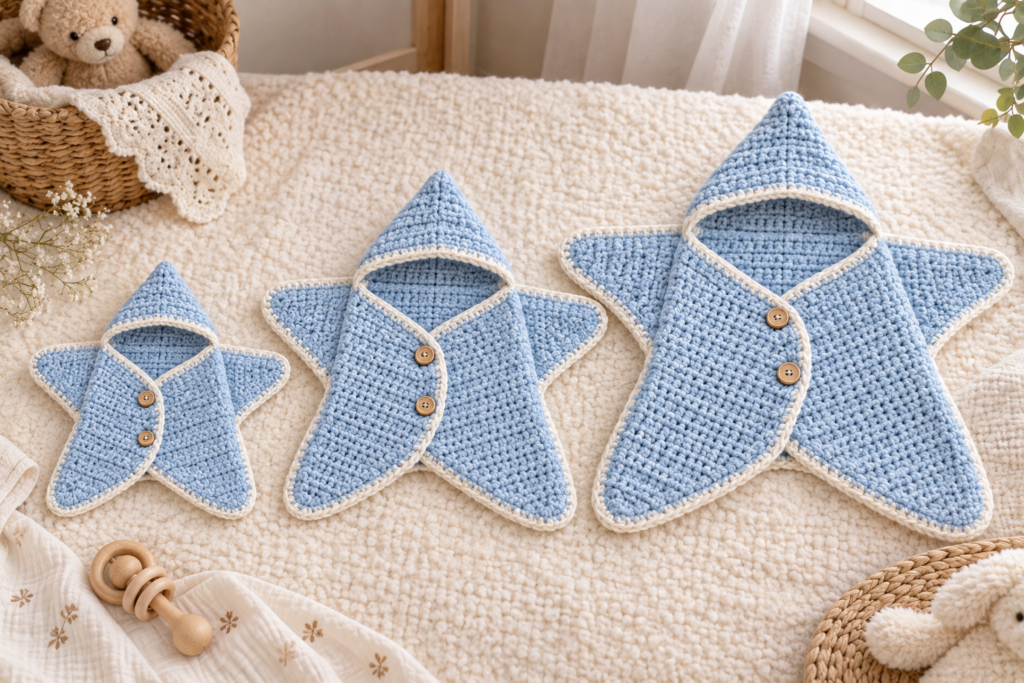
Measure the piece flat.
How to Make the Wrap Longer
If you want additional coverage:
Add rows to the lower star points.
For example:
+4 rows = slightly longer
+8 rows = noticeably longer
Keep the decreases consistent so the point maintains its shape.
How to Make It Wider
Add stitches to the central panel.
For every additional:
2 foundation chains
you add approximately two stitches to the width.
Keep the left and right sections symmetrical.
How to Make a Newborn Photo Prop
If you’re making this specifically for photography rather than everyday wear, you can make the wrap slightly larger.
However, never leave a baby unattended with crochet items, buttons, ties or decorative elements.
For photography:
- Use the wrap under adult supervision.
- Keep the baby’s face completely clear.
- Avoid covering the baby’s mouth or nose.
- Remove the wrap after the photograph.
- Never use long decorative cords around a baby’s neck.
How to Make the Wrap More Structured
If your finished piece looks too floppy:
- Check your gauge.
- Use a slightly smaller hook.
- Choose a firmer yarn.
- Block the finished piece.
- Add a second border.
Don’t use heavy interfacing or stiff materials for a baby wrap.
Blocking
Blocking can dramatically improve the star shape.
Wet Blocking
- Gently wash the finished wrap according to the yarn instructions.
- Remove excess water without wringing.
- Lay flat on a clean towel.
- Shape each star point.
- Pin the points gently.
- Allow to dry completely.
Don’t stretch aggressively.
The goal is to even the stitches, not dramatically enlarge the garment.
Troubleshooting
| Problem | Cause | Solution |
|---|---|---|
| Star points curl | Too little edging | Add border |
| Wrap looks uneven | Different tension | Check stitch counts |
| Hood collapses | Too soft or wide | Add a border |
| Hood pulls backward | Incorrect attachment | Recenter neckline |
| Front edges don’t match | Unequal rows | Count both sides |
| Wrap is too small | Tight gauge | Use larger hook |
| Wrap is too large | Loose gauge | Use smaller hook |
| Fabric feels stiff | Hook too small | Move up 0.5 mm |
| Holes appear | Hook too large | Move down 0.5 mm |
| Point looks too sharp | Too many decreases | Round final tip |
| Border waves | Too many stitches | Reduce increases |
| Border curls | Too few stitches | Add increases |
How to Keep the Star Points Symmetrical
This is one of the most important finishing details.
Before sewing the hood:
- Lay the wrap completely flat.
- Measure the left point.
- Measure the right point.
- Compare the lower points.
- Check the center.
- Adjust the blocking before attaching anything permanently.
Use stitch markers to identify the center of each point.
Softness and Drape
The finished wrap should bend easily.
If it feels like a stiff mat, your tension is probably too tight or your yarn is too thick.
A baby wrap should have enough structure to hold its shape while still draping naturally.
Styling the Baby Blue Wrap
The blue version in the reference works beautifully with neutral baby clothing.
Try:
Classic
Baby blue wrap + white onesie + cream socks
Winter
Baby blue wrap + white knit outfit + gray hat
Minimal
Baby blue wrap + cream romper
Soft Pastel
Baby blue wrap + dusty pink clothing
Natural
Baby blue wrap + beige outfit + wooden accessories
Baby Shower Gift Idea
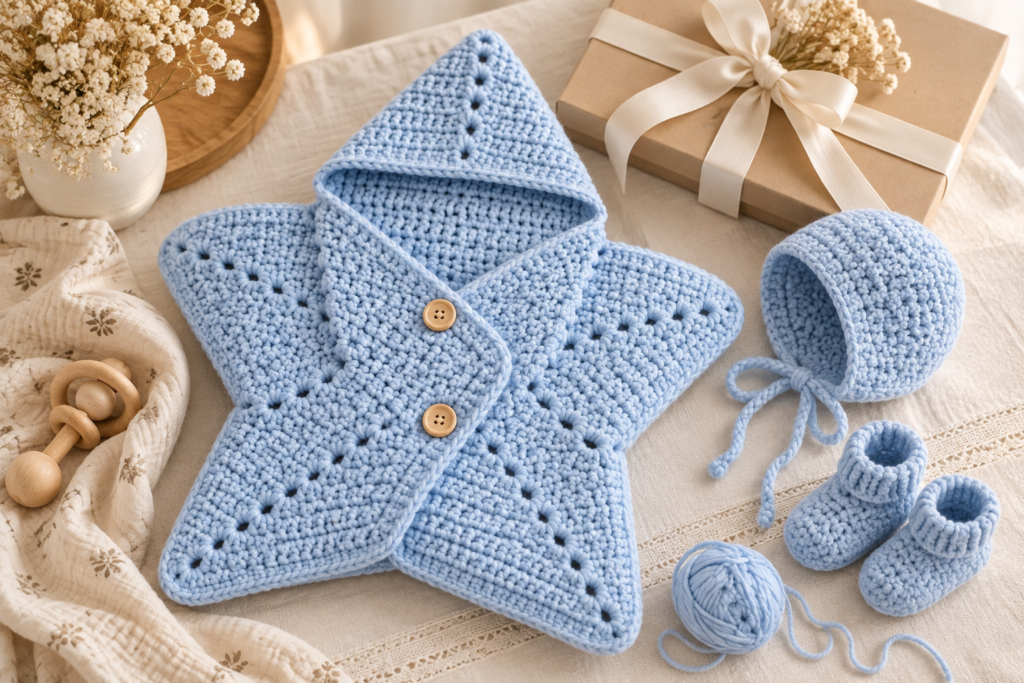
This project works especially well as a baby shower gift because it can be presented as a complete handmade set.
Create a basket containing:
- Crochet star wrap
- Matching baby hat
- Crochet baby socks
- Small handmade blanket
- Handmade card
Use a neutral basket and cream tissue paper.
Matching Crochet Accessories
You can build a complete collection around the same baby-blue yarn.
Ideas include:
- Baby bonnet
- Baby socks
- Baby mittens
- Baby blanket
- Baby booties
- Small comforter
- Baby cardigan
- Crochet star pillow
This is also a useful way to create multiple related articles on a crochet website.
Handmade Gift Set Color Palette
| Item | Main Color | Accent |
|---|---|---|
| Star wrap | Baby blue | Cream |
| Bonnet | Cream | Baby blue |
| Socks | Baby blue | White |
| Blanket | Cream | Baby blue |
| Booties | Baby blue | Natural |
| Bow | Cream | Blue |
Care Instructions
Always follow the yarn manufacturer’s washing instructions.
For most washable baby yarns:
- Wash gently.
- Avoid harsh detergents.
- Don’t bleach unless specifically permitted.
- Avoid aggressive wringing.
- Reshape while damp.
- Dry completely before storage.
Before giving the item to a baby, inspect:
- Buttons
- Seams
- Edges
- Yarn tails
- Closure loops
Storage
Fold the wrap loosely.
Don’t compress it under heavy items.
Store it:
- Clean
- Completely dry
- Away from moisture
- Away from direct sunlight
For long-term storage, breathable fabric storage is preferable to tightly sealed plastic when moisture could become trapped.
Safety Checklist
Before using the wrap, check:
- No loose yarn ends
- No detached stitches
- Buttons securely attached
- No long loose cords
- No sharp hardware
- Hood opening is unobstructed
- Baby’s face remains completely clear
- Wrap isn’t excessively tight
- Adult supervision is maintained
The wrap should be treated as a wearable blanket/wrap, not as an unattended sleep product.
How to Photograph Your Finished Wrap
This project is extremely Pinterest-friendly because of its unusual silhouette.
For your main article image:
Use:
- Soft natural light
- Cream bedding
- Wooden buttons
- Baby-blue yarn
- Neutral background
- Close-up stitch detail
You can photograph the wrap:
- Fully opened
- Folded
- With hood upright
- Close-up of the buttons
- Close-up of the crochet texture
- Flat-lay star shape
- Different color versions
For a website article, a flat-lay showing the complete star silhouette is particularly useful because readers can immediately understand how the construction works.
Flat-Lay Photography Setup
Place the wrap on:
cream knitted blanket + light wooden surface
Add:
- Crochet hook
- Small ball of blue yarn
- Wooden buttons
- Measuring tape
- Tiny neutral floral arrangement
Keep the props around the edges.
Don’t cover the star silhouette.
Selling Handmade Star Wraps
If you’re making these for a crochet business, calculate your actual production cost.
A simple formula is:
Materials + Labor + Packaging + Platform Fees + Overhead + Profit = Selling Price
Keep track of:
- Yarn
- Buttons
- Labels
- Packaging
- Time
- Shipping materials
- Platform fees
The star shape is a strong product differentiator because it looks different from a standard rectangular baby blanket.
Customization Ideas
Once you understand the construction, try:
1. Rainbow Star
Use five pastel colors for the points.
2. Cloud Star
Cream body + pale blue border.
3. Pink Star
Dusty pink + cream.
4. Woodland Star
Sage + beige + brown.
5. Winter Star
White + icy blue + silver-gray.
6. Sunset Star
Peach + blush + cream.
7. Neutral Star
Oatmeal + cream + taupe.
Beginner Version
If the full star shape feels complicated, simplify the project.
Make:
Central rectangle → triangular side points → simple hood → single crochet border
Skip:
- Decorative shell edging
- Color changes
- Complex closures
- Multiple borders
The result will still look beautiful.
Advanced Version
More experienced crocheters can add:
- Textured stitches
- Front-post stitches
- Ribbed cuffs
- Decorative hood edging
- Colorwork
- Appliqué stars
- Matching booties
- Matching bonnet
For a baby item, keep decorative elements secure and avoid anything that can easily detach.
Frequently Asked Questions
Is this crochet star wrap suitable for beginners?
The basic stitches are beginner-friendly, but shaping and assembly require some attention. If you’re new to crochet, practice increases and decreases before starting the full garment.
What yarn should I use?
A soft washable DK or light-worsted baby yarn is a good starting point.
What hook size should I use?
Start with a 4 mm hook for DK yarn and adjust according to your gauge.
How much yarn do I need?
A newborn version may require approximately 250–300 g, while larger versions can require 400 g or more.
Always purchase a little extra if you’re using a specific dye lot.
Can I make it without a hood?
Yes.
Simply omit the hood section and finish the upper edge with a clean border.
Can I make it larger?
Yes. Increase the central panel dimensions and extend the star points.
Can I make the star points sharper?
Yes.
Use more aggressive decreases toward the final rows.
For babies, however, slightly rounded points can be more practical.
Can I use cotton yarn?
Yes, provided the yarn is soft enough for your intended use. Cotton can create excellent stitch definition but may have less stretch and drape than some blends.
Can I add buttons?
Yes, but buttons need special attention on baby garments. They should be extremely securely attached and regularly checked. For very young babies, a soft closure or embroidered detail can be preferable.
Can I make this as a stroller wrap?
Yes. Increase the width and length to create additional coverage, but make sure the wrap cannot interfere with the baby’s face, breathing or stroller restraints.
Is this intended as a baby sleep blanket?
No. This tutorial is for a wearable wrap/blanket-style accessory. Follow safe-sleep guidance for babies and do not use the hood or wrap as an unattended sleep product.
Quick Pattern Reference
Central Panel
Foundation: ch 31
Rows: hdc across
Continue: until desired central dimensions are reached.
Star Points
Work triangular sections using:
Hdc across
then gradually:
Hdc2tog at both edges
until a point is formed.
Hood
Ch 32
Hdc across.
Decrease at both edges on successive shaping rows.
Continue until a pointed hood shape is created.
Fold and sew the back seam.
Border
One round:
sc evenly around
At points:
3 sc in tip
Optional second round:
sc around
Project Checklist
Before calling your Baby Blue Star Wrap finished:
- Correct size selected
- Gauge checked
- Central panel completed
- Five points shaped
- Hood constructed
- Hood securely attached
- Front edges finished
- Border completed
- Button/closure secured
- Loose yarn tails hidden
- Wrap blocked
- Measurements checked
- Seams inspected
- Baby-safety inspection completed
Final Thoughts
The Baby Blue Star Crochet Wrap is more than a traditional baby blanket. Its star-shaped silhouette gives it a distinctive handmade appearance while the hood adds an extra cozy element.
The best part of the design is how adaptable it is. Start with soft baby blue yarn for the classic version, then experiment with cream, sage, dusty pink, lavender or neutral shades. You can also make matching hats, socks, booties and blankets to create a complete handmade baby collection.
For a beginner, focus on getting the gauge, increases, decreases and symmetry right before worrying about decorative details. Once the basic structure is working, the hood, border and color combinations become opportunities to personalize the project.
And because the finished wrap has such a recognizable star silhouette, it makes an especially attractive baby-shower gift and Pinterest project: the shape immediately communicates what makes the design different, while the customizable colors allow you to create something genuinely personal.