Halloween nails do not have to take an hour, require advanced nail-art skills, or involve complicated tools.
If you love the spooky-season look but want something you can actually create on a busy evening, simple Halloween nail art is the answer. With a few classic colors—orange, black, white, red and nude—you can create surprisingly effective designs in just a few minutes.
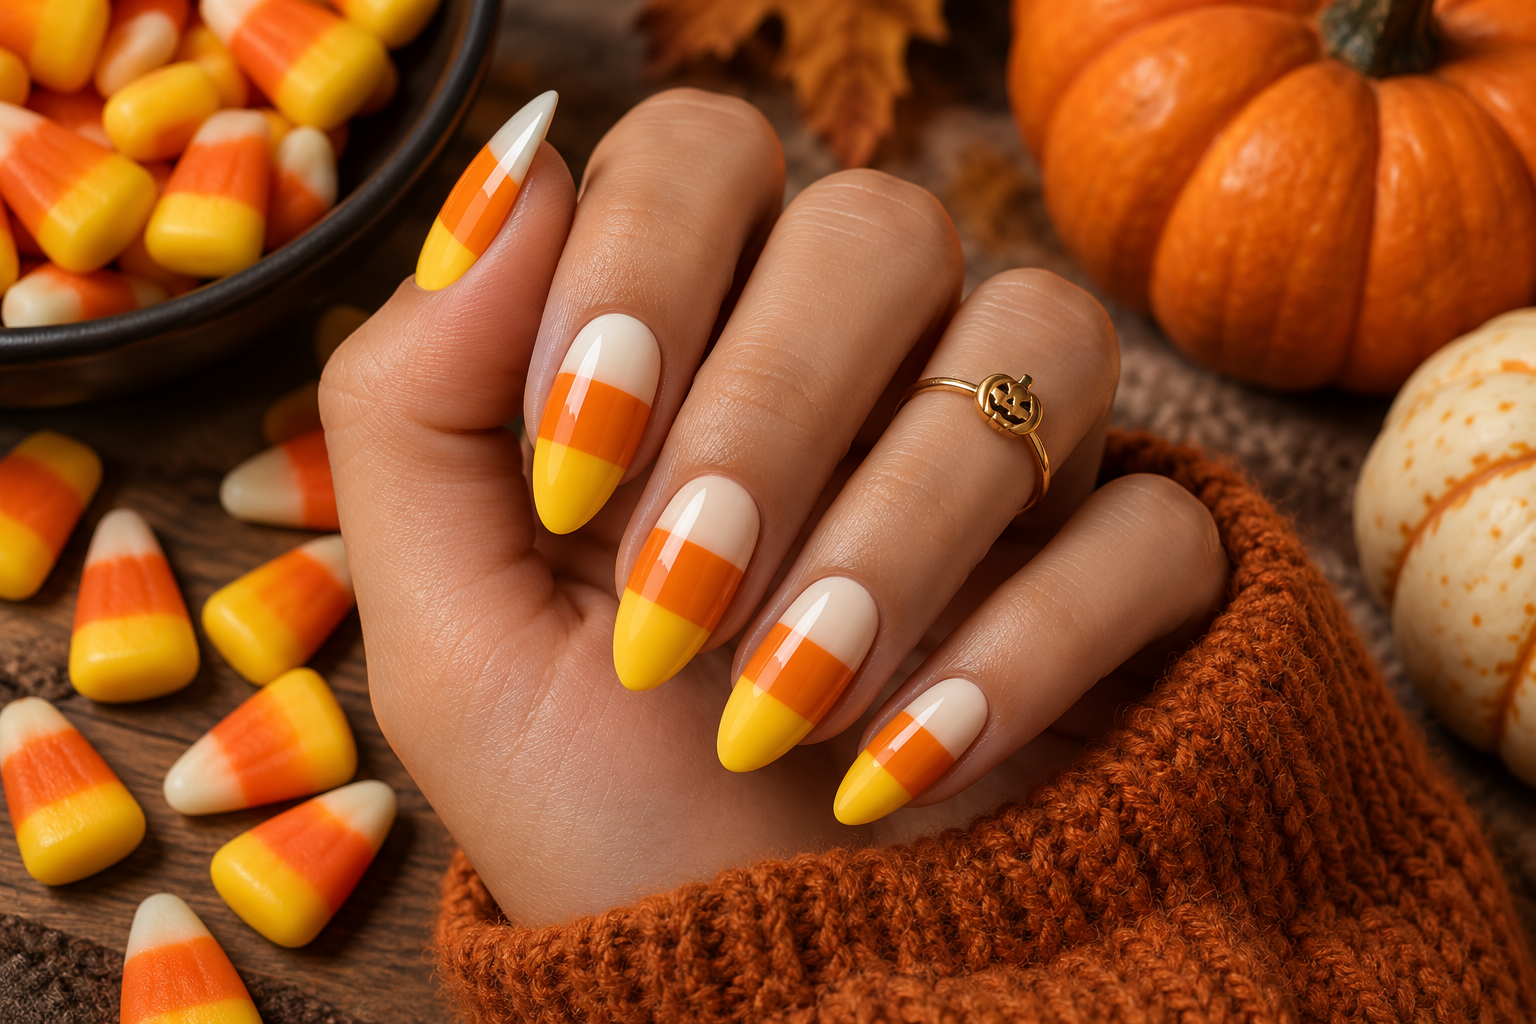
The inspiration for this article is a perfect example: a glossy candy-corn-inspired manicure using orange, yellow and white. The design looks festive because of the color contrast, but the technique itself can be adapted into a very simple manicure.
In this guide, you’ll find 25 quick Halloween nail ideas, beginner-friendly patterns, step-by-step tutorials, color combinations, shortcuts, nail-shape recommendations, troubleshooting tips and easy formulas you can reuse for different Halloween looks.
Table of Contents
- Why Quick Halloween Nails Work
- The Best Halloween Nail Colors
- Essential Tools
- 25 Quick Halloween Nail Designs
- Step-by-Step Candy Corn Nails
- Easy Halloween Nail-Art Patterns
- How to Make Halloween Nails in 5 Minutes
- Designs for Short Nails
- Designs for Long Nails
- Best Designs for Different Nail Shapes
- How to Make Simple Nail Art Look Professional
- Common Mistakes
- How to Make Your Manicure Last
- DIY Halloween Nail-Art Formulas
- Halloween Nail Color Combinations
- Quick Design Decision Table
- FAQ
- Final Thoughts
Why Quick Halloween Nails Work
Halloween nail art doesn’t need complicated illustrations to look festive.
In fact, some of the easiest designs rely on just three things:
- Strong color contrast
- Simple shapes
- Glossy or matte finishes
Think about the manicure in the inspiration image.
The nails use a recognizable Halloween palette and a simple three-color gradient/stripe concept. You don’t need to paint tiny pumpkins or detailed characters for the manicure to immediately feel seasonal.
The trick is choosing recognizable Halloween visual cues.
The easiest Halloween cues are:
Orange + black
Instantly recognizable as Halloween.
Black + white
Creates a gothic or ghostly effect.
Orange + yellow + white
Perfect for candy-corn-inspired nails.
Red + black
Creates a darker vampire-inspired look.
Purple + black
Gives a witchy aesthetic.
Green + black
Works beautifully for witchy, potion or spooky designs.
The Best Halloween Nail Colors
You don’t need a huge polish collection.
A small Halloween palette can create dozens of combinations.
| Color | Halloween Effect | Best With |
|---|---|---|
| Orange | Pumpkin, autumn, candy | Black, white, yellow |
| Black | Gothic, spooky, dramatic | Every Halloween shade |
| White | Ghosts, spiderwebs, candy corn | Black, orange, red |
| Yellow | Candy corn, moonlight | Orange, white, black |
| Red | Vampire, blood, gothic | Black, nude |
| Burgundy | Dark autumn | Black, gold |
| Purple | Witchy, mystical | Black, silver |
| Green | Potion, witchy | Black, purple |
| Nude | Elegant base | Black, red, orange |
| Silver | Moonlight, chrome | Black, purple |
| Gold | Glamorous Halloween | Black, burgundy |
The Three-Color Rule
For a fast manicure, try not to use too many colors.
A simple formula is:
1 base color + 1 main Halloween color + 1 accent
For example:
Nude + orange + black
or
Black + white + orange
This keeps the manicure cohesive and saves time.
Essential Tools for 5-Minute Halloween Nails
You don’t need professional nail-art equipment.
Basic tools
- Base coat
- Top coat
- Orange nail polish
- Black nail polish
- White nail polish
- Yellow nail polish
- Red nail polish
- Nude nail polish
- Thin nail-art brush
- Dotting tool
- Toothpick
- Small cleanup brush
- Nail-polish remover
- Cotton swabs
Optional tools
- Nail stickers
- Nail stamping plates
- Cosmetic sponge
- Fine glitter
- Metallic polish
- Matte top coat
A Toothpick Can Be Your Nail-Art Tool
If you don’t own a dotting tool, a toothpick can create surprisingly good details.
Use the pointed end for:
- Tiny spider legs
- Fine lines
- Small stars
- Spiderweb lines
Use the rounded end, if available, for:
- Dots
- Eyes
- Small bubbles
25 Quick Halloween Nail Designs
1. Classic Candy Corn Nails
This is the design shown in the inspiration image.
Use three colors:
Yellow → orange → white
The result resembles classic Halloween candy corn.
Best nail shapes
- Almond
- Coffin
- Stiletto
- Long square
Quick method
Paint the bottom portion yellow, the middle orange and the tip white.
You don’t have to make every section perfectly identical.
The glossy finish is what brings the design together.
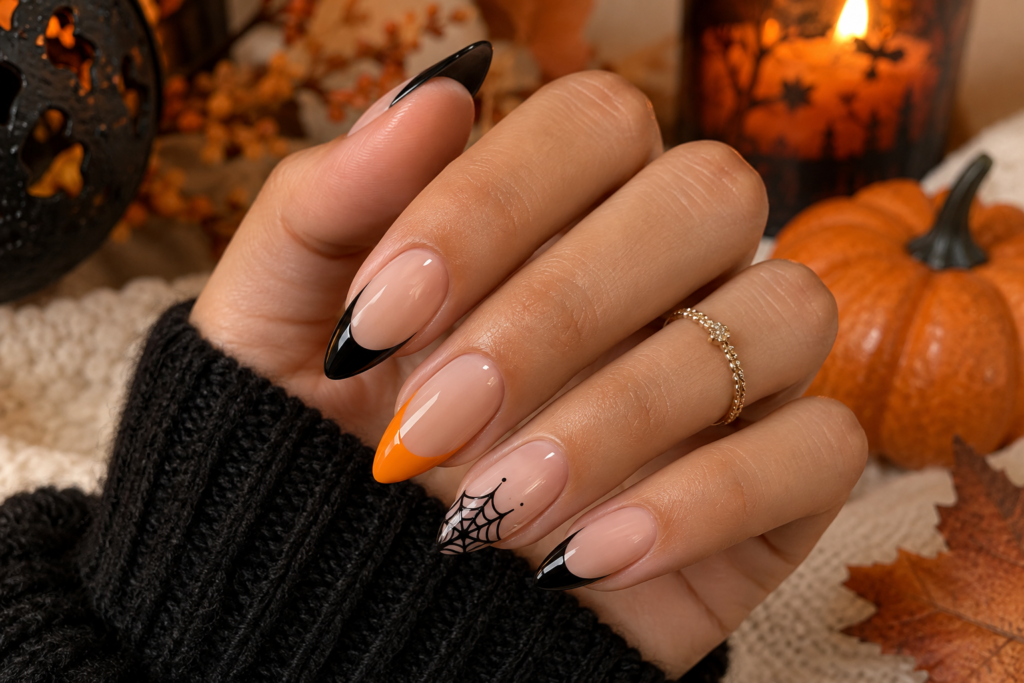
2. Black and Orange French Tips
Start with a nude or transparent base.
Paint:
- Black on one nail
- Orange on another
- Alternating French tips across the rest
For an even quicker version, use black on every tip and add a single orange accent nail.
3. Orange French Tips
This is one of the easiest Halloween manicures.
Use:
Nude base + orange French tip
Add one black accent nail if you want something more dramatic.
4. Black French Tips
Black French tips instantly create a gothic Halloween look.
They work particularly well with:
- Almond nails
- Coffin nails
- Long square nails
For short nails, keep the French line very thin.
5. Pumpkin Accent Nails
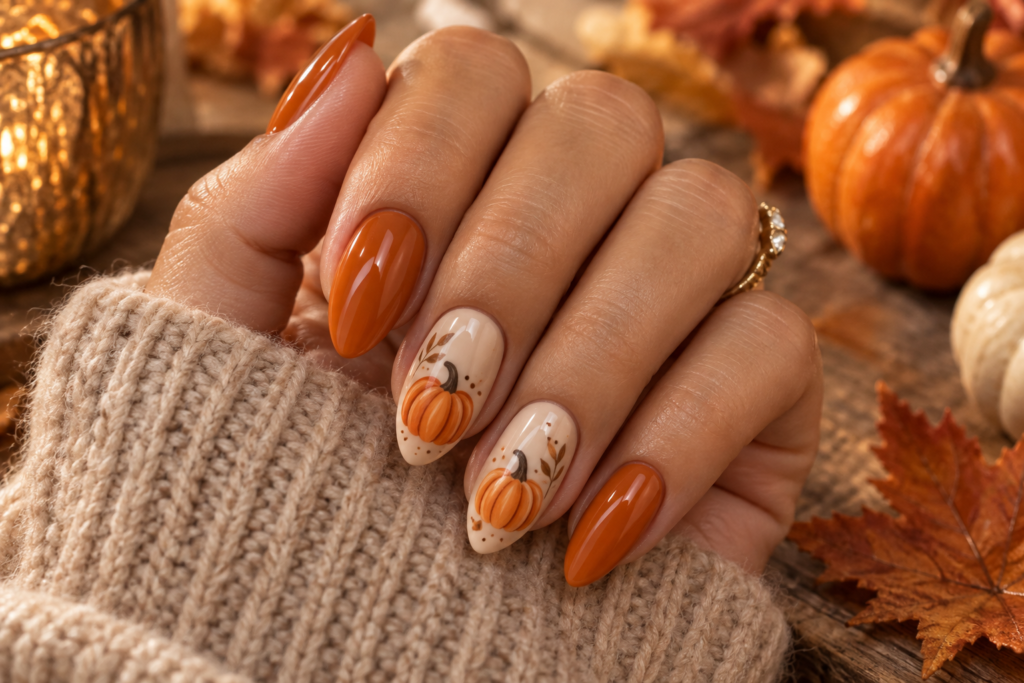
Paint most nails orange or nude.
Choose one or two accent nails for tiny pumpkins.
Simple pumpkin pattern
- Create a small orange oval.
- Add two short curved lines.
- Add a tiny green or black stem.
- Finish with top coat.
You don’t need to draw a detailed pumpkin face.
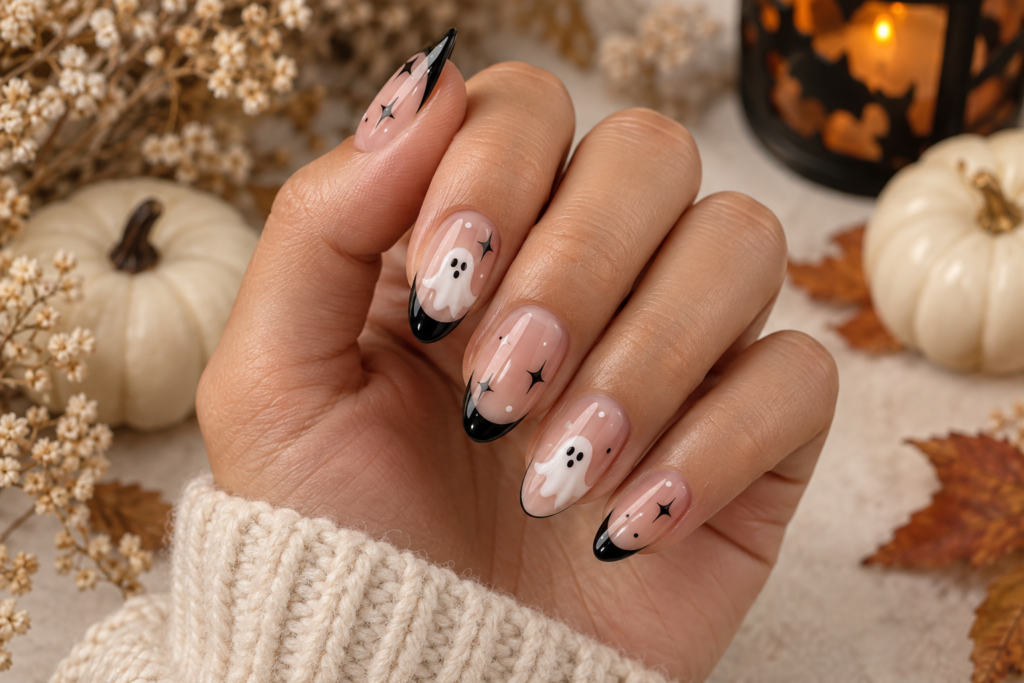
6. Ghost French Tips
Create white French tips over a nude base.
Then add two tiny black dots for eyes.
For a more recognizable ghost:
- Make the white tip slightly rounded.
- Add two black dots.
- Add a tiny black mouth.
7. Spiderweb Accent Nails
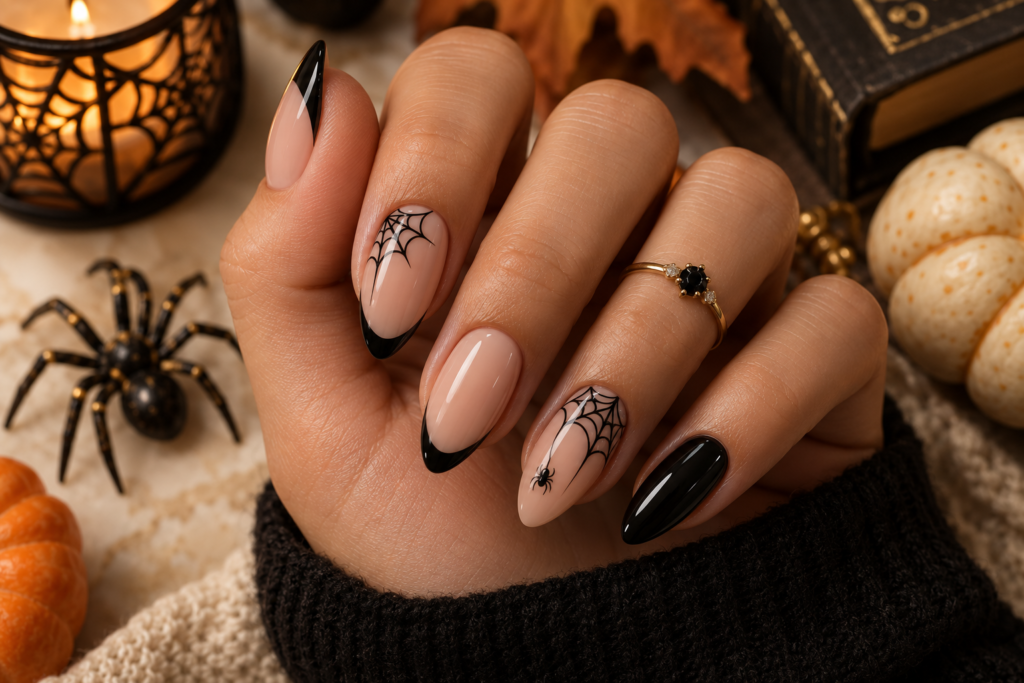
Paint your nails black or nude.
Choose one accent nail.
Draw:
- Three or four thin lines radiating from one corner.
- Connect them with curved lines.
- Finish with glossy top coat.
The trick is not making the web too symmetrical.
8. Black Cat Halloween Nails
Start with a nude base.
On one accent nail:
- Create two black triangular ears.
- Connect them with a small rounded head.
- Add tiny eyes.
Keep the rest of the nails simple.
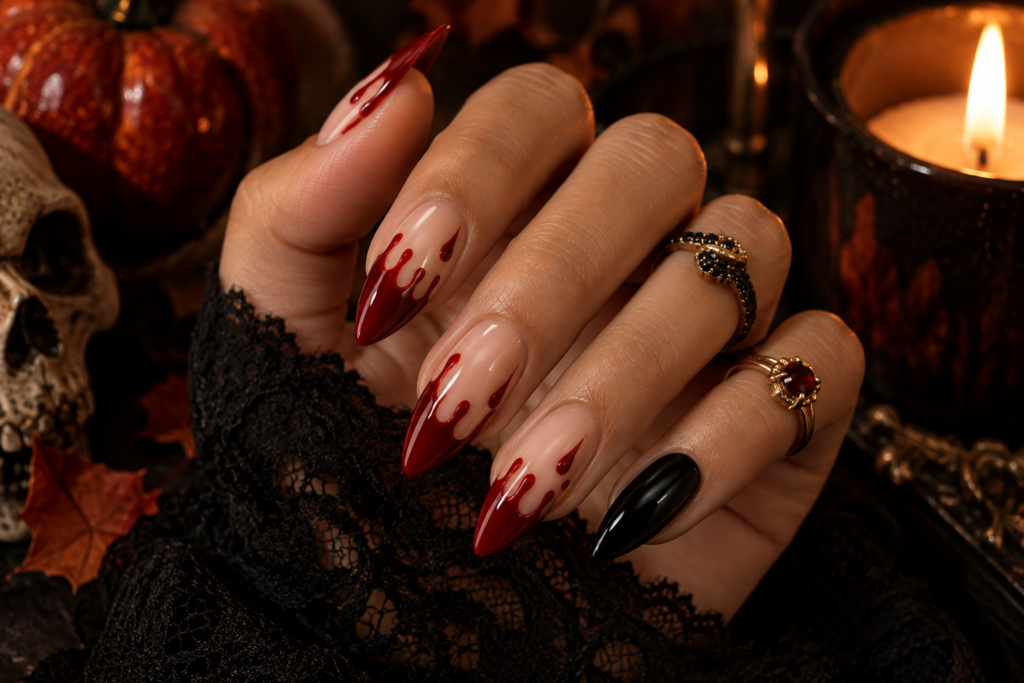
9. Blood-Drip French Tips
Use a nude base.
Paint the tips red.
Then add several uneven downward drips.
Quick pattern
Red tip → long drip → short drip → rounded drip
Uneven drips actually make the design look more natural.
10. Vampire Red Nails
For the fastest possible gothic manicure:
- Paint every nail deep red.
- Add one black accent nail.
- Finish with high-shine top coat.
This is ideal if you have less than five minutes.
11. Matte Black + Glossy Black
This is one of the easiest sophisticated Halloween looks.
Paint all nails black.
Apply matte top coat.
Then add glossy black details on two nails.
The contrast between the finishes creates the design without complicated artwork.
12. Orange and Black Checkerboard
Create alternating orange and black squares.
For a faster version, only make checkerboard patterns on two accent nails.
Keep the remaining nails solid orange or black.
13. Halloween Flames
Use a black base.
Add orange flames.
For a more dramatic version, add a thin yellow line inside the orange flames.
Simple flame structure
Base → curved orange flame → pointed tip → optional yellow inner flame
14. Purple Witchy Nails
Use lavender, deep purple and black.
A very quick combination:
- 3 lavender nails
- 1 black nail
- 1 purple glitter nail
Add one tiny crescent moon if you have extra time.
15. Crescent Moon Nails
Paint the nails nude, black or deep purple.
Use a dotting tool to create a small crescent moon.
Add two or three tiny stars.
This design is especially good for short nails.
16. Black and White Ghost Nails
Use white as the main color.
Add black ghost faces.
The design can be extremely simple:
Two black dots + one small mouth
That’s enough to create a recognizable ghost.
17. Spider Accent Nail
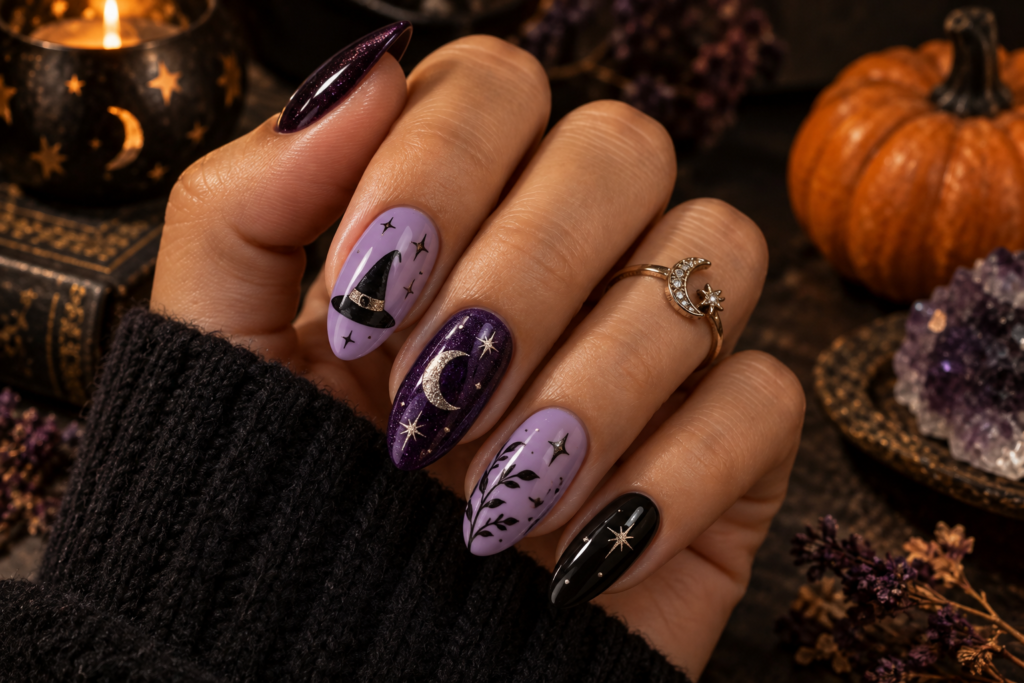
Paint most nails black.
On one nude accent nail:
- Add a black dot for the body.
- Add a smaller dot for the head.
- Draw four thin legs on each side.
You don’t need eight perfectly identical legs.
18. Bloody Red French Tips
Use a nude base.
Instead of a traditional smooth red French tip, create an irregular red edge with small downward drips.
This gives the manicure a spooky effect without covering the whole nail.
19. Black Cat-Eye Halloween Nails
Use a black or deep burgundy magnetic polish.
Apply the magnetic effect while the polish is wet.
The reflective finish creates an instantly dramatic Halloween look.
Add one tiny moon or star if desired.
20. Pumpkin Orange Chrome
Use a bright pumpkin-orange polish.
Add a chrome or shimmer top coat.
This gives you a Halloween manicure without drawing anything.
21. Nude + Tiny Halloween Symbols
This is ideal if you prefer subtle nails.
Use a nude base and add tiny:
- Bats
- Ghosts
- Stars
- Pumpkins
- Spiders
- Crescent moons
Place only one symbol on each nail.
22. Black Lace Halloween Nails
Use nude polish as your base.
Paint thin black lace-inspired lines over one or two nails.
The rest can remain nude or black.
This creates a more elegant gothic effect.
23. Orange Ombre Nails
Create a gradient from:
Yellow → orange → deep orange
A makeup sponge can make the transition easier.
Finish with a glossy top coat.
24. Black + Burgundy Halloween Nails
If orange feels too playful, switch to a darker palette.
Use:
Black + burgundy + nude
This is perfect for an elegant Halloween outfit.
25. The 5-Minute Ultimate Halloween Mix
If you want several Halloween elements without complicated artwork, use this formula:
Nail 1: Orange
Nail 2: Black French tip
Nail 3: White ghost
Nail 4: Orange French tip
Nail 5: Black
This gives you a complete Halloween manicure with very little detailed painting.
Step-by-Step: Candy Corn Halloween Nails
This is the design most closely inspired by the uploaded image.
What You’ll Need
- Yellow polish
- Orange polish
- White polish
- Base coat
- Glossy top coat
- Thin nail-art brush
- Cleanup brush
- Nail-polish remover
Step 1: Prepare Your Nails
Remove old polish.
Shape your nails and gently clean the surface.
Apply a thin base coat.
Allow it to dry enough that the next layer doesn’t drag.
Step 2: Apply Yellow
Paint the lower section of each nail yellow.
Don’t worry about creating a perfect horizontal line.
The next color will cover part of it.
Step 3: Add Orange
Apply orange through the middle of the nail.
Overlap slightly with the yellow.
The orange should become the dominant middle section.
Step 4: Add White
Paint the upper section white.
On almond or stiletto nails, the white naturally follows the pointed tip.
This is why the design looks especially good on elongated nail shapes.
Step 5: Clean the Edges
Dip a small cleanup brush into nail-polish remover.
Carefully clean around the cuticle and sidewalls.
Step 6: Add Gloss
Apply a generous but controlled glossy top coat.
The shine is important because candy corn has a polished, glossy appearance.
Quick Version
If you’re really short on time, skip perfect sections.
The key visual elements are simply:
Yellow base + orange center + white tip + glossy finish
5-Minute Spiderweb Tutorial
You’ll need:
- Base polish
- Black polish
- White polish
- Thin brush
Step 1
Apply your base color.
Step 2
Place three thin black lines from one corner of the nail.
Step 3
Connect the lines using curved strokes.
Step 4
Add a tiny black dot or spider at the center.
Step 5
Apply top coat.
Pattern
Think:
✦ radial lines + curved bridges
You don’t need to draw an entire web across the nail.
5-Minute Ghost Nail Tutorial
Step 1
Apply a nude or dark base.
Step 2
Create a small white rounded shape near the tip.
Step 3
Add two black dots.
Step 4
Add a tiny mouth.
Step 5
Finish with top coat.
Beginner Shortcut
Instead of painting a complete ghost, create a white French tip and add two black eyes.
It immediately reads as a ghost while taking much less time.
5-Minute Pumpkin Nail Tutorial
Step 1
Apply your base color.
Step 2
Create a small orange circle or oval.
Step 3
Add two or three curved black lines.
Step 4
Add a tiny stem.
Step 5
Finish with top coat.
For very small nails, skip the pumpkin face.
A simple orange pumpkin shape is easier to keep clean.
5-Minute Blood-Drip Tutorial
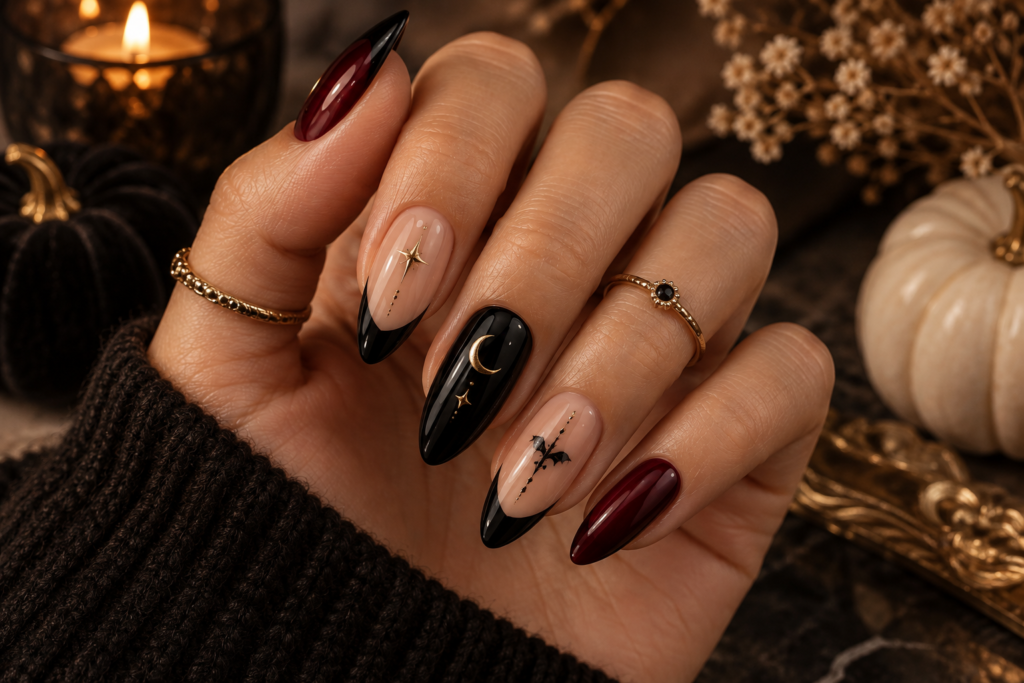
Step 1
Start with nude or white nails.
Step 2
Paint a red French tip.
Step 3
Create three uneven downward drips.
Step 4
Round the bottom of each drip.
Step 5
Add glossy top coat.
Important Trick
Don’t make every drip the same length.
Variation makes the design more convincing.
Easy Halloween Nail-Art Patterns
If you want to create your own designs, use these simple pattern formulas.
Pattern 1: French + Accent
4 French nails + 1 detailed accent
Best for:
- Ghosts
- Pumpkins
- Spiderwebs
- Bats
Pattern 2: Alternating Colors
Orange → black → orange → black → orange
Fast and extremely effective.
Pattern 3: One Symbol Per Nail
Moon → star → ghost → pumpkin → spider
Best for short nail-art sessions.
Pattern 4: Three-Color Gradient
Yellow → orange → white
Perfect for candy-corn nails.
Pattern 5: Dark Base + Metallic Accent
Black + gold
or
Black + silver
Perfect for a more sophisticated Halloween look.
How to Make Halloween Nails in 5 Minutes
If you’re genuinely working against the clock, don’t attempt detailed nail art.
Use this process.
Minute 1: Base
Apply a quick-drying base color.
Minute 2: Main Design
Add French tips, color blocks or a second polish.
Minute 3: Accent
Choose one nail for a tiny symbol.
Minute 4: Cleanup
Clean the edges.
Minute 5: Top Coat
Apply glossy or matte top coat.
The goal isn’t perfection.
The goal is high visual impact with minimal complexity.
Best Halloween Designs for Short Nails
Short nails can look fantastic with Halloween designs.
Try:
- Black French tips
- Orange French tips
- Tiny ghosts
- Mini pumpkins
- Black and orange dots
- Crescent moons
- Tiny spiders
- Burgundy polish
- Nude + black symbols
- Chocolate-brown Halloween nails
Avoid extremely detailed illustrations because the small canvas can make them look crowded.
Best Halloween Designs for Long Nails
Long nails provide more room for:
- Candy-corn gradients
- Flames
- Spiderwebs
- Blood drips
- Gothic French tips
- Pumpkins
- Ghosts
- Cat-eye effects
- Chrome designs
Almond and stiletto shapes are particularly useful when creating designs that visually follow the nail’s length.
Best Designs by Nail Shape
| Nail Shape | Halloween Designs |
|---|---|
| Almond | Candy corn, French tips, flames |
| Stiletto | Blood drips, flames, gothic designs |
| Coffin | Checkerboard, ghosts, pumpkins |
| Square | French tips, spiderwebs, color blocks |
| Short Round | Tiny ghosts, moons, dots |
| Short Squoval | Pumpkin accents, black French tips |
| Long Square | Graphic patterns, spiderwebs |
| Oval | Minimal Halloween designs |
How to Make Simple Nail Art Look Professional
Keep the Cuticle Area Clean
Even a simple manicure looks significantly better when polish doesn’t flood the cuticle.
Use Thin Layers
Thick polish takes longer to dry and can create dents.
Let Layers Set
If you immediately add another thick layer, the underlying polish can move.
Use a Good Top Coat
A glossy top coat can make basic color-blocking look much more polished.
Don’t Overdecorate
One beautiful accent nail can look better than five crowded designs.
The Accent Nail Formula
One of the easiest ways to save time is to use an accent nail.
For example:
Option A
4 orange nails + 1 ghost
Option B
4 nude nails + 1 spiderweb
Option C
4 black nails + 1 pumpkin
Option D
3 black + 2 orange
This gives you a Halloween look without requiring five detailed designs.
Halloween Nail Color Combinations
Classic Halloween
Orange + Black + White
Candy Corn
Yellow + Orange + White
Vampire
Black + Blood Red + Nude
Witchy
Purple + Black + Silver
Gothic
Black + Burgundy + Nude
Pumpkin
Orange + Green + Black
Ghostly
White + Black + Silver
Elegant Halloween
Burgundy + Black + Gold
Dark Autumn
Chocolate Brown + Black + Cream
DIY Halloween Nail-Art Decision Table
| If You Want… | Try… | Time |
|---|---|---|
| Fastest manicure | Solid orange + black accent | 3–5 min |
| Cute | Ghost accents | 5 min |
| Elegant | Burgundy + black | 3–5 min |
| Spooky | Blood-drip tips | 5 min |
| Classic Halloween | Orange + black French | 5 min |
| Playful | Candy corn | 5–10 min |
| Gothic | Matte black + glossy details | 5 min |
| Witchy | Purple + black + moon | 5–10 min |
| Glamorous | Black + gold | 5 min |
| Minimalist | Nude + tiny symbols | 5 min |
Times assume basic preparation is already complete and may vary depending on polish formula, drying time and experience.
How to Choose the Right Design
Ask yourself three questions.
1. How much time do I have?
Under 5 minutes:
Use color combinations or French tips.
5–10 minutes:
Add one or two simple symbols.
10–20 minutes:
Try spiderwebs, pumpkins or multiple accent nails.
2. Do I want cute or sophisticated?
For cute:
- Ghosts
- Pumpkins
- Candy corn
- Bats
For sophisticated:
- Burgundy
- Black French tips
- Matte finishes
- Gold accents
- Minimal symbols
3. Do I want a Halloween manicure or an autumn manicure?
Halloween-specific:
Orange + black + ghosts + pumpkins
More wearable:
Burgundy + black + nude
The second option can work throughout the fall season rather than only around October 31.
How to Make Your Halloween Manicure Last
A few simple habits can help protect your manicure.
Before painting
Clean the nail surface so it is free of oil and residue.
During application
Use thin coats.
After painting
Allow sufficient drying time before doing activities that can dent the polish.
During the week
Wear gloves when doing tasks involving prolonged exposure to water or cleaning products.
Avoid using your nails as tools.
If a nail chips, repair it rather than repeatedly peeling the polish away.
Common Halloween Nail Mistakes
Making Every Nail Too Complicated
You don’t need five completely different designs.
Using Too Many Colors
Three or four coordinated colors are usually enough.
Applying Thick Layers
They take longer to dry and can become uneven.
Making Tiny Details Too Small
If a symbol is too tiny, it may become visually unclear.
Skipping Cleanup
Small imperfections around the cuticle can make an otherwise beautiful manicure look unfinished.
Forgetting the Top Coat
The top coat can dramatically improve the finish.
The 5-Minute Halloween Nail Formula
When you’re in a hurry, use this formula:
Step 1
Choose one base color.
Step 2
Choose one Halloween accent color.
Step 3
Choose one symbol.
Step 4
Put the symbol on one or two nails only.
Step 5
Finish everything with the same top coat.
For example:
Nude + black + spiderweb
or
Orange + white + candy corn
or
Black + red + blood drip
This formula gives you countless combinations without requiring a completely new technique each time.
10 Ultra-Fast Halloween Manicure Combinations
1. Pumpkin Classic
Orange + black
2. Candy Corn
Yellow + orange + white
3. Vampire
Burgundy + black
4. Ghost
White + black
5. Witch
Purple + black
6. Pumpkin Patch
Orange + green + nude
7. Gothic
Black + burgundy + gold
8. Spiderweb
Black + white
9. Blood Drip
Nude + red
10. Midnight Halloween
Black + silver
Halloween Nails for Work
If you want Halloween nails that remain office-friendly, avoid extremely elaborate designs.
Try:
- Nude + tiny black bats
- Black French tips
- Burgundy nails
- Chocolate brown + orange
- Nude + miniature pumpkin
- Cream + tiny spiderweb
- Black + gold accent
- Deep red glossy nails
These designs give you a seasonal detail without making the manicure feel like a costume.
Halloween Nails for a Party
For a Halloween party, you can be more dramatic.
Try:
- Stiletto blood-drip nails
- Chrome orange
- Black flames
- Gothic French tips
- Red chrome
- Spiderweb nails
- Black and orange checkerboard
- Purple cat-eye
- Ghost nail art
How to Adapt the Inspiration Image
The candy-corn manicure in the inspiration image works because the design is extremely recognizable.
You can create several variations from the same idea.
Classic
Yellow → orange → white
Reverse Candy Corn
White → orange → yellow
Dark Candy Corn
Cream → orange → black
Glam Candy Corn
Yellow → orange → white + gold shimmer
Gothic Candy Corn
Cream → burnt orange → black
Soft Candy Corn
Butter yellow → peach orange → cream
This gives you multiple looks from one simple technique.
Quick Pattern Cheat Sheet
Candy Corn
Yellow | Orange | White
French Tip
Nude | Halloween-colored tip
Blood Drip
Nude | Red uneven drips
Ghost
White rounded shape | Black eyes
Spider
Black dot | 8 tiny legs
Pumpkin
Orange oval | Black details
Spiderweb
Radial lines | Curved connectors
Bat
Black center | Two pointed wings
Moon
Crescent | Tiny stars
Flames
Orange curves | Black base
Frequently Asked Questions
Can Halloween nails really be done in five minutes?
Simple designs can be completed quickly, particularly color-blocked designs, French tips and single-accent manicures. Detailed artwork may require considerably longer, especially when drying time is included.
What is the easiest Halloween nail design?
A solid Halloween color with one simple accent nail is among the easiest options. Orange nails with one black accent, black French tips or a simple candy-corn pattern are good beginner choices.
What colors are best for Halloween nails?
Orange, black, white, red, yellow, purple, burgundy and green are versatile Halloween colors. You can combine them depending on whether you want a cute, gothic, elegant or traditional look.
How do I make candy-corn nails?
Use yellow at the base, orange through the middle and white toward the tips. Finish with a glossy top coat for a candy-like appearance.
Can I do Halloween nail art on short nails?
Absolutely. Tiny ghosts, moons, spiders, French tips, dots and simple pumpkins work particularly well on short nails.
What Halloween nails look elegant?
Black French tips, burgundy nails, nude designs with tiny symbols, black-and-gold combinations and minimalist spiderwebs can create a more sophisticated Halloween manicure.
How can I make Halloween nail art faster?
Use an accent-nail strategy. Keep three or four nails simple and put the detailed design on only one or two nails.
Do I need a nail-art brush?
No. A toothpick, dotting tool or very small brush can work for many beginner designs.
How can I stop nail polish from looking messy?
Use thin layers, avoid flooding the cuticles and clean the edges with a small brush dipped in nail-polish remover before applying your final top coat.
Final Thoughts
Halloween nail art doesn’t need to be complicated to look impressive.
The candy-corn manicure from the inspiration image demonstrates exactly why simple designs can work so well: the color combination is instantly recognizable, the pattern is easy to understand and the glossy finish gives the manicure a polished appearance.
If you’re short on time, start with the simplest formula:
Choose 2–3 Halloween colors → create one simple pattern → add one accent → finish with glossy top coat.
Whether you choose candy-corn nails, black French tips, tiny ghosts, spiderwebs, pumpkins, blood-drip tips or an elegant burgundy-and-black manicure, the best design is one that matches the amount of time and detail you’re realistically willing to spend.
For a genuinely 5-minute Halloween manicure, keep the artwork simple and let color, contrast and finish do most of the work.