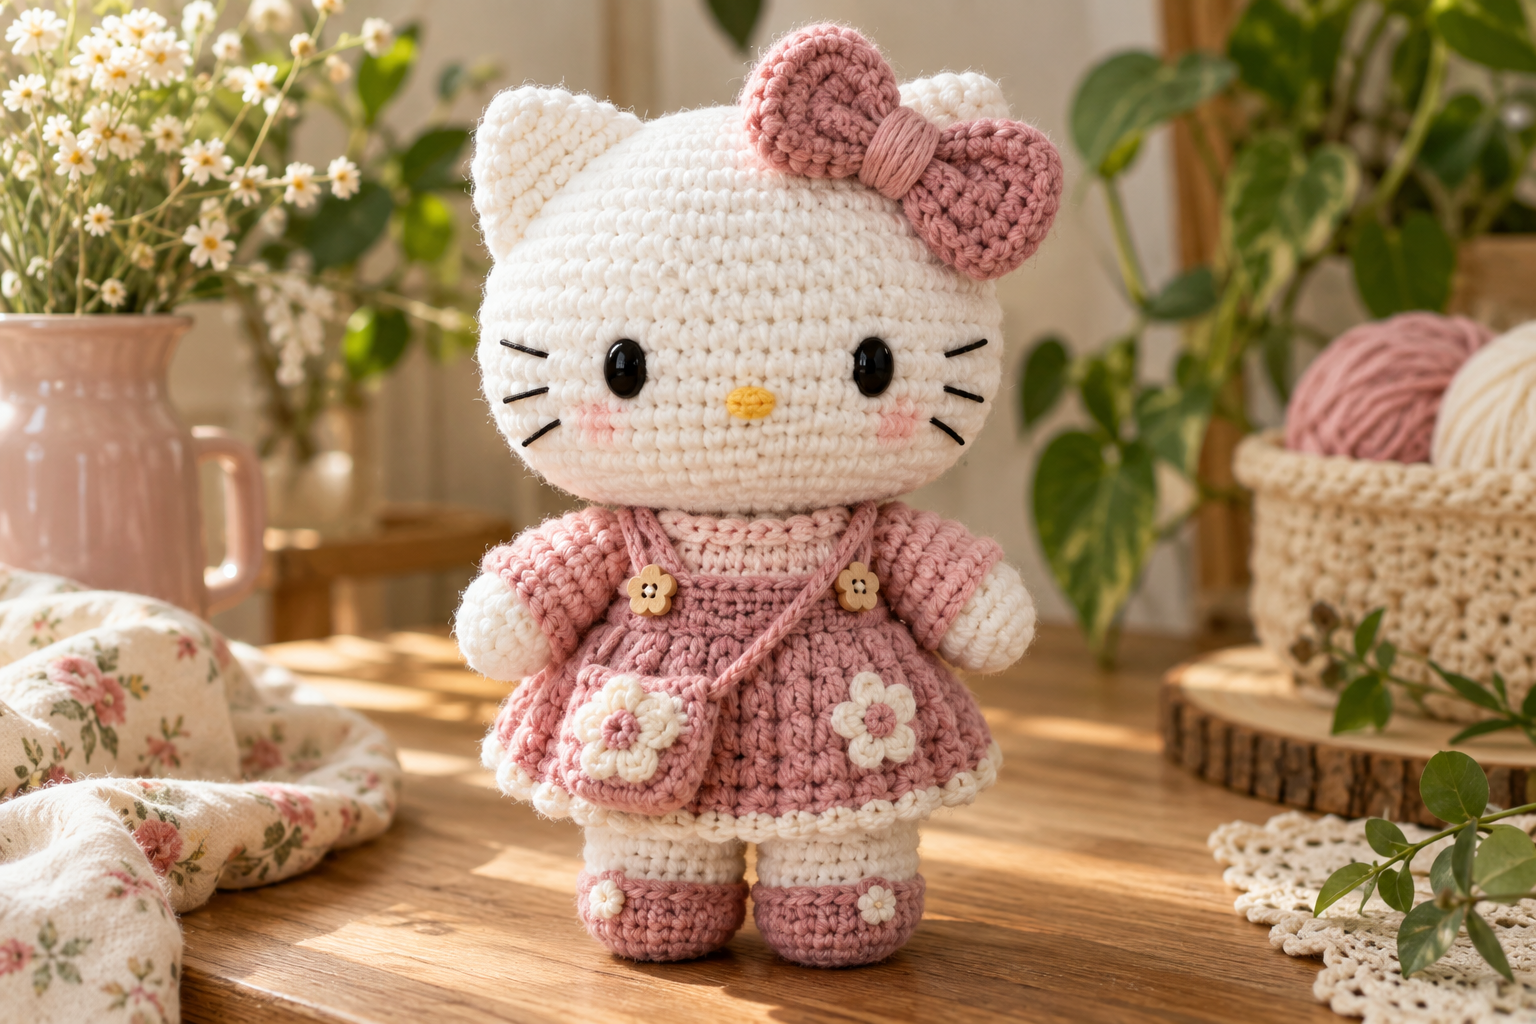
If you love cute amigurumi, this little crochet kitty is a fun project to add to your handmade collection. The reference design features a soft white cat with a pink outfit, a large bow, rounded ears and an adorable kawaii-inspired face.
For this tutorial, the pattern below is written as an original cute cat amigurumi design inspired by the overall look of the reference, rather than reproducing a character-specific commercial pattern. You can customize the colors, clothing, bow and facial details to create your own unique kitty.
The finished cat makes a lovely handmade decoration, gift, shelf companion or crochet-shop item.
What You’ll Learn
This tutorial includes:
- Complete materials list
- Yarn and hook recommendations
- Crochet abbreviations
- Gauge and finished-size information
- Head pattern
- Body pattern
- Ear pattern
- Arm pattern
- Leg pattern
- Tail pattern
- Bow pattern
- Clothing/body-color changes
- Face embroidery
- Assembly instructions
- Shaping techniques
- Beginner-friendly alternatives
- Color combinations
- Size adjustments
- Safety information
- Troubleshooting
- Care instructions
- Gift ideas
- Selling considerations
- Photography tips
- Frequently asked questions
Finished Crochet Kitty
With the recommended yarn and hook, the finished kitty should measure approximately 18–22 cm tall, depending on your tension and how firmly you stuff the pieces.
| Feature | Approximate Size |
|---|---|
| Finished height | 18–22 cm |
| Head width | 9–11 cm |
| Body width | 8–10 cm |
| Ear height | 3–4 cm |
| Bow width | 6–8 cm |
| Recommended hook | 3.5 mm |
| Recommended yarn | DK/worsted |
| Skill level | Beginner–intermediate |
Because amigurumi tension varies considerably, use the measurements as a guide rather than an absolute requirement.
Materials You’ll Need
| Material | Suggested Amount | Purpose |
|---|---|---|
| White yarn | 80–100 g | Head, body, ears, limbs |
| Pink yarn | 30–40 g | Outfit and bow |
| Black yarn | Small amount | Face |
| Yellow yarn | Small amount | Nose |
| Crochet hook | 3.5 mm | Main project |
| Tapestry needle | 1 | Sewing |
| Polyester stuffing | 50–80 g | Filling |
| Stitch marker | 1 | Rounds |
| Scissors | 1 | Cutting yarn |
| Embroidery needle | 1 | Facial details |
Optional:
- Stitch counter
- Pins
- Row counter
- Small amount of green yarn for an alternative outfit
- Pink felt for optional inner ears
Choosing the Yarn
A smooth yarn is ideal for amigurumi because it makes the stitches easy to see.
Good choices include:
- Cotton
- Cotton-acrylic blend
- Smooth acrylic
- DK yarn
- Worsted-weight yarn
Cotton gives a particularly crisp appearance.
Acrylic is often softer and more economical.
Recommended Color Palette
The reference uses white and pink, but you can create many variations.
| Cat | Outfit | Bow | Nose |
|---|---|---|---|
| White | Pink | Pink | Yellow |
| White | Red | Red | Yellow |
| Cream | Dusty pink | Rose | Brown |
| Gray | Lavender | Purple | Pink |
| Beige | Sage | Cream | Brown |
| White | Mint | Pink | Yellow |
| Black | Pink | Pink | Yellow |
Crochet Abbreviations
This tutorial uses US crochet terminology.
| Abbreviation | Meaning |
|---|---|
| MR | Magic ring |
| ch | Chain |
| sc | Single crochet |
| hdc | Half double crochet |
| dc | Double crochet |
| sl st | Slip stitch |
| inc | Increase |
| dec | Decrease |
| BLO | Back loop only |
| FLO | Front loop only |
| st | Stitch |
| sts | Stitches |
| FO | Fasten off |
For amigurumi, use invisible decreases whenever possible. They produce a much cleaner finish.
Important Amigurumi Tips Before You Begin
Work Tightly
Amigurumi should generally be crocheted more tightly than blankets or scarves.
You don’t want large gaps between stitches because stuffing can show through.
If you can see stuffing through your stitches, try a smaller hook.
Use a Stitch Marker
Place a marker in the first stitch of each round.
Because amigurumi is worked continuously, it can be difficult to identify the beginning of each round without one.
Stuff Gradually
Don’t wait until the final round to add all the stuffing.
Instead:
- Crochet several rounds.
- Add a small amount of stuffing.
- Continue crocheting.
- Add more stuffing.
- Shape the piece with your fingers.
This gives you much better control over the shape.
Pattern 1: Crochet Kitty Head
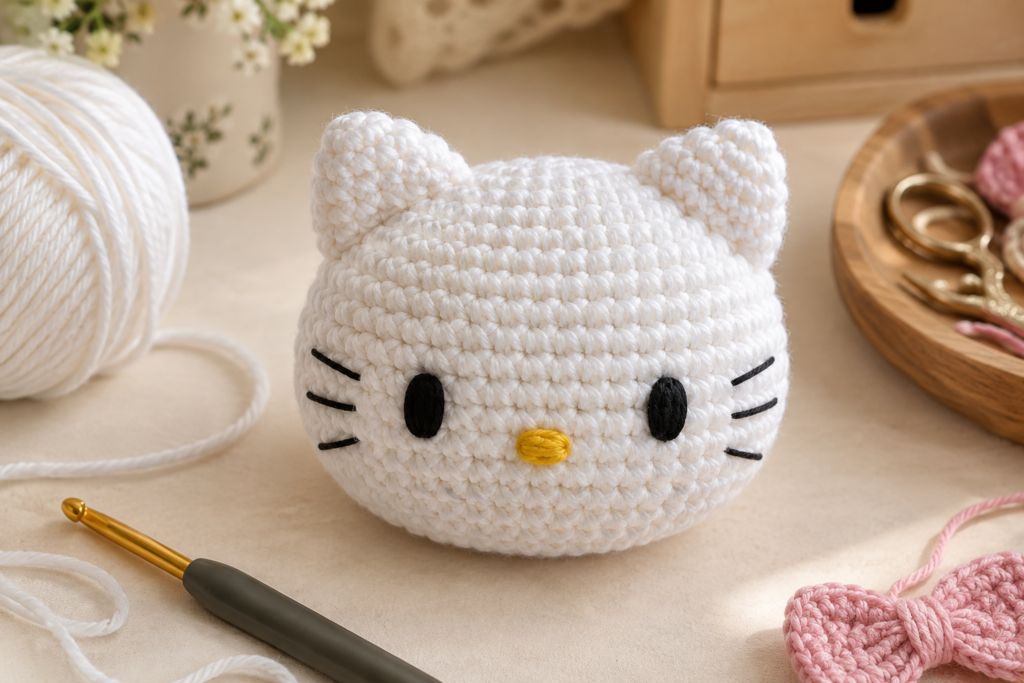
The head is worked from the top down in continuous rounds.
Use white yarn.
Round 1
Make a magic ring.
6 sc into MR
Total: 6 sts
Round 2
inc around
Total: 12 sts
Round 3
(sc, inc) × 6
Total: 18 sts
Round 4
(2 sc, inc) × 6
Total: 24 sts
Round 5
(3 sc, inc) × 6
Total: 30 sts
Round 6
(4 sc, inc) × 6
Total: 36 sts
Round 7
(5 sc, inc) × 6
Total: 42 sts
Round 8
(6 sc, inc) × 6
Total: 48 sts
Rounds 9–14
sc around
Total: 48 sts
The head should now begin looking rounded.
Round 15
(6 sc, dec) × 6
Total: 42 sts
Round 16
(5 sc, dec) × 6
Total: 36 sts
Round 17
(4 sc, dec) × 6
Total: 30 sts
Begin adding stuffing.
Round 18
(3 sc, dec) × 6
Total: 24 sts
Add more stuffing.
Round 19
(2 sc, dec) × 6
Total: 18 sts
Round 20
(sc, dec) × 6
Total: 12 sts
Add the final stuffing and shape the head.
Round 21
dec × 6
Total: 6 sts
Fasten off.
Leave a long tail.
Pull the opening closed and weave the tail through the remaining stitches.
Shaping the Head
Before completely closing the head, check its shape.
You want:
- Rounded cheeks
- A slightly wider lower face
- Smooth sides
- Firm but soft stuffing
Don’t overstuff the head.
Excessive stuffing can stretch the stitches and make the face look distorted.
Pattern 2: Crochet Kitty Body
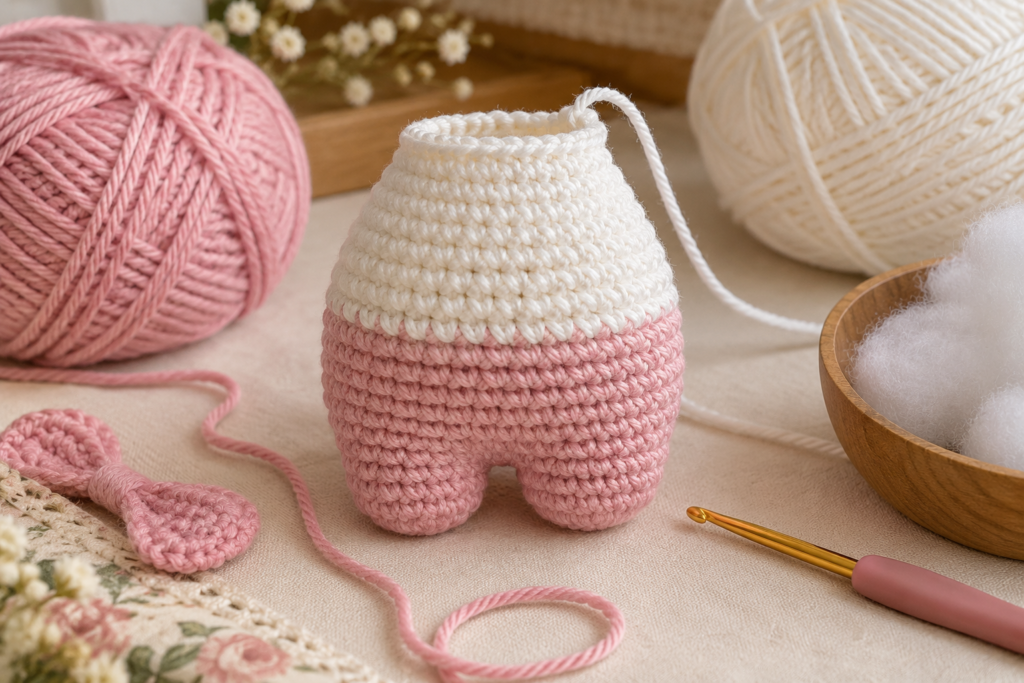
Use white yarn for the upper body and pink yarn for the outfit.
Start with white yarn.
Round 1
MR, 6 sc
6 sts
Round 2
inc around
12 sts
Round 3
(sc, inc) × 6
18 sts
Round 4
(2 sc, inc) × 6
24 sts
Round 5
(3 sc, inc) × 6
30 sts
Round 6
(4 sc, inc) × 6
36 sts
Rounds 7–9
sc around
36 sts
Now change to pink yarn.
Creating the Pink Outfit
Rounds 10–15
sc around
36 sts
This creates the main pink torso.
For a slightly longer outfit, add:
Rounds 16–17
sc around
36 sts
Body Shaping
Round 18
(4 sc, dec) × 6
30 sts
Round 19
(3 sc, dec) × 6
24 sts
Begin stuffing.
Round 20
(2 sc, dec) × 6
18 sts
Round 21
(sc, dec) × 6
12 sts
Round 22
dec × 6
6 sts
Fasten off and close.
Creating a Sweater-Like Collar
For an extra detail around the neckline, attach pink yarn to the upper edge of the body.
Work:
sl st around
or:
sc around
for one round.
For a more decorative collar:
(sl st, ch 2, skip 1 st)
Repeat around.
This creates a delicate decorative edge.
Pattern 3: Crochet Kitty Ears
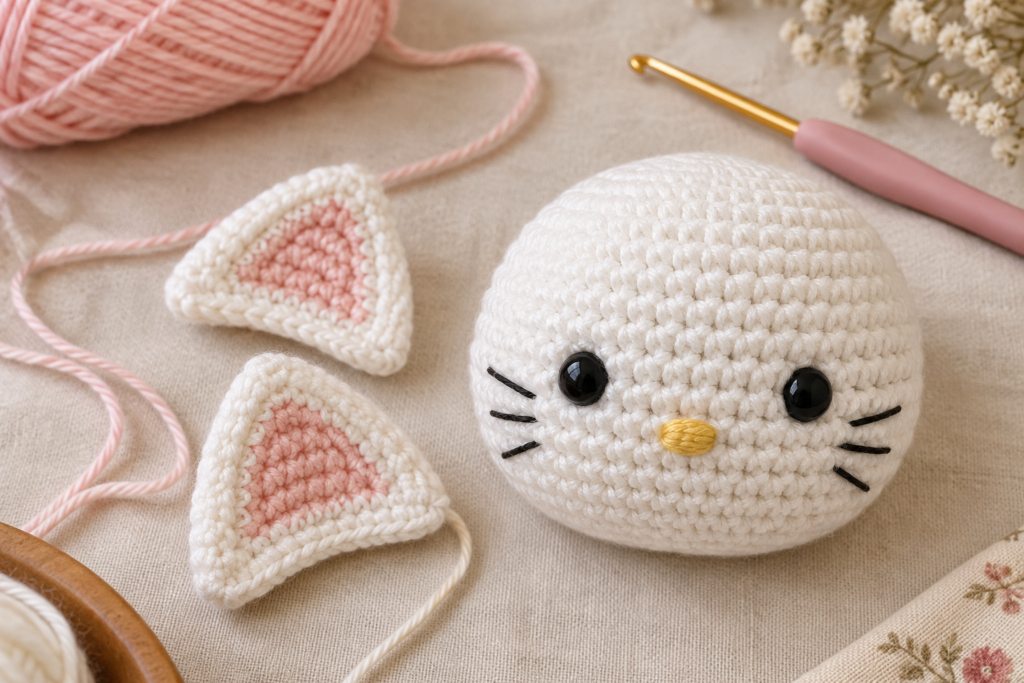
Make two.
Use white yarn.
The ears are crocheted as small flattened shapes rather than stuffed heavily.
Round 1
MR, 6 sc
6 sts
Round 2
(sc, inc) × 3
9 sts
Round 3
(2 sc, inc) × 3
12 sts
Round 4
sc around
12 sts
Round 5
(3 sc, inc) × 3
15 sts
Rounds 6–7
sc around
15 sts
Fasten off.
Leave a sewing tail.
Fold the piece gently into a triangular ear shape.
Don’t stuff heavily.
Optional Inner Ear
For a more detailed appearance, crochet a smaller pink triangle.
Use pink yarn.
Inner Ear
ch 5
Starting in the second chain:
sc, hdc, dc, hdc
Fasten off.
Sew the pink triangle onto the front of each white ear.
This gives the ears additional depth.
Pattern 4: Crochet Arms
Make two.
Use white yarn.
Round 1
MR, 6 sc
Round 2
inc around
12 sts
Rounds 3–8
sc around
12 sts
Add a small amount of stuffing.
Don’t make the arms completely firm.
Round 9
(2 sc, dec) × 3
9 sts
Round 10
sc around
9 sts
Fasten off.
Leave a long sewing tail.
Flatten the opening slightly.
Why You Shouldn’t Overstuff the Arms
The arms should remain flexible enough to sit naturally beside the body.
If you overstuff them, they can become:
- Too stiff
- Bulky
- Difficult to sew
- Less cute
A small amount of stuffing is enough.
Pattern 5: Crochet Legs
Make two.
Use white yarn.
Round 1
MR, 6 sc
Round 2
inc around
12 sts
Round 3
(sc, inc) × 6
18 sts
Rounds 4–6
sc around
18 sts
Add stuffing gradually.
Round 7
(sc, dec) × 6
12 sts
Rounds 8–9
sc around
12 sts
Fasten off.
Leave a long tail.
Flatten the top slightly before attaching to the body.
Creating Pink Clothing on the Legs
To give the appearance of pink trousers or shorts, attach pink yarn near the upper section of each leg.
Work:
sc around
for 2–3 rounds.
Then return to white for the feet.
This creates the visual effect of the pink outfit shown in the reference.
Pattern 6: Crochet Tail
The tail can be simple or slightly curved.
Use white yarn.
Round 1
MR, 6 sc
Rounds 2–6
sc around
6 sts
Round 7
(sc, inc) × 3
9 sts
Rounds 8–14
sc around
9 sts
Add a tiny amount of stuffing.
Round 15
(sc, dec) × 3
6 sts
Fasten off.
Leave a long sewing tail.
Shape the tail into a gentle curve before sewing it onto the body.
Pattern 7: Large Crochet Bow
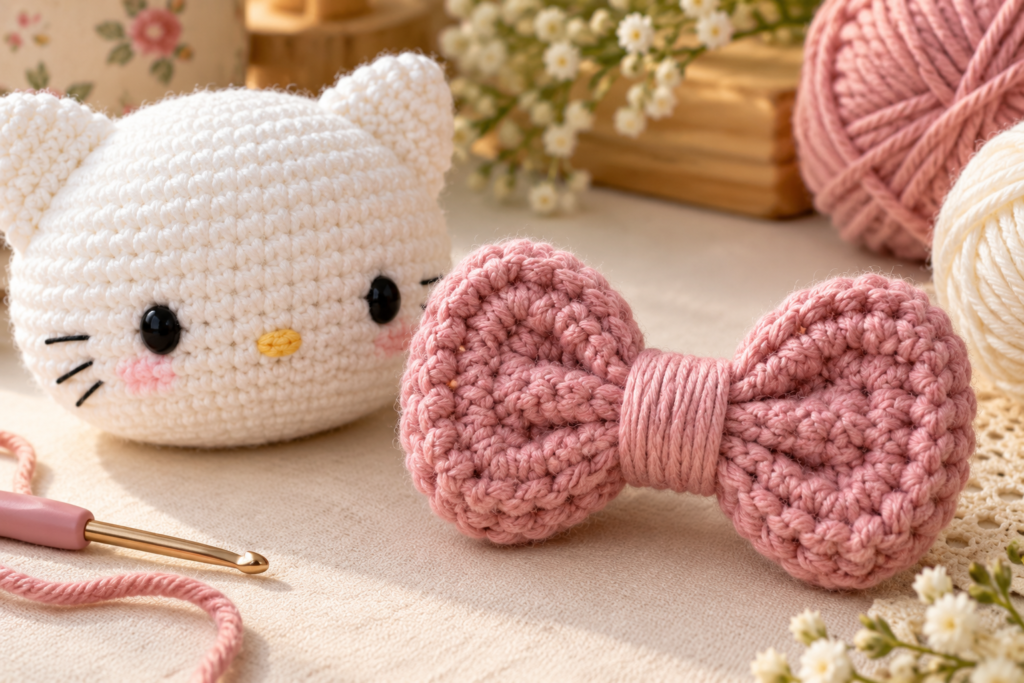
The bow is one of the most important decorative elements of this design.
Use pink yarn.
You’ll make:
- Two bow loops
- One center wrap
Bow Loop 1
Chain:
ch 15
Row 1:
sc across
14 sts
Rows 2–8:
ch 1, turn, sc across
14 sts
Fasten off.
Bow Loop 2
Repeat the same pattern.
You now have two rectangular crochet pieces.
Shaping the Bow
For each rectangle:
- Fold the piece lengthwise.
- Pinch the center.
- Wrap yarn around the middle.
- Pull firmly.
- Secure the yarn at the back.
Repeat with the second loop.
Sew the two loops together.
Bow Center
Chain:
ch 7
Rows 1–3:
sc across
Fasten off.
Wrap this small strip around the middle of the bow.
Sew the ends together at the back.
You now have a dimensional crochet bow.
Alternative Rounded Bow
For softer bow loops, work the rectangles with slightly rounded corners by using:
- sc
- hdc
- sc
around the outside edge.
This creates a more polished boutique finish.
Pattern 8: Small Decorative Collar/Bow Detail
If you want a small decorative motif on the pink outfit, use a short chain.
ch 12
Slip stitch back along the chain.
Shape it into a small curved loop.
Sew it onto the upper chest.
This creates an understated decorative detail without adding excessive bulk.
Pattern 9: Kitty Face
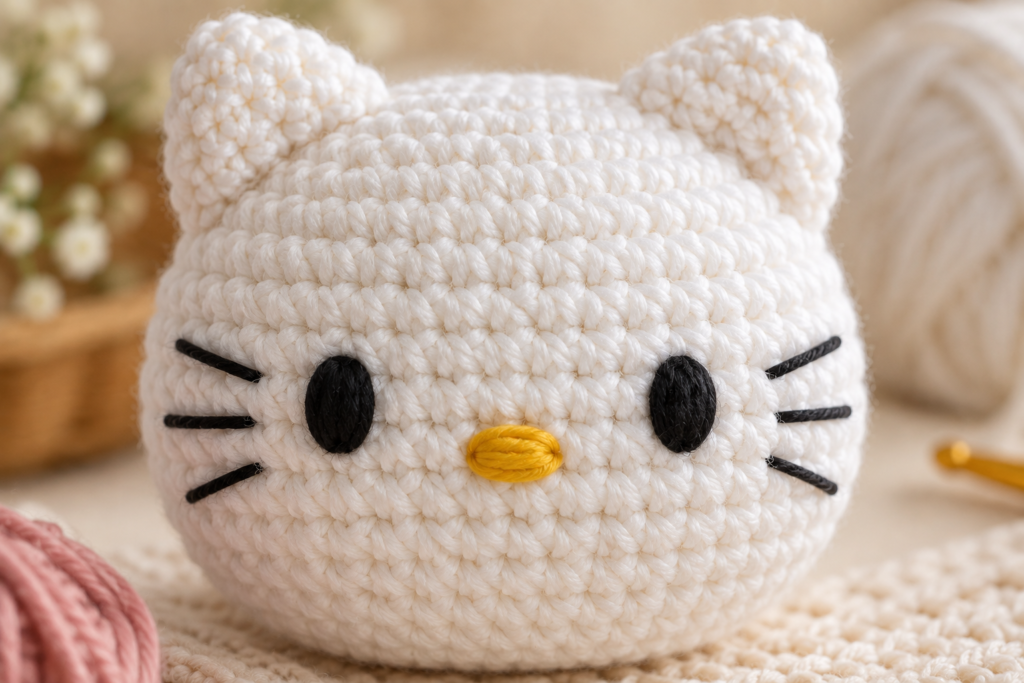
The face is where the personality comes alive.
For an original kawaii cat design, use embroidered features rather than plastic safety eyes.
This allows you to customize the expression.
Eyes
Use black yarn.
Create two vertical oval shapes approximately:
1–1.5 cm tall
Place them symmetrically on the face.
Sew several vertical stitches until the desired thickness is achieved.
Nose
Use yellow yarn.
Embroider a small horizontal oval.
Approximately:
0.5–0.8 cm wide
Add several stitches until the shape is filled.
Whiskers
Use black embroidery thread.
Add three short whiskers on each side.
Keep the lines relatively thin.
Mouth
You can leave the mouth off for a minimalist expression.
Alternatively, embroider a tiny downward or curved line beneath the nose.
Face Placement Guide
The placement of the facial features matters enormously.
| Feature | Position |
|---|---|
| Eyes | Upper-middle face |
| Nose | Centered between eyes |
| Whiskers | Beside lower eye/nose area |
| Mouth | Directly below nose |
| Bow | Near one ear |
| Ears | Top corners |
Before sewing anything permanently, pin or temporarily mark the placement.
Then step back and check symmetry.
Pattern 10: Assembly
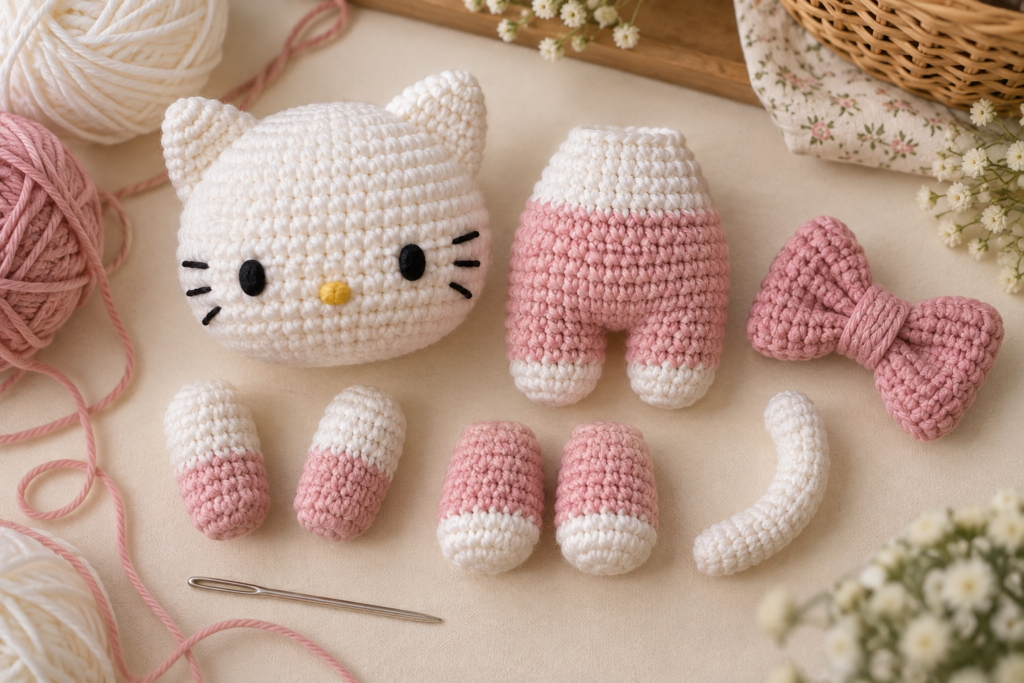
Now comes the most satisfying part.
You should have:
- Head
- Body
- 2 ears
- 2 arms
- 2 legs
- Tail
- Bow
- Optional inner ears
Step 1: Attach the Head
Place the head directly on top of the body.
Use the long yarn tail from the head.
Sew through:
head → body → head
around the entire opening.
Take several passes.
The head should feel firmly attached.
Step 2: Attach the Ears
Position the ears symmetrically.
Place them slightly toward the sides of the head rather than directly at the center.
Pin them first.
Check the angle.
Then sew the bottom edges securely.
Step 3: Attach the Arms
Place one arm on each side of the body.
A slight downward angle creates a relaxed appearance.
Sew through the upper portion of the arm several times.
Step 4: Attach the Legs
Place the legs at the bottom of the body.
Keep them approximately equal distance from the center.
Sew them securely.
Make sure both feet point forward.
Step 5: Attach the Tail
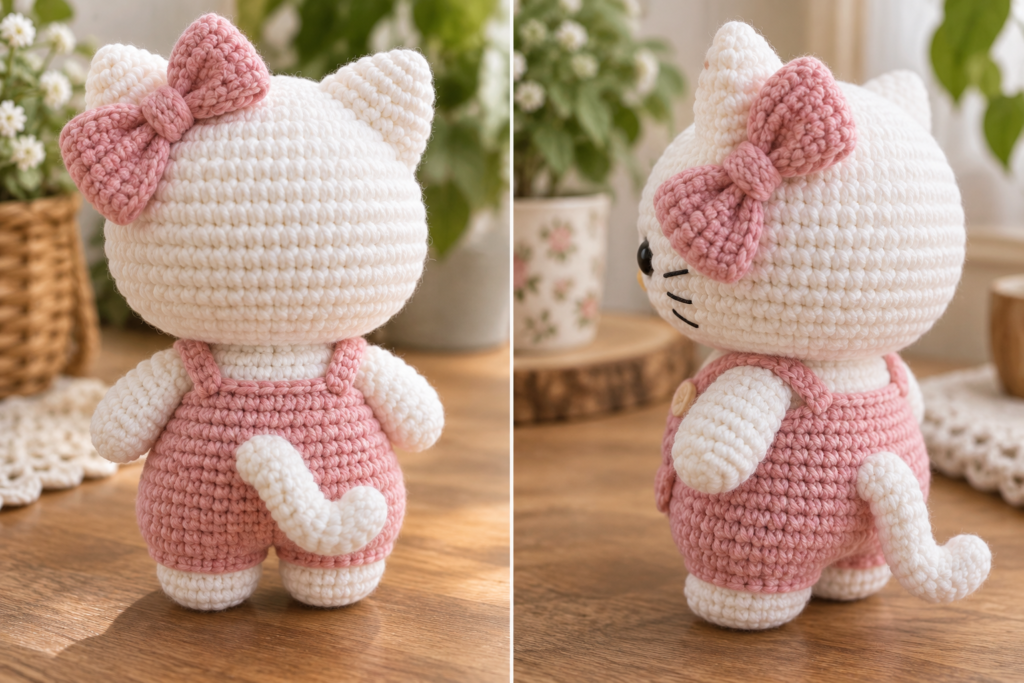
Position the tail on the back.
A slight sideways curve gives the kitty more personality.
Sew firmly at the base.
Step 6: Attach the Bow
Position the bow near one ear.
For an asymmetrical kawaii look, place it slightly toward the side.
Sew the center of the bow securely to the head.
Step 7: Add the Face
Complete:
- Eyes
- Nose
- Whiskers
- Optional mouth
Check symmetry before tying off.
Creating a More Professional Finish
The difference between a basic amigurumi and a polished handmade piece often comes down to finishing.
Hide Yarn Tails Properly
Don’t simply cut the ends.
Instead:
- Thread the tail onto a tapestry needle.
- Pass it through several stitches.
- Change direction.
- Pass through the stuffing area.
- Pull gently.
- Trim close to the surface.
The tail should disappear inside the piece.
How Firm Should the Kitty Be?
The ideal amigurumi should be:
Firm but squeezable.
Too little stuffing creates:
- Wrinkles
- A floppy body
- Uneven shape
Too much stuffing creates:
- Visible gaps
- Stretched stitches
- Distorted proportions
Add stuffing gradually and check the shape frequently.
Size Adjustment Guide
You can easily make the kitty in different sizes.
| Size | Yarn | Hook | Approx. Height |
|---|---|---|---|
| Mini | DK | 2.5–3 mm | 10–14 cm |
| Small | DK | 3–3.5 mm | 14–18 cm |
| Standard | DK/Worsted | 3.5 mm | 18–22 cm |
| Large | Worsted | 4–4.5 mm | 23–28 cm |
| Jumbo | Bulky | 5–6 mm | 30+ cm |
Changing the hook and yarn changes more than the height—it also changes the proportions and firmness.
Outfit Color Ideas
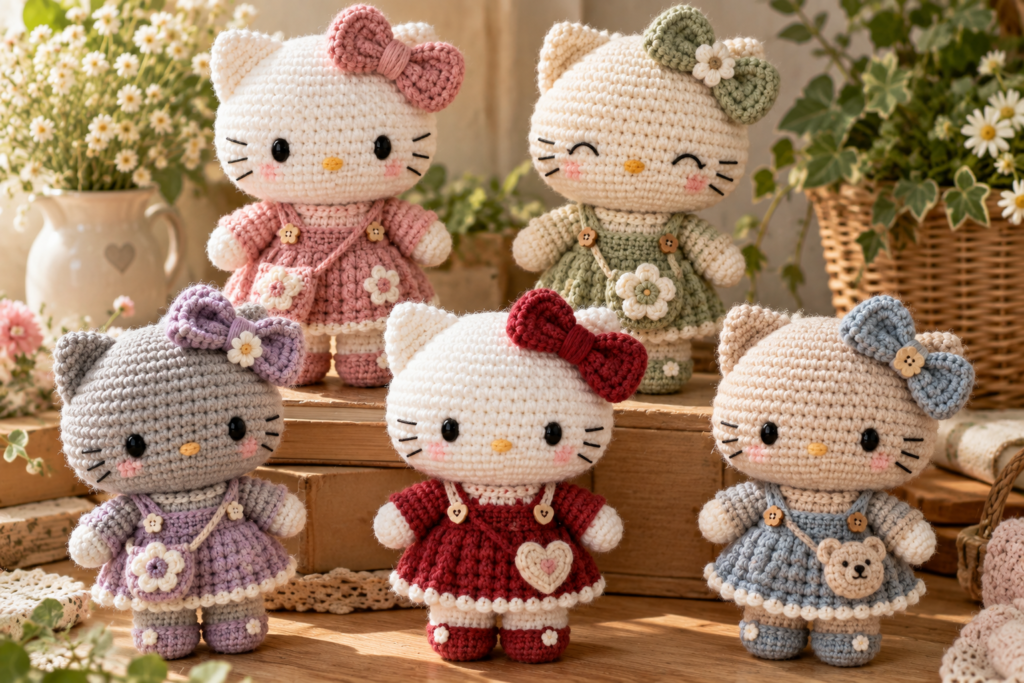
The pink outfit is cute, but you can create a whole wardrobe of kitty designs.
Strawberry Kitty
- White
- Strawberry red
- Leaf green
Lavender Kitty
- White
- Lavender
- Purple
Pastel Kitty
- Cream
- Baby pink
- Mint
Halloween Kitty
- Black
- Orange
- Purple
Christmas Kitty
- White
- Red
- Forest green
Spring Kitty
- White
- Sage
- Soft yellow
Crochet Kitty Variations
Once you’ve completed the basic pattern, try creating variations.
1. Sleepy Kitty
Embroider closed eyes.
2. Garden Kitty
Add a small crochet flower to the bow.
3. Bunny-Inspired Kitty
Make longer ears.
4. Winter Kitty
Add a tiny crochet scarf.
5. Strawberry Kitty
Make a red outfit and add tiny embroidered seeds.
6. Halloween Kitty
Use black yarn and add a miniature witch hat.
7. Christmas Kitty
Add a red bow and tiny green leaves.
Beginner-Friendly Version
If this is your first amigurumi project, simplify it.
Start with:
- Simple head
- Simple body
- Basic ears
- Basic arms
- Basic legs
- Embroidered face
Skip the:
- Inner ears
- Complex bow
- Decorative collar
- Hanging accessories
Once you understand the construction, add the decorative details.
How to Make the Kitty Extra Cute
Small changes can dramatically affect the finished expression.
Try:
- Slightly larger eyes
- Smaller nose
- Wider cheeks
- Larger bow
- Shorter arms
- Larger ears
- Slightly tilted head
The proportions are what create the kawaii appearance.
Common Amigurumi Problems
| Problem | Likely Cause | Solution |
|---|---|---|
| Stuffing shows | Hook too large | Use smaller hook |
| Head is lumpy | Uneven stuffing | Add stuffing gradually |
| Face is crooked | Features positioned unevenly | Mark placement first |
| Ears lean | Uneven sewing | Pin before sewing |
| Legs don’t match | Different tension | Count rounds carefully |
| Body is floppy | Too little stuffing | Add more stuffing |
| Head is too large | Too many increase rounds | Reduce expansion |
| Bow won’t hold shape | Loose stitches | Use smaller hook |
| Stitches are difficult | Hook too small | Move up 0.5 mm |
| Arms look oversized | Too much stuffing | Use less stuffing |
| Tail won’t curve | Too much stuffing | Stuff lightly |
How to Make the Bow Stay Structured
If your bow keeps collapsing:
- Use slightly tighter stitches.
- Choose cotton yarn.
- Add a light blocking treatment if appropriate for your yarn.
- Wrap the center tightly.
- Sew the center firmly to the head.
Don’t use excessive stuffing inside the bow.
Crochet Kitty Safety
If you’re making this as a toy for a young child, facial details deserve particular attention.
For babies and toddlers, avoid:
- Loose beads
- Buttons
- Small bells
- Detachable decorations
- Poorly secured eyes
- Long loose cords
Embroidered facial features are generally preferable for young-child toys because they don’t create separate detachable pieces.
Always inspect handmade toys regularly for loose components or damaged seams.
Washing and Care
Follow the yarn manufacturer’s care instructions whenever possible.
For washable yarn:
- Use gentle washing.
- Avoid harsh chemicals.
- Don’t wring aggressively.
- Reshape while damp.
- Allow the amigurumi to dry completely.
If the kitty contains decorative materials that aren’t washable, spot cleaning may be preferable.
How to Display Your Crochet Kitty
This design works beautifully as a decorative amigurumi.
Place it:
- On a bookshelf
- On a desk
- In a nursery
- On a craft shelf
- Beside plants
- On a bedside table
- In a handmade gift basket
A collection of three kitties in different colors can make a particularly attractive display.
Handmade Gift Idea
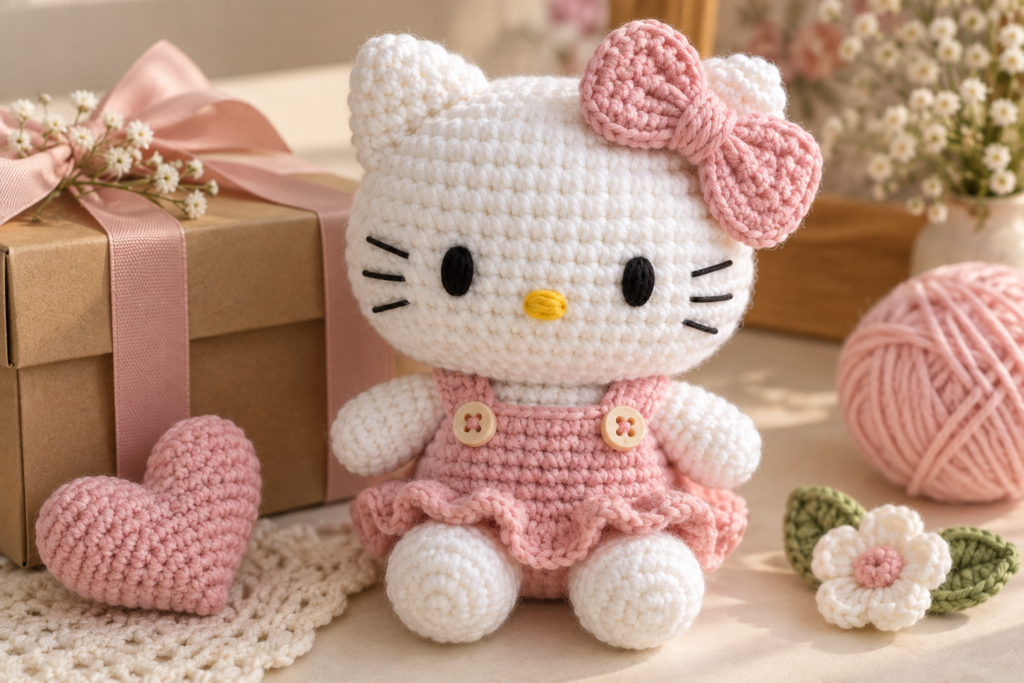
A crochet kitty makes a lovely gift for:
- Cat lovers
- Crochet enthusiasts
- Children
- Teenagers
- Handmade collectors
- Birthday gifts
- Baby-shower-themed décor, when made with appropriate safety considerations
- Valentine’s gifts
- Christmas gifts
Create a small gift set with:
Crochet Kitty + Mini Crochet Heart + Handmade Card
Crochet Kitty Gift Color Sets
| Gift Style | Kitty | Outfit | Bow |
|---|---|---|---|
| Romantic | White | Pink | Pink |
| Elegant | Cream | Burgundy | Cream |
| Pastel | White | Lavender | Pink |
| Botanical | Cream | Sage | Mustard |
| Christmas | White | Red | Green |
| Halloween | Black | Orange | Purple |
Turning the Kitty Into a Keychain
The same design can be made smaller.
Use:
- 2.5–3 mm hook
- DK yarn
- Less stuffing
- Smaller bow
Add a secure keychain attachment to the top.
Make sure all hardware is securely attached and appropriate for its intended use.
Turning It Into a Bag Charm
A small crochet kitty can also become a decorative bag charm.
Instead of attaching the charm directly to the body, sew a small reinforced loop into the top.
Attach the clasp to this reinforced loop.
The attachment should be stronger than a single yarn loop.
Selling Handmade Crochet Kitties
If you’re planning to sell finished pieces, think beyond the yarn cost.
Your price should account for:
Materials + Labor + Packaging + Fees + Overhead + Profit
For example:
| Cost | Example |
|---|---|
| Yarn | $2.50 |
| Stuffing | $0.80 |
| Embroidery materials | $0.30 |
| Packaging | $1.00 |
| Labor | $8.00 |
| Total production cost | $12.60 |
These are only illustrative numbers. Your actual costs and appropriate selling price depend on your materials, time, market and selling platform.
Don’t compete only on low price. Handmade quality, finishing, customization and presentation can all add value.
Product Photography Tips
A crochet amigurumi photographs best when the texture is clearly visible.
For your main image:
- Use natural light.
- Choose a clean background.
- Keep the kitty centered.
- Use a shallow depth of field.
- Show the complete body.
- Make the face clearly visible.
For additional images, photograph:
- Face close-up
- Bow
- Crochet texture
- Back and tail
- Side profile
- Color variations
- Size comparison
- Finished gift presentation
Creating a Crochet Kitty Collection
Once you have the basic pattern, you can build an entire collection without redesigning the body.
For example:
Kitty No. 1
Pink outfit + large bow
Kitty No. 2
Lavender outfit + flower
Kitty No. 3
Sage outfit + leaf appliqué
Kitty No. 4
Red outfit + heart
Kitty No. 5
Black outfit + Halloween hat
The same basic construction can therefore become many different products.
Quick Pattern Reference
Head
R1: MR, 6 sc
R2: inc × 6 = 12
R3: (sc, inc) × 6 = 18
R4: (2 sc, inc) × 6 = 24
R5: (3 sc, inc) × 6 = 30
R6: (4 sc, inc) × 6 = 36
R7: (5 sc, inc) × 6 = 42
R8: (6 sc, inc) × 6 = 48
R9–14: sc around = 48
R15: (6 sc, dec) × 6 = 42
R16: (5 sc, dec) × 6 = 36
R17: (4 sc, dec) × 6 = 30
R18: (3 sc, dec) × 6 = 24
R19: (2 sc, dec) × 6 = 18
R20: (sc, dec) × 6 = 12
R21: dec × 6 = 6
Body
R1: MR, 6 sc
R2: inc × 6 = 12
R3: (sc, inc) × 6 = 18
R4: (2 sc, inc) × 6 = 24
R5: (3 sc, inc) × 6 = 30
R6: (4 sc, inc) × 6 = 36
R7–9: sc around = 36
R10–17: pink, sc around = 36
R18: (4 sc, dec) × 6 = 30
R19: (3 sc, dec) × 6 = 24
R20: (2 sc, dec) × 6 = 18
R21: (sc, dec) × 6 = 12
R22: dec × 6 = 6
Arms
R1: MR, 6 sc
R2: inc around = 12
R3–8: sc around = 12
R9: (2 sc, dec) × 3 = 9
R10: sc around = 9
Legs
R1: MR, 6 sc
R2: inc around = 12
R3: (sc, inc) × 6 = 18
R4–6: sc around = 18
R7: (sc, dec) × 6 = 12
R8–9: sc around = 12
Ears
R1: MR, 6 sc
R2: (sc, inc) × 3 = 9
R3: (2 sc, inc) × 3 = 12
R4: sc around = 12
R5: (3 sc, inc) × 3 = 15
R6–7: sc around = 15
Project Checklist
Before finishing, check:
- Head is firmly stuffed
- Body has an even shape
- Ears are symmetrical
- Arms are securely attached
- Legs are balanced
- Tail is firmly sewn
- Bow is secure
- Eyes are symmetrical
- Nose is centered
- Whiskers are balanced
- All yarn tails are hidden
- No loose decorative pieces remain
- Final shape has been adjusted
Frequently Asked Questions
Is this crochet kitty pattern beginner-friendly?
Yes, although beginners may find the assembly and facial embroidery slightly more challenging than the individual crochet pieces. The head and body use basic increases and decreases.
What yarn should I use?
Smooth DK or worsted-weight yarn is a good choice. Cotton is particularly useful when you want clearly defined stitches.
What crochet hook is recommended?
A 3.5 mm hook is a good starting point for the recommended yarn.
How big will the finished kitty be?
Approximately 18–22 cm, although your finished size will depend on yarn weight, hook size and tension.
Can I make the kitty smaller?
Yes. Use DK yarn with a 2.5–3 mm hook and reduce the overall proportions.
Can I make it larger?
Yes. Use thicker yarn and a larger hook while maintaining tight stitches.
Can I change the outfit color?
Absolutely. The pink section can easily be replaced with red, lavender, sage, blue, cream or any other color.
Can I make the bow larger?
Yes. Increase the foundation chain and number of rows used for the bow loops.
Do I need safety eyes?
No. This tutorial uses embroidered facial features, which also gives you more freedom to create your own expression.
Can I sell finished kitties made from this tutorial?
You can make finished handmade items based on your own implementation, subject to the rules of the marketplace where you sell. Use your own photography and product description rather than presenting your work as an official character product.
Can I turn this into a keychain?
Yes. Make a smaller version and add a securely reinforced attachment loop.
Final Thoughts
This cute crochet kitty amigurumi is a great project for anyone who enjoys combining simple crochet construction with decorative details.
The basic body is intentionally straightforward: increases create the rounded head and body, decreases shape the finished pieces, and separate ears, arms, legs and tail allow you to customize the proportions.
The real personality comes from the finishing.
A large bow immediately changes the appearance. Different outfit colors create completely different moods. Embroidered eyes and whiskers allow you to make each kitty unique, while small additions such as flowers, hearts, scarves or hats can turn the same basic pattern into an entire collection.
If you’re a beginner, make the simple version first. Once you’re comfortable with the construction, experiment with different outfits and accessories.
And if you’re building a handmade crochet collection, this project has particularly good potential for variations: pink kitty, strawberry kitty, lavender kitty, Halloween kitty, Christmas kitty and botanical kitty can all be developed from the same basic construction.
The result is a cute, customizable handmade amigurumi that works equally well as a gift, decoration, collectible or small crochet project.