

A tiny crochet rubber duck is one of those handmade projects that instantly makes you smile. With its soft chenille texture, rounded body, little beak, and adorable proportions, this mini amigurumi duck is perfect for spring decorations, handmade gifts, nursery displays, and cute crochet collections.
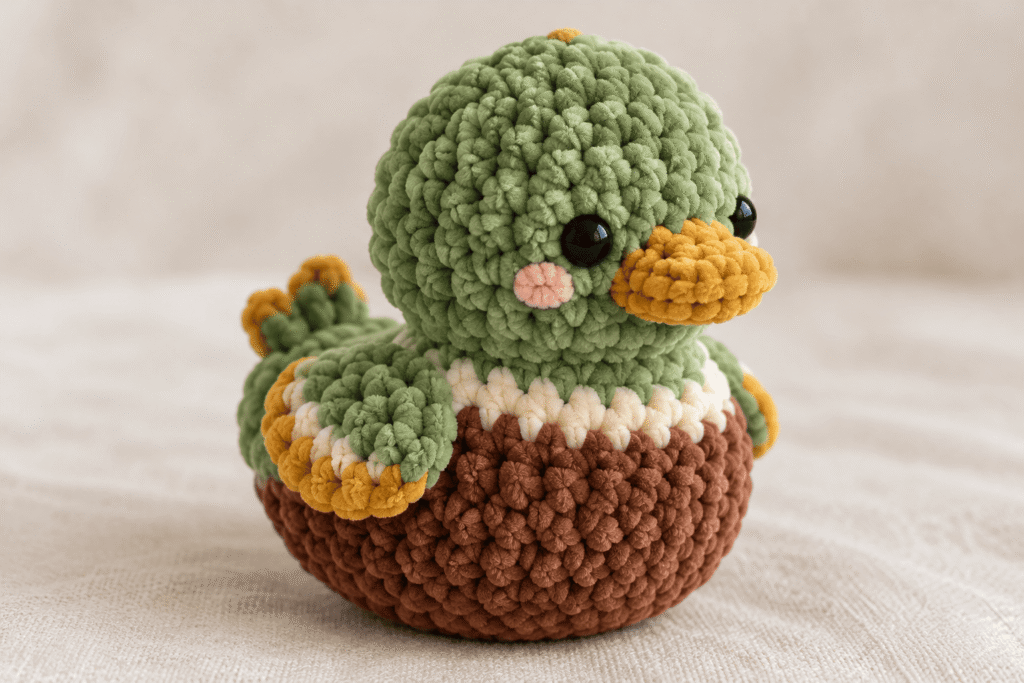
This Mini Rubber Ducky crochet project uses Super Bulky Chenille yarn to create a plush, velvety finish. The pattern inspiration includes three beautiful color variations: a classic light-green duck with orange details, a green-and-brown duck with cream and gold accents, and a striped duck made with white, teal, and gold yarn.
The project also provides an opportunity to practice several useful amigurumi techniques, including starting with a chain, making single crochet increases, working invisible decreases, changing colors, and closing a stuffed piece neatly.
In this tutorial, you will find the recommended materials, yarn quantities for all three color versions, US crochet abbreviations, detailed technique instructions, assembly guidance, finishing tips, and troubleshooting advice.
Pattern note: The supplied reference pages contain materials, yarn quantities, measurements, and technique tutorials, but they do not show the complete original duck instructions or all component stitch counts. The construction guide below is an original simplified adaptation, not a transcription of the original designer’s complete pattern. It should be treated as an untested adaptation until you make a sample and verify the proportions.
Mini Rubber Ducky Pattern Overview
- Project: Mini rubber duck amigurumi
- Skill level: Beginner to intermediate
- Yarn type: Super Bulky Chenille
- Main crochet hook: 4.0 mm
- Estimated finished height: Approximately 4.7 inches with the indicated yarn, subject to tension and construction
- Construction: Crocheted pieces, stuffed and assembled
- Techniques: Single crochet, increases, invisible decreases, color changes, sewing, and finishing
- Main variations: Light green, green and brown, and striped white and teal
The plush yarn gives the duck a soft, rounded appearance, while contrasting colors allow you to create several distinct designs from the same basic concept.
Materials You Will Need
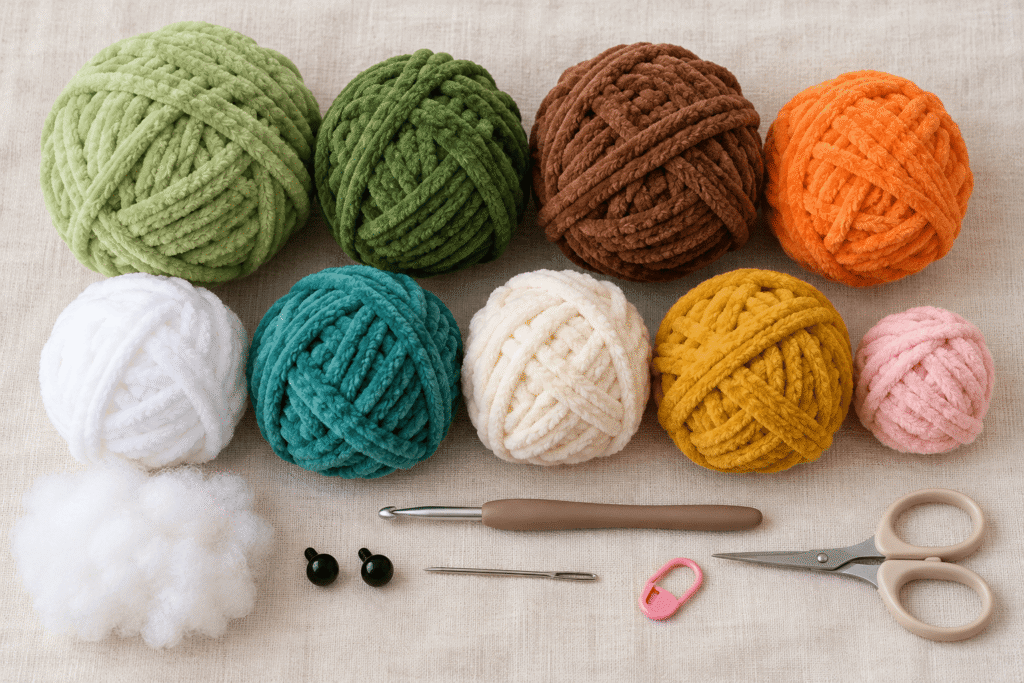
Before starting, gather your yarn, crochet hook, stuffing, and assembly tools.
Main Materials
| Material | Specification |
|---|---|
| Main crochet hook | 4.0 mm |
| Yarn | Super Bulky Chenille |
| Stuffing | Polyester fiberfill |
| Eyes | 12 mm black safety eyes, 2 pieces |
| Sewing tools | Yarn needle and scissors |
| Stitch marker | Recommended for continuous rounds |
The reference specifications use a 4.0 mm hook with Super Bulky Chenille yarn. Your tension may require a different hook size. If your stitches are too loose and the stuffing shows through, try a smaller hook. If the yarn is difficult to work with, a slightly larger hook may be more comfortable, provided the fabric remains sufficiently dense.
Yarn Quantities for the Three Color Variations
The following quantities are taken from the supplied reference.
Version 1: Light Green Mini Rubber Ducky
| Color | Approximate quantity |
|---|---|
| Light green | 25 g |
| Orange | 8 g |
| Brown | 15 g |
This version combines a soft green body with orange accents and brown details. It offers a playful alternative to the traditional yellow rubber duck.
Version 2: Green and Brown Mini Rubber Ducky
| Color | Approximate quantity |
|---|---|
| Green | 10 g |
| Brown | 20 g |
| Cream | 5 g |
| Gold | 8 g |
| Light pink | 2 g |
This color combination creates a richer, more detailed duck. Cream and gold can provide contrast, while light pink adds a delicate accent.
Version 3: Striped Mini Rubber Ducky
| Color | Approximate quantity |
|---|---|
| White | 15 g |
| Teal | 15 g |
| Gold | 8 g |
This version uses white and teal for a striped effect, with gold for additional details.
These quantities are the reference estimates for each version, not independently measured requirements for the simplified adaptation below. Actual consumption depends on the final size, the number of components, yarn brand, and tension.
Understanding Super Bulky Chenille Yarn
Super Bulky Chenille yarn is known for its soft, plush surface. It creates a velvety finish that works particularly well for amigurumi animals, stuffed toys, decorative figures, and miniature plush projects.
However, chenille behaves differently from smooth cotton or acrylic yarn. The fibers can conceal individual stitches, and the yarn may shed or break if pulled too aggressively.
Tips for Working With Chenille
Use gentle tension. Avoid pulling the working yarn too tightly, as this can damage the yarn structure and make stitches difficult to identify.
Count stitches carefully. Chenille can hide stitch openings. Use a stitch marker and count at the end of every round.
Avoid repeatedly undoing your work. Unraveling chenille too many times can cause the fibers to separate or become damaged. If you need to correct a mistake, work slowly and gently.
Use a suitable hook. A 4.0 mm hook is the reference recommendation. Test your tension before starting the complete project.
Sew with care. Chenille can fray when repeatedly passed through a needle. Use a yarn needle with an appropriate eye and avoid pulling the yarn through the fabric too many times.
Can You Use Another Yarn?
Yes, but the finished result may differ.
Cotton yarn creates a firmer surface with clearly defined stitches. Standard acrylic yarn offers a smoother texture than chenille. A similar-weight plush yarn may preserve the soft appearance, but the final dimensions can change.
If you substitute yarn, make a small sample first and check the stitch definition, fabric density, and finished size.
Crochet Abbreviations
This tutorial uses US crochet terminology.
| Abbreviation | Meaning |
|---|---|
| ch | Chain |
| sc | Single crochet |
| dc | Double crochet |
| hdc | Half double crochet |
| trc | Triple crochet |
| sl st | Slip stitch |
| sk | Skip |
| inc | Increase: work 2 single crochet stitches into the same stitch |
| dec | Invisible decrease: combine 2 stitches into 1 |
| rnd | Round |
| rnds | Rounds |
| st | Stitch |
| sts | Stitches |
| BLO | Back loop only |
| FLO | Front loop only |
| TLO | Third loop only |
| FO | Fasten off |
| [sc 2, inc] 2x | Repeat the instructions in brackets twice |
| {sc, inc} | Work the instructions inside the braces into the same stitch when specified |
| (24) | Total stitch count at the end of a round |
| Bobble dc x | A bobble stitch made with the indicated number of double crochet stitches |
The pattern notation tells you what to do and how many stitches should remain at the end of a round.
For example, [sc 2, inc] 2x means to work one single crochet into each of the next two stitches, make an increase in the following stitch, and repeat that sequence twice.
Important distinction: Brackets, braces, and parentheses may be used differently by individual designers. Always follow the explanation provided with a particular pattern.
Essential Crochet Techniques
The following techniques will help you work with chenille and assemble a neat amigurumi duck.
1. Starting With Chain 2
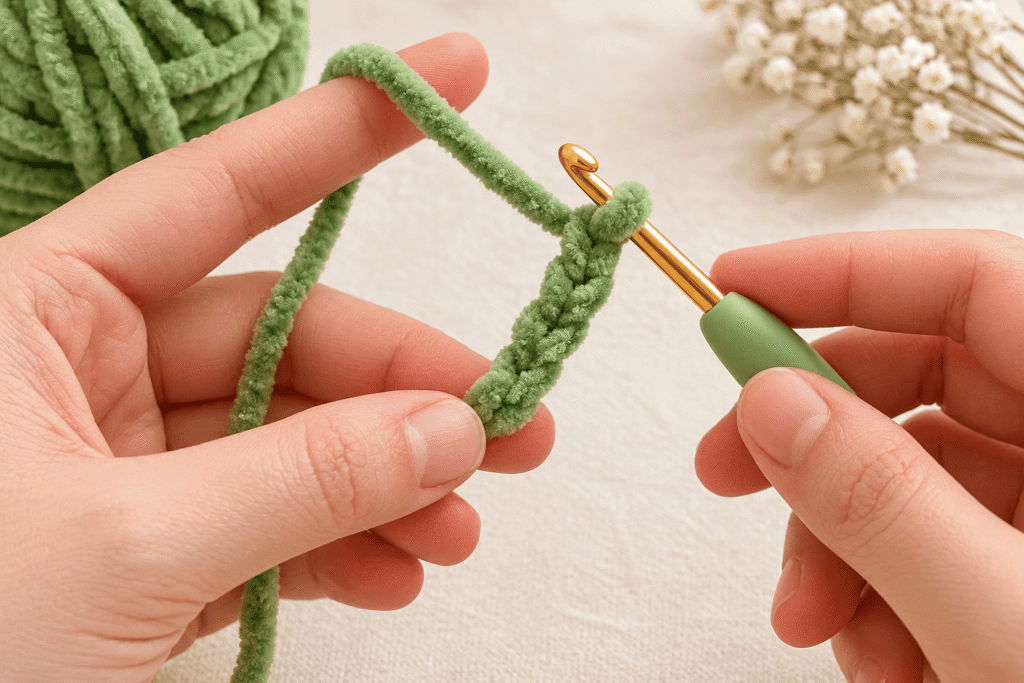
Some small amigurumi components can begin without a traditional magic ring.
To use the chain-two method:
- Make a slip knot and place it on your hook.
- Chain 2.
- Insert your hook into the second chain from the hook.
- Work the required number of single crochet stitches into that chain.
- Continue to the next round according to your instructions.
This method can be easier for beginners, particularly when chenille yarn makes a magic ring difficult to tighten.
A magic ring is also an option if you prefer it and can close it securely.
2. Identifying the Front and Back Loops
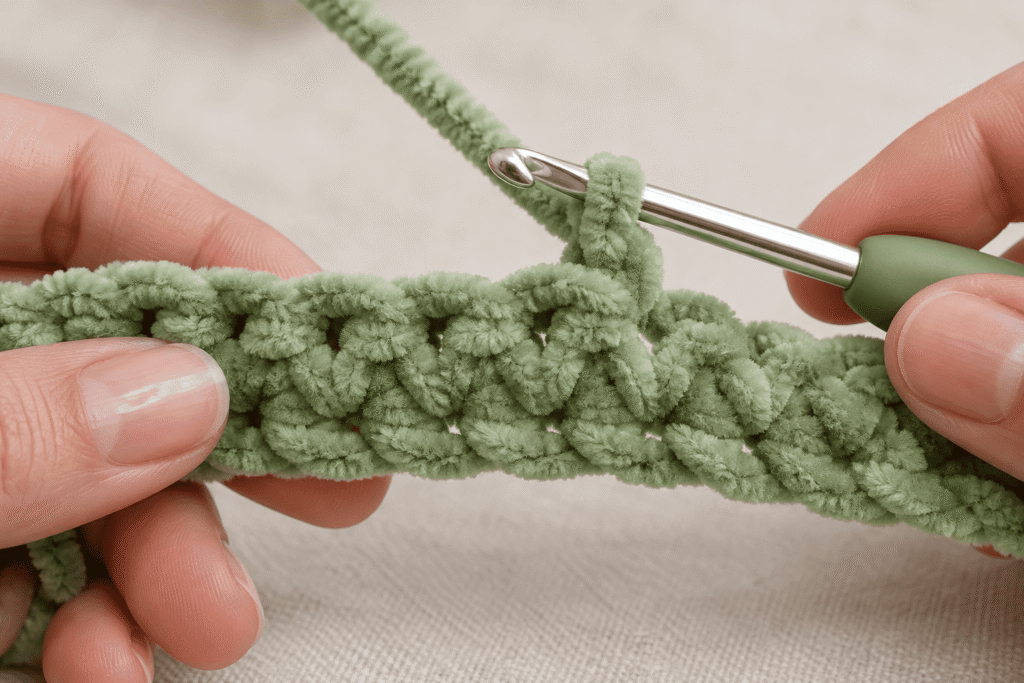
Each single crochet stitch has a small V-shaped top made from two loops.
The front loop is the loop closest to you when viewing the outside of the work. The back loop is the loop farther away.
For a regular single crochet, insert the hook beneath both loops. When a pattern specifies FLO or BLO, insert your hook into only the named loop.
Working into one loop can create a visible ridge, provide texture, or leave a loop available for a later decorative detail.
3. Making a Single Crochet Increase
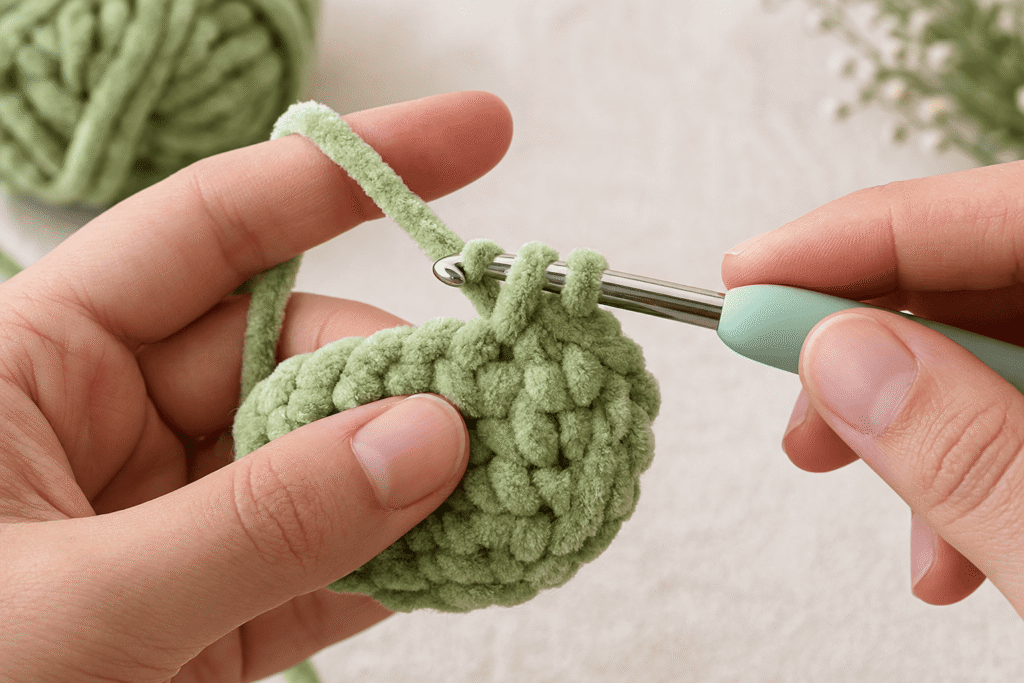
An increase adds one stitch to the round.
- Insert your hook into the indicated stitch.
- Yarn over and pull up a loop.
- Yarn over and pull through both loops on the hook.
- Insert your hook into the same stitch again.
- Work another single crochet into that stitch.
You have now worked two single crochet stitches into one original stitch.
Increases are commonly used to create rounded shapes in amigurumi.
4. Making an Invisible Single Crochet Decrease
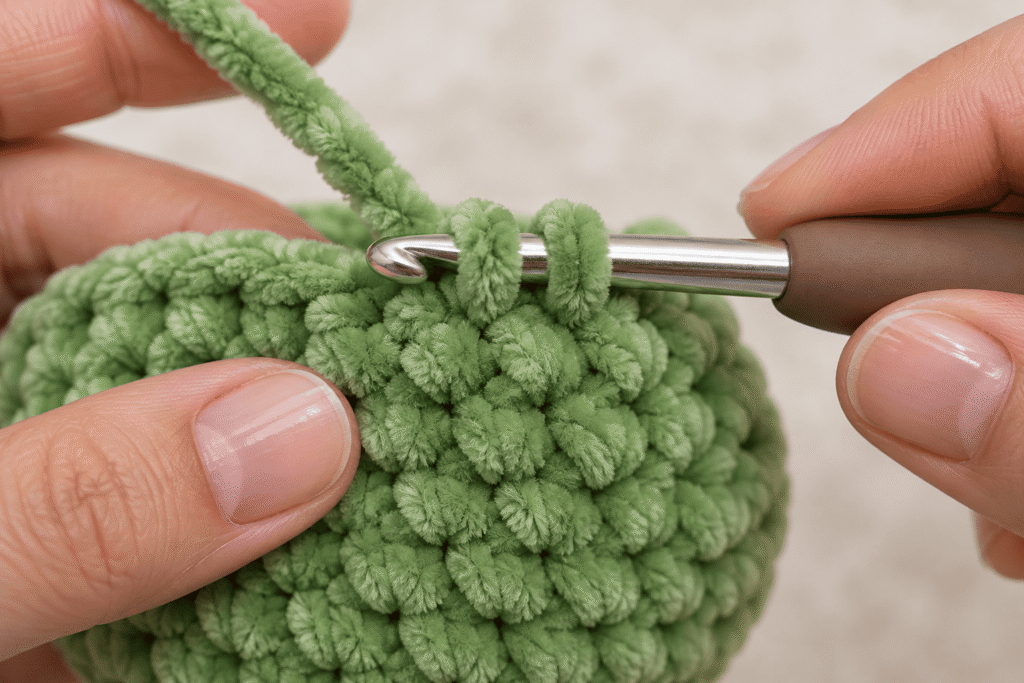
An invisible decrease combines two stitches into one while minimizing the visible gap.
- Insert your hook into the front loop of the next stitch.
- Insert your hook into the front loop of the following stitch.
- Yarn over and pull through both front loops.
- Yarn over again and pull through the two loops remaining on the hook.
This technique is especially useful when shaping the head, body, or other stuffed parts of an amigurumi.
5. Changing Colors
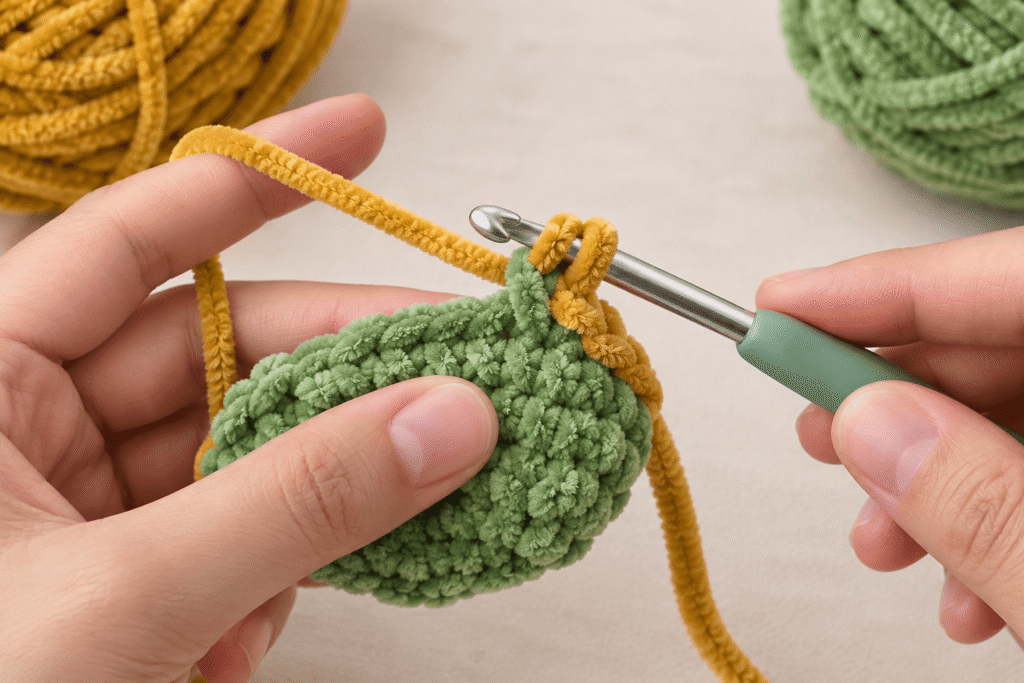
A clean color change is easier when completed during the final stitch of the old color.
- Begin the last single crochet stitch in the old color.
- Insert your hook into the stitch and pull up a loop with the old color.
- Before completing the stitch, yarn over with the new color.
- Pull the new color through the loops on your hook.
- Continue crocheting with the new color.
The next stitch will be the first stitch in the new color.
Keep both yarn ends secure. When working with chenille, avoid pulling the yarn tails too tightly because the fibers can fray.
For stripes, make sure the color changes occur at the intended round boundaries.
6. Closing a Stuffed Piece
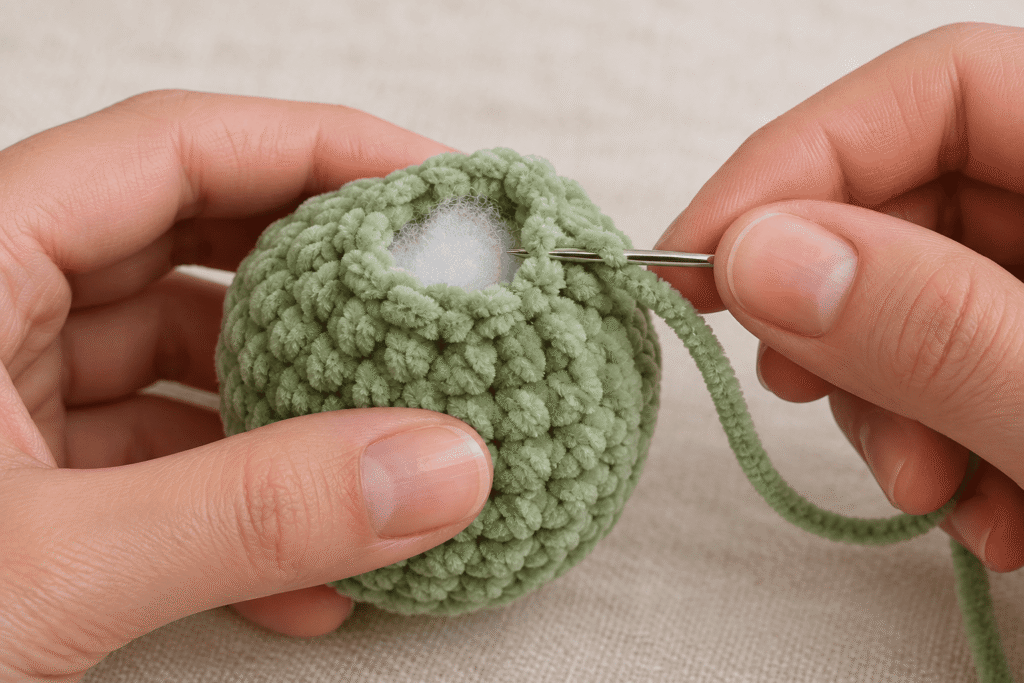
When your pattern tells you to close a small opening, cut the yarn and leave a sufficiently long tail.
Thread the tail onto a yarn needle and pass it through the designated loops around the opening. Pull gently to bring the stitches together, then secure the yarn and weave the tail into the piece.
Do not pull too aggressively, particularly with chenille. Excessive tension can damage the yarn or distort the finished shape.
Mini Rubber Ducky Construction Guide
The reference images do not contain enough information to reproduce the original duck’s complete stitch-by-stitch construction. The following guide describes an original, simplified approach to making a small plush duck using the supplied materials and techniques.
It is not a verified reproduction of the pictured designer’s pattern.
Step 1: Plan the Duck’s Main Shape
A recognizable rubber duck generally has a rounded body, a slightly raised head, a small beak, and two compact wings.
Before crocheting, decide which yarn color will form the main body and which colors will be used for the beak, wings, and optional decorative details.
For the light-green version, use light green for the main body, orange for the beak, and brown for contrasting details.
For the green-and-brown version, plan where the green, brown, cream, gold, and pink accents will appear before beginning.
For the striped version, alternate white and teal according to your intended stripe placement, reserving gold for the small decorative elements.
Step 2: Crochet the Main Body
The main body is the largest component and determines the overall proportions of the duck.
For this original adaptation, a rounded body can be shaped using single crochet increases, several rounds without increases, and decreases toward the lower section.
A typical amigurumi shaping sequence begins with a small circle, increases gradually to establish the widest point, continues with plain rounds to build height, and then decreases to form the lower curve.
The exact number of stitches and rounds must be tested to achieve the intended duck proportions. Do not assume that a round ball will automatically produce the same silhouette as the duck shown in the reference.
If you want a striped duck, plan the color changes while shaping the body. Keep a written record of each color round so that the stripes remain consistent.
Step 3: Shape the Head
The head should blend naturally into the body rather than looking like a separate oversized ball.
Depending on the desired design, you can shape the head as part of one continuous body or crochet a separate head and sew it onto the body.
A continuous body can reduce the amount of sewing required. A separate head provides more freedom to adjust the proportions but requires careful attachment.
The exact construction method and stitch counts should be verified against the original pattern if you want to reproduce the pictured duck precisely.
Step 4: Make the Beak
The beak is a small contrasting component that gives the duck its characteristic appearance.
Use orange yarn for the light-green version or gold yarn for the striped version. The green-and-brown version can use the accent color that best matches your design.
The beak should be proportionate to the head and positioned centrally on the front of the face.
Before sewing, pin the beak in place and check its position from the front and side. A beak that is too high, too low, or too large can noticeably change the expression.
Step 5: Make the Wings
The wings are optional decorative components that help distinguish the duck from a simple plush ball.
Use the main body color for a coordinated appearance or a contrasting shade for a more playful design.
Make two matching pieces, position them symmetrically on the sides of the body, and pin them before sewing.
Because chenille can make stitches difficult to see, take time to align the wings before securing them.
Step 6: Stuff the Body
Add polyester fiberfill gradually.
Start with small amounts and distribute them evenly throughout the body. Use your fingers to smooth out lumps and check the shape from multiple angles.
The reference guidance recommends stuffing the project generously enough to maintain its shape, but not so tightly that the design becomes distorted.
Avoid forcing large clumps of stuffing through a small opening. Add smaller portions until the body feels evenly filled.
Step 7: Assemble the Duck
Arrange the head, beak, wings, and any additional decorative parts before sewing them permanently.
Check that the head is centered and the beak sits straight. Compare the position of the wings on both sides.
Use a yarn needle and secure the components with small, even stitches. When sewing with chenille, look for stitch openings and avoid repeatedly piercing the yarn itself.
Step 8: Finish the Surface
Once the components are attached, inspect the duck for gaps, uneven stuffing, and loose yarn tails.
Weave the ends into the body, trim excess yarn, and gently reshape the plush figure with your fingers.
If the project includes stripes, check that the color transitions are secure and that no loose ends are visible on the outside.
Three Mini Rubber Ducky Color Ideas
Version 1: Light Green, Orange, and Brown
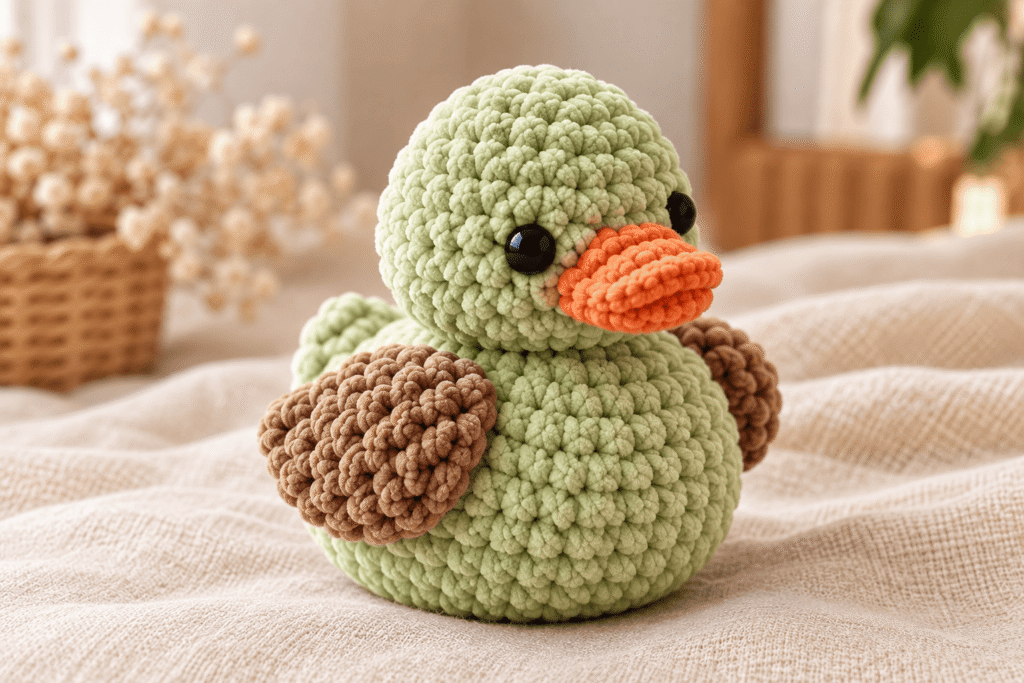
This version offers a fresh, playful look.
Use light green as the main color, orange for the beak and selected accents, and brown for contrasting details.
The combination works well for spring-inspired decorations, woodland-style amigurumi collections, and handmade gifts.
Version 2: Green, Brown, Cream, Gold, and Light Pink
This version offers a more detailed palette.
Green and brown provide the main contrast, while cream can soften the design. Gold adds warmth, and small touches of light pink introduce a gentle accent.
To keep the finished duck visually balanced, use the accent colors sparingly.
Version 3: White, Teal, and Gold Stripes
This version is ideal if you enjoy color changes.
Alternate white and teal to create a striped effect. Use gold for a contrasting beak or other small details.
Keep the stripe widths consistent and secure the yarn ends neatly. Chenille yarn can make color transitions more visible, so work carefully when changing colors.
General Tips for a Better Amigurumi Finish
Use a Stitch Marker
A stitch marker makes it easier to identify the beginning of each round when working in a continuous spiral.
Move the marker after completing every round, and count your stitches regularly.
Maintain Consistent Tension
Uneven tension can affect the shape and size of the duck.
Try to keep your stitches consistent, especially around increases and decreases. If you notice gaps, test a smaller hook before continuing.
Avoid Overstuffing
Stuffing helps the duck maintain its shape, but too much can distort the fabric.
Add fiberfill in small portions and smooth the surface as you go.
Sew Carefully With Chenille
Chenille yarn can fray when repeatedly pulled through stitches.
Use a suitable yarn needle, avoid unnecessary piercing, and keep the sewing yarn at a comfortable tension.
Check Safety Before Giving the Duck as a Gift
The reference materials list 12 mm black safety eyes. However, safety eyes can detach and present a choking hazard.
They are not recommended for children under three years of age. If the duck is intended for young children, use securely embroidered eyes instead, and ensure that all components are firmly attached.
For a toy intended for a particular age group, follow the applicable toy-safety requirements rather than assuming that embroidered features alone make the item safe.
Common Problems and Solutions
| Problem | Possible cause | Suggested solution |
|---|---|---|
| Stuffing shows through | Stitches are too loose | Try a smaller hook and check tension |
| Body looks uneven | Missed stitches or inconsistent shaping | Use a stitch marker and count every round |
| Chenille yarn frays | Excessive pulling or repeated unraveling | Work gently and minimize repeated frogging |
| Color change looks untidy | New color was introduced at the wrong point | Change color during the final step of the previous stitch |
| Beak looks crooked | Placement was not checked before sewing | Pin the beak in place and inspect from the front |
| Wings look asymmetrical | Pieces were sewn at different heights | Mark the positions before attaching |
| Body feels too hard | Too much stuffing | Remove some fiberfill and reshape |
| Opening will not close neatly | Yarn tail is too short or stitches are uneven | Leave a longer tail and close gradually |
Frequently Asked Questions
What yarn is recommended for a Mini Rubber Ducky?
The supplied reference recommends Super Bulky Chenille yarn. Its plush texture gives the finished project a soft, velvety appearance.
What crochet hook size should I use?
The indicated hook size is 4.0 mm. Your tension and yarn brand may affect the result, so make a small sample before starting.
How tall is the finished duck?
The reference lists a height of approximately 4.7 inches when made with the indicated yarn. This is a reference measurement; the simplified adaptation may produce a different size.
Which color variation should I choose?
The light-green version uses light green, orange, and brown. The second uses green, brown, cream, gold, and light pink. The striped version uses white, teal, and gold. Choose the palette that best suits your project.
Can I use a magic ring instead of chain 2?
Yes. The reference notes that the chain-two starting method can be replaced with a magic ring when preferred. With chenille yarn, use whichever method you can close securely.
Why is my chenille yarn difficult to work with?
Chenille fibers can conceal stitch openings and become damaged if repeatedly unraveled. Use a stitch marker, count carefully, and work gently.
Can I substitute another yarn?
Yes, but the texture and finished size may change. Choose a yarn of a similar weight if you want to stay close to the reference dimensions, and check your tension before continuing.
Are safety eyes suitable for every age group?
No. Safety eyes can detach and present a choking hazard. The supplied reference specifically advises against safety eyes for children under three. Embroidered eyes are a preferable option for items intended for young children, although the finished toy must still be assessed for safety.
Can I sell the finished duck?
You can consider selling handmade items you make yourself, subject to applicable laws and any licensing or usage terms associated with the pattern you follow. Use your own product photographs and original listing descriptions, and do not claim another designer’s pattern or images as your own.
Final Thoughts
The Mini Rubber Ducky is a charming project for crocheters who enjoy soft yarn, playful color combinations, and cute amigurumi designs. Super Bulky Chenille gives the project its plush appearance, while the three suggested palettes offer plenty of opportunities to personalize the finished duck.
The most important techniques are maintaining consistent tension, counting stitches carefully, changing colors neatly, and assembling the components with patience. Working with chenille can take practice, but a stitch marker and a gentle approach make the process easier.
Use the supplied yarn quantities and materials as your planning guide, and verify the complete stitch counts before treating this adaptation as a finished pattern. If you have access to the original round-by-round instructions, use those to reproduce the exact design and dimensions.
Happy crocheting!






