

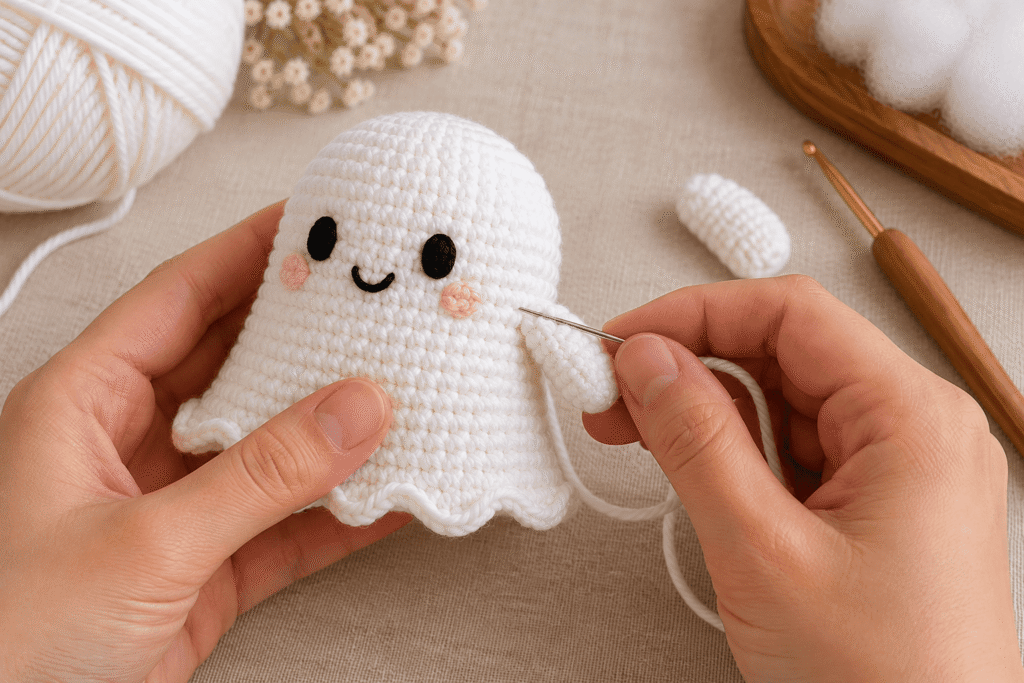
Looking for a cute, beginner-friendly Halloween crochet project? This easy crochet ghost amigurumi pattern is a lovely way to add a handmade touch to your autumn decorations. With its rounded body, sweet embroidered face, tiny arms, and playful wavy hem, this little ghost is full of personality without requiring complicated stitches.
Whether you’re preparing handmade Halloween gifts, decorating your home, creating seasonal items for a craft fair, or simply looking for a relaxing crochet project, this adorable ghost is a great choice.
The pattern uses basic amigurumi techniques, including single crochet, increases, decreases, and working in continuous rounds. The decorative ruffle adds a charming finishing detail, while the embroidered eyes and cheeks give your ghost a friendly expression.
In this tutorial, you’ll find a complete materials list, abbreviations, detailed round-by-round instructions, finishing tips, customization ideas, and troubleshooting advice to help you create your own crochet ghost.
Pattern overview
- Skill level: Beginner to confident beginner
- Project type: Amigurumi and Halloween decoration
- Construction: Worked from the top down in continuous rounds
- Main stitches: Single crochet, increase, decrease, slip stitch, and half double crochet
- Estimated time: Approximately 2–4 hours, depending on experience
- Main color: White
- Customization: Different expressions, cheek colors, yarn textures, and decorative accessories
Please note that the time and finished size are estimates. Your results will depend on your yarn, hook, tension, and finishing technique.
Materials You Will Need
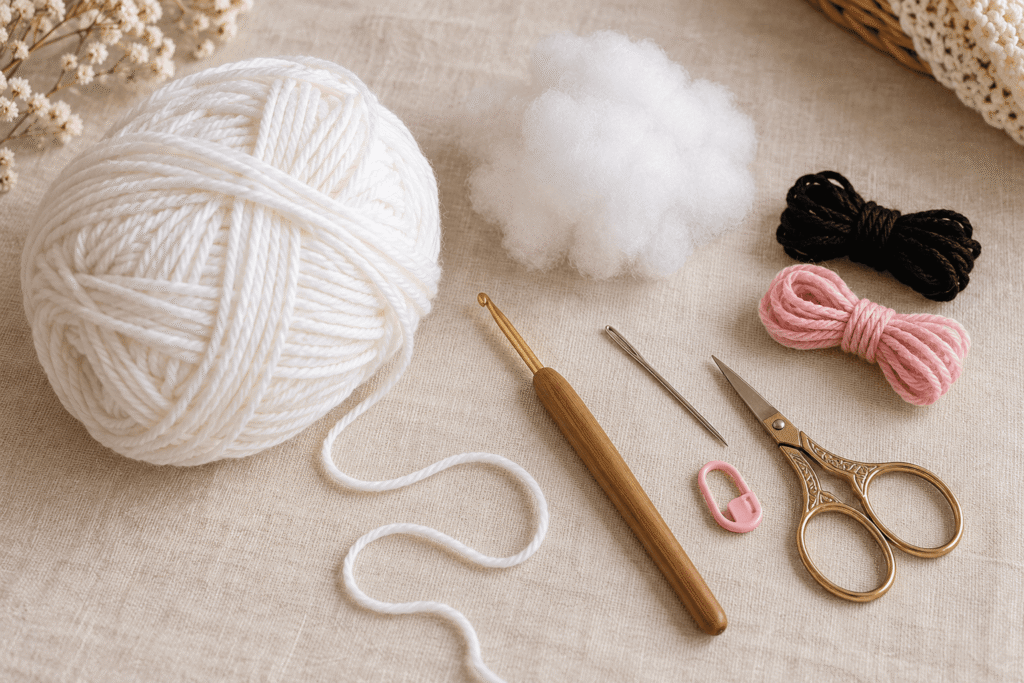
Gather your materials before starting. Using the right supplies will make the process easier and help your ghost hold its shape.
| Material | Recommended choice |
|---|---|
| Main yarn | White or off-white yarn |
| Crochet hook | 3–3.5 mm, depending on your yarn |
| Stuffing | Polyester fiberfill |
| Eye embroidery yarn | Black yarn or embroidery thread |
| Cheek embroidery yarn | Pink yarn or embroidery thread |
| Yarn needle | For sewing and weaving in ends |
| Stitch marker | To mark the beginning of each round |
| Scissors | For trimming yarn |
| Pins | Optional, for positioning the arms |
Choosing the Right Yarn
A smooth, medium-weight yarn is a good choice for this project because it makes the stitches easy to see and gives the ghost a neat shape.
Cotton yarn creates a defined stitch texture and a slightly firmer finish. Acrylic yarn is often softer and widely available in a variety of colors. A cotton-acrylic blend can offer a balance between softness and stitch definition.
For a classic Halloween ghost, choose white or ivory. If you want a more unusual design, pastel pink, lavender, pale blue, or cream can create a sweet, decorative variation.
Avoid very fuzzy yarn for your first attempt. Fluffy fibers can make it difficult to identify stitches, count rounds, and embroider a neat face.
Choosing the Crochet Hook
Use the hook size recommended for your yarn as a starting point, then adjust if necessary.
Amigurumi is usually crocheted with a relatively tight tension so the stuffing does not show through the stitches. If you can see large gaps between your stitches, try a smaller hook.
However, your stitches should not be so tight that your hands become uncomfortable or the hook is difficult to insert.
Stuffing and Safety
Use small amounts of polyester stuffing to create a smooth, rounded body. Add the stuffing gradually rather than filling the ghost all at once.
If the finished ghost will be handled by young children, avoid loose decorative parts and securely embroidered facial features. Small parts can present a choking hazard. This pattern is best treated as a decorative item unless it has been adapted and safety-tested for the intended age group.
Crochet Abbreviations
This pattern uses US crochet terminology.
| Abbreviation | Meaning |
|---|---|
| MR | Magic ring |
| sc | Single crochet |
| inc | Increase: work 2 single crochet stitches into the same stitch |
| dec | Decrease: combine 2 stitches into 1 |
| sl st | Slip stitch |
| hdc | Half double crochet |
| BLO | Back loop only |
| FLO | Front loop only |
| st | Stitch |
| sts | Stitches |
| rnd | Round |
| FO | Fasten off |
Important: An increase adds one stitch to the total, while a decrease removes one stitch. Count your stitches at the end of each round to keep the ghost’s shape consistent.
How to Work a Single Crochet
Insert your hook into the stitch, yarn over, and pull up a loop. Yarn over again and pull through both loops on your hook.
How to Increase
Work two single crochet stitches into the same stitch. This adds one stitch to your round and gradually widens the ghost’s body.
How to Decrease
For a neat amigurumi finish, use an invisible decrease when possible. Insert the hook into the front loop of the next stitch, then into the front loop of the following stitch. Yarn over, pull through both front loops, yarn over again, and pull through the two loops remaining on your hook.
How to Identify the Front and Back Loops
Each crochet stitch normally has two loops at the top. The front loop is the loop closest to you when looking at the outside of your work. The back loop is the loop farther away.
Working into only one of these loops leaves the other loop available for decorative details. In this pattern, Round 11 is worked in the back loops only so that the front loops remain available for the wavy hem.
Before You Begin
Read these notes before starting your ghost.
Work in continuous rounds. The body is crocheted in a spiral rather than joined at the end of every round. Do not join with a slip stitch unless specifically instructed.
Use a stitch marker. Place it in the first stitch of each round and move it as you progress.
Count your stitches. The number in parentheses at the end of each round is the total stitch count for that round.
Keep your tension consistent. Loose stitches may allow stuffing to show, while uneven tension can distort the body.
Do not overstuff. A lightly and evenly stuffed ghost usually looks softer and more rounded than one packed too tightly.
Easy Crochet Ghost Amigurumi Pattern
The ghost is made in several simple stages: the body, the decorative ruffle, the arms, and the embroidered face.
Part 1: Crochet the Ghost Body
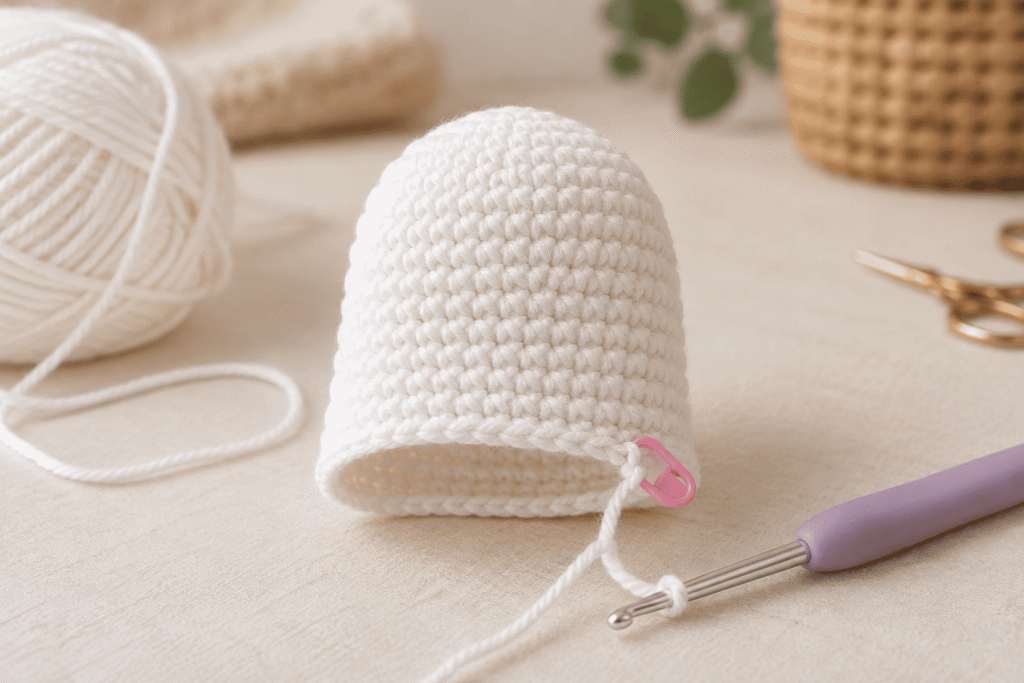
Use white yarn and your chosen hook.
The body begins at the top of the head, increases to create a rounded shape, continues straight to form the main body, and then decreases toward the bottom.
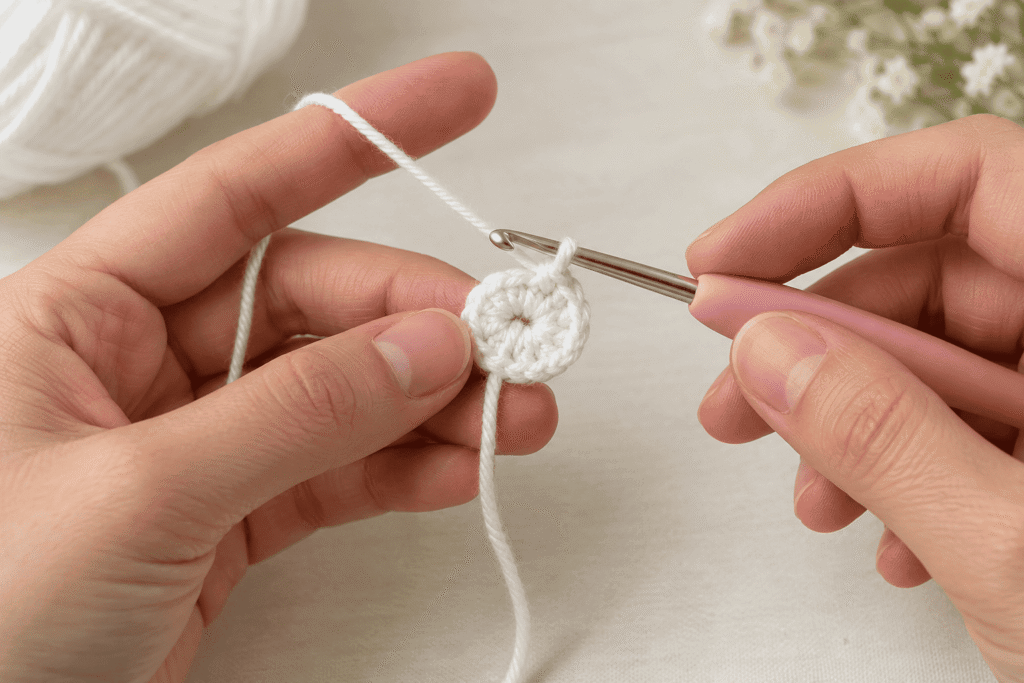
Round 1: Create the Magic Ring
Make a magic ring.
Work 6 single crochet stitches into the ring.
Pull the yarn tail to close the center.
Total: 6 stitches
If you find the magic ring difficult, you can use an alternative starting method: chain 2 and work 6 single crochet stitches into the second chain from the hook. The center may be slightly less adjustable, but it can work well for beginners.
Round 2: Increase Around
Work 2 single crochet stitches into each stitch around.
You will have 12 stitches when the round is complete.
Total: 12 stitches
This round begins widening the top of the ghost’s head.
Round 3: Single Crochet and Increase
Repeat the following sequence 6 times:
- Work 1 single crochet into the next stitch.
- Work 2 single crochet stitches into the following stitch.
Total: 18 stitches
Your work should now look like a small, flat circle.
Round 4: Two Single Crochet, Then an Increase
Repeat the following sequence 6 times:
- Work 1 single crochet into each of the next 2 stitches.
- Work 2 single crochet stitches into the next stitch.
Total: 24 stitches
The circle will become wider as the head develops.
Round 5: Three Single Crochet, Then an Increase
Repeat the following sequence 6 times:
- Work 1 single crochet into each of the next 3 stitches.
- Work 2 single crochet stitches into the next stitch.
Total: 30 stitches
You should now have a circular shape with 30 stitches around the edge.
Rounds 6–10: Build the Head and Body
Work 1 single crochet into every stitch around for 5 rounds.
Keep the stitch count at 30 throughout these rounds.
Total: 30 stitches per round
The work will begin to curve into a rounded head and a short, tube-like body. This is normal.
If the shape looks slightly different from your expectations, check your tension and make sure you have not accidentally added or skipped stitches.
Round 11: Create the Loop for the Ruffle
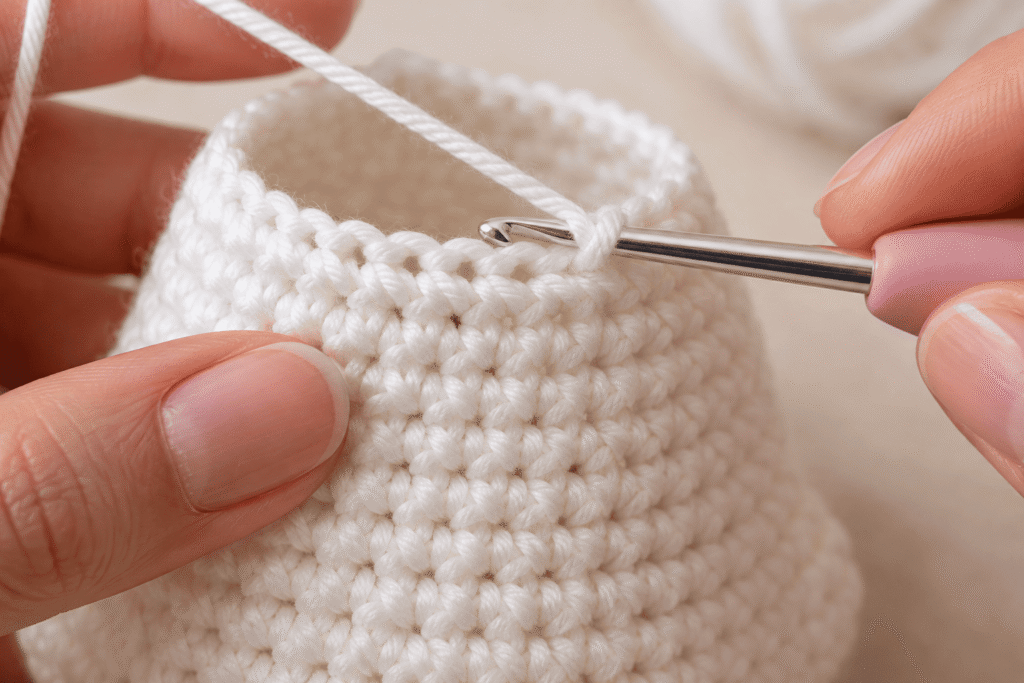
Work 1 single crochet into the back loop only of every stitch around.
Total: 30 stitches
This round is important because it creates the foundation for the decorative hem.
Working into the back loops only leaves the front loops unworked. You will use those remaining front loops later to attach the ruffle around the bottom of the ghost.
Make sure you work consistently into the back loop of every stitch.
Round 12: Begin Decreasing
Repeat the following sequence 6 times:
- Work 1 single crochet into each of the next 3 stitches.
- Work 1 decrease over the following 2 stitches.
Total: 24 stitches
The body begins narrowing toward the lower section.
Round 13: Continue Decreasing
Repeat the following sequence 6 times:
- Work 1 single crochet into each of the next 2 stitches.
- Work 1 decrease over the following 2 stitches.
Total: 18 stitches
The opening will become smaller, allowing you to shape the underside of the ghost.
Add the Stuffing and Prepare the Face
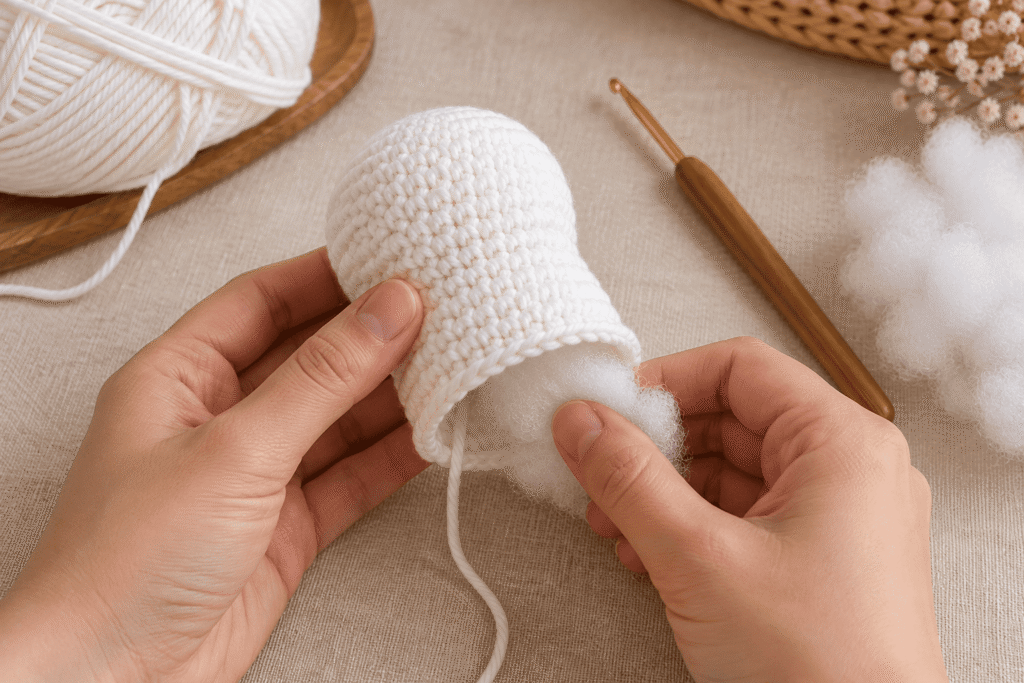
Before closing the body completely, add a small amount of stuffing through the opening.
Use your fingers or the rounded end of a crochet hook to distribute the stuffing evenly. Do not force too much stuffing into the narrow opening.
At this stage, embroider the face while you still have access to the inside of the ghost. This makes it easier to secure the yarn ends neatly.
Round 14: Narrow the Opening
Repeat the following sequence 6 times:
- Work 1 single crochet into the next stitch.
- Work 1 decrease over the following 2 stitches.
Total: 12 stitches
Add a little more stuffing if needed, keeping the body soft and evenly rounded.
Round 15: Close the Body
Work 1 decrease over the next 2 stitches, repeating 6 times.
Total: 6 stitches
Cut the yarn, leaving a tail long enough to close the opening.
Thread the tail onto a yarn needle. Pass the needle through the front loops of the remaining 6 stitches and pull gently to close the opening.
Secure the yarn and weave the tail inside the body.
Your ghost body is now complete.
Part 2: Crochet the Wavy Ghost Hem
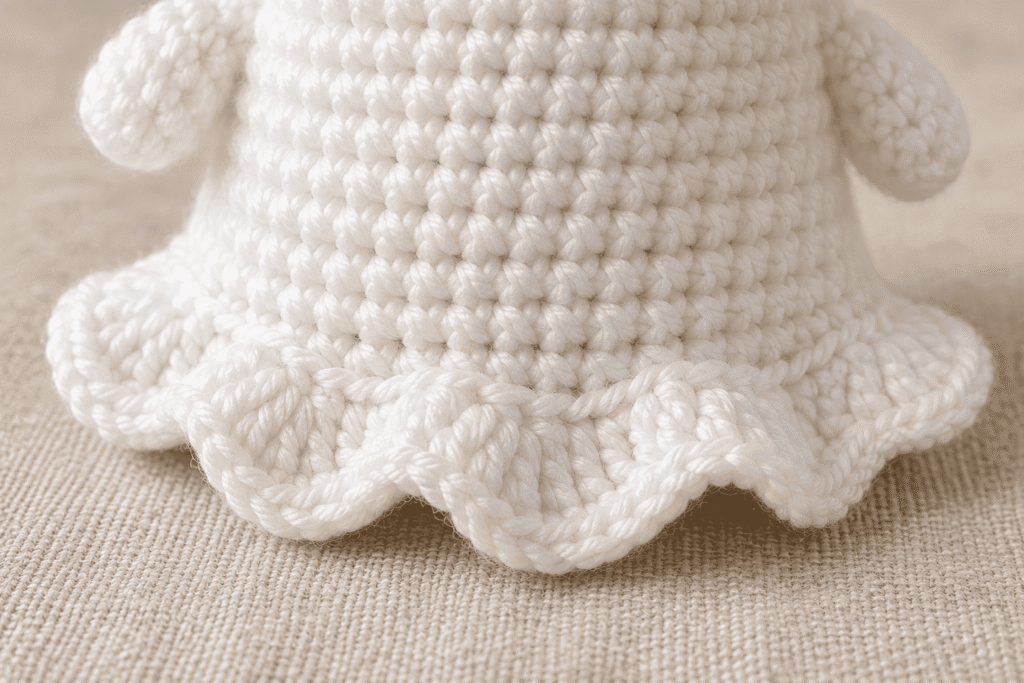
The scalloped or wavy hem gives the ghost its playful appearance. This decorative edge is worked into the front loops left unworked in Round 11.
Step 1: Attach the White Yarn
Hold the ghost with the unused front loops from Round 11 facing you.
Insert your hook into one of these front loops and attach the white yarn with a slip knot.
Work a slip stitch into the first available front loop to secure the yarn.
Step 2: Create the Ruffle
Repeat the following sequence around the entire round:
- Work 1 slip stitch into the next available front loop.
- Work 3 half double crochet stitches into the following front loop.
Continue repeating these two steps until you return to your starting point.
You will use the 30 available front loops from Round 11. Because the three half double crochet stitches are placed into alternating loops, the edge forms a soft, wavy ruffle.
The slip stitches create lower sections, while the groups of half double crochet stitches create the raised scallops.
Step 3: Finish the Edge
After completing the ruffle, join the final stitch to the starting area with a discreet slip stitch if needed.
Cut the yarn, leaving a tail. Pull the tail through the final loop and weave it securely into the inside of the body.
Gently arrange the ruffle with your fingers so that the waves fall evenly around the ghost.
Troubleshooting the hem: If the ruffle curls too tightly, check that you have not accidentally skipped too many loops. If it looks uneven, make sure you are consistently working one slip stitch into one loop and three half double crochet stitches into the next loop.
The ruffle may look slightly different depending on your yarn, hook, and tension. That is part of the charm of handmade crochet.
Part 3: Crochet the Tiny Arms
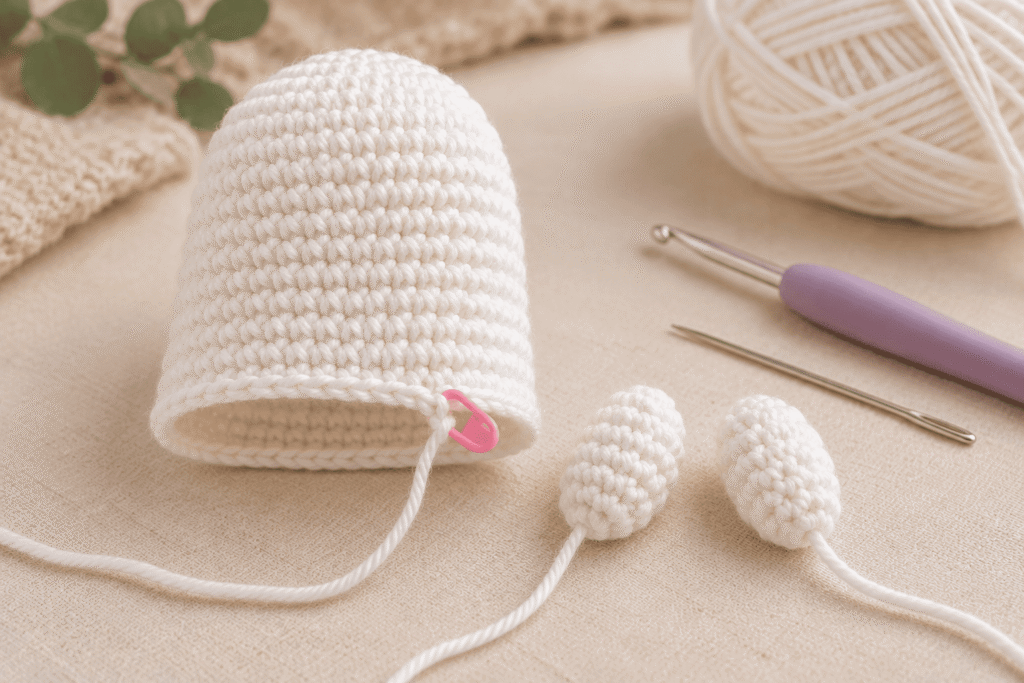
The arms are optional, but they add character and make the ghost look especially cute.
Make two identical arms using white yarn.
Arm Pattern
Round 1: Make a magic ring and work 6 single crochet stitches into the ring. (6 stitches)
Round 2: Work 1 single crochet into every stitch around. (6 stitches)
Fasten off, leaving a long tail for sewing.
The arms are intentionally small. You can leave them unstuffed for a flatter shape or add a tiny amount of stuffing if you prefer a fuller appearance.
Attach the Arms
Position one arm on each side of the ghost’s body.
Place them slightly below the head, around the upper-middle portion of the body. Use pins to hold them in place before sewing.
Thread the yarn tail onto a yarn needle and sew the top edge of each arm securely to the body. Pass through several stitches on both pieces to prevent the arms from becoming loose.
Weave in the yarn ends carefully.
For a more expressive design, you can angle the arms slightly upward or outward.
Part 4: Embroider the Ghost’s Face
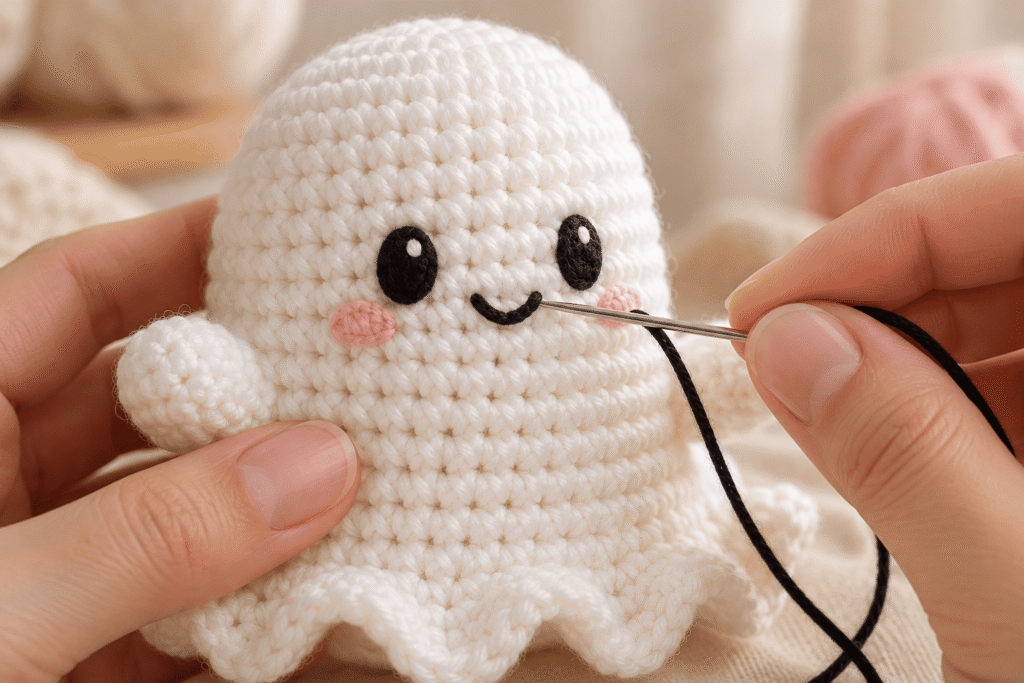
The face gives your crochet ghost its personality. You can create a happy, sleepy, surprised, or mischievous expression using a few simple embroidery stitches.
Use black yarn or embroidery thread for the eyes and mouth. Pink yarn can be used for optional cheeks.
Embroider the Eyes
Thread a yarn needle with black yarn.
Choose a position on the front of the head, leaving enough room between the eyes for a small mouth.
For simple oval eyes, make several small vertical stitches in the same area until each eye has the desired shape.
Keep the eyes approximately the same size and place them at a similar height.
Before securing the yarn, look at the face from the front to check that the eyes are evenly spaced.
Add a Small Mouth
Use black yarn to embroider a short horizontal stitch or a small curved line below the eyes.
A tiny straight mouth creates a simple expression, while a curved mouth can make the ghost look happy.
You can also leave the mouth off entirely for a minimalist face.
Add Pink Cheeks
For a softer, cuter appearance, use pale pink yarn to embroider small cheeks on either side of the face.
Make one or two tiny stitches on each side, keeping them subtle so they do not overpower the eyes.
Alternatively, you can use pink embroidery thread to create a small blush effect with several short stitches.
Face Placement Tips
- Embroider the face before completely closing the body whenever possible.
- Keep the eyes relatively close together for a cute amigurumi expression.
- Use pins or removable markers to test the placement before stitching.
- Avoid pulling the embroidery yarn too tightly, as it can distort the crocheted fabric.
- Secure the yarn ends inside the body.
There is no single correct expression. Experiment with different placements to find the look you like best.
Part 5: Finishing Your Crochet Ghost
Once the body, ruffle, arms, and face are complete, take a few minutes to finish the project neatly.
Shape the Body
Use your fingers to smooth the head and body. Gently redistribute the stuffing if one side looks fuller than the other.
The ghost should stand or sit in the position you prefer, depending on its proportions and stuffing.
Check the Ruffle
Spread the wavy hem around the body so that the scallops are evenly distributed.
If one section looks twisted, gently rotate and arrange it. Avoid pulling hard on the decorative stitches.
Secure All Loose Ends
Check the body, arms, and embroidered face for loose yarn ends.
Weave each end into the inside of the crochet fabric, changing direction once or twice to help prevent it from coming loose.
Trim excess yarn only after the ends have been secured.
Final Inspection
Before displaying your ghost, check the following:
- The body is evenly stuffed.
- The opening at the bottom is completely closed.
- The arms are securely attached.
- The facial features are firmly embroidered.
- The ruffle is attached evenly.
- No long yarn tails are visible.
Your crochet ghost is now ready to display as part of your Halloween decorations.
How to Customize Your Crochet Ghost
One of the best things about making an amigurumi ghost is how easy it is to personalize. Once you understand the basic construction, you can experiment with colors, expressions, accessories, and yarn textures.
1. Make a Classic White Ghost
Use white yarn, black embroidered eyes, and a small black mouth. Add the wavy hem for a traditional Halloween look.
This simple design works well on a shelf, desk, mantel, or seasonal display.
2. Create a Pastel Ghost
Replace the white yarn with pale pink, lavender, baby blue, or mint green.
Pastel ghosts are ideal for cute seasonal decorations, handmade gifts, and playful autumn displays.
3. Make a Sleepy Ghost
Use curved embroidered eyes instead of open oval eyes.
Create each closed eye with a short curved line. Add a tiny mouth beneath them for a peaceful, sleepy expression.
4. Make a Happy Ghost
Use slightly curved eyes and a small embroidered smile.
A little pink blush on the cheeks can make the expression look even sweeter.
5. Add a Tiny Witch Hat
Crochet or sew a small witch hat separately and attach it to the top of the head.
Choose black, purple, or dark green yarn for a traditional Halloween look. A tiny orange band can add a seasonal accent.
Make sure any accessory is attached securely, especially if the ghost will be handled frequently.
6. Add a Mini Bow
A small bow made from yarn or ribbon can give the ghost a softer, more decorative style.
Position it near one side of the head or below the face. If the item is intended for young children, avoid detachable ribbon and other loose decorative pieces.
7. Experiment with Different Ruffles
The standard ruffle uses alternating slip stitches and groups of three half double crochet stitches.
For a more subtle edge, you can try smaller groups of stitches. For a fuller edge, experiment with a slightly larger group.
Changing the number of stitches will change the fullness of the ruffle, so test the variation before applying it to your finished ghost.
8. Create a Mini Ghost Family
Make several ghosts in different colors or sizes.
Use the same face style for a coordinated collection, or give each ghost a different expression. A group of small ghosts can look lovely on a shelf or as part of a Halloween centerpiece.
How to Change the Size of Your Crochet Ghost
You can create a smaller or larger ghost by adjusting the yarn, hook, and proportions.
To Make a Smaller Ghost
- Choose finer yarn.
- Use a smaller hook that works well with your yarn.
- Keep the same general pattern structure.
- Use proportionally smaller embroidered features.
A smaller hook and finer yarn will generally produce a smaller ghost, although the exact size depends on your tension.
To Make a Larger Ghost
- Choose a thicker yarn.
- Use a hook suitable for that yarn while maintaining a tight fabric.
- Consider using slightly larger safety-conscious embroidered features.
- Add stuffing gradually to maintain a rounded shape.
If you use bulky yarn, the body may become larger without requiring additional rounds. If you want a much taller ghost rather than simply a larger one, you can add extra plain rounds between the shaping sections.
Remember that changing the yarn and hook affects not only the size but also the drape of the ruffle and the overall proportions.
Tips for Beginner Crocheters
If this is your first amigurumi project, a few small habits can make the process easier.
Use a Stitch Marker From the First Round
Because the body is worked in a spiral, the beginning of each round can be difficult to identify.
Place a marker in the first stitch of the round and move it after completing each round. This will help you keep track of your stitch count.
Count Every Round
Do not rely only on how the body looks.
If a round should contain 24 stitches, count the stitches before moving to the next round. A missed increase can make the head uneven, while an accidental extra stitch can affect the shape.
Practice the Magic Ring
The magic ring creates a tightly closed center, which is useful for amigurumi.
If you struggle with it, practice with a small amount of scrap yarn before beginning the project. The alternative chain-two method is also useful for beginners.
Keep Your Tension Consistent
Try to make your stitches approximately the same size throughout the project.
If your tension changes dramatically between rounds, the ghost may develop uneven sections.
Use Invisible Decreases
Invisible decreases help reduce visible gaps in the fabric.
They are particularly useful in amigurumi because they create a smoother surface and help keep the stuffing inside.
Stuff in Small Amounts
Add the stuffing gradually, especially when the opening becomes smaller.
Use small pieces rather than one large clump, and spread them evenly throughout the head and body.
Take Your Time With the Face
The face is one of the most noticeable details of an amigurumi project.
Before embroidering, test the placement with pins or temporary markers. A small change in the distance between the eyes can give the ghost a completely different expression.
Common Crochet Ghost Problems and How to Fix Them
Even simple crochet projects can have a few challenges. Here are some common problems and their solutions.
| Problem | Possible cause | How to fix it |
|---|---|---|
| Stuffing shows through the body | Stitches are too loose or the hook is too large | Try a smaller hook and maintain consistent tension |
| Head looks uneven | Missed increases or inconsistent tension | Count each round and check the stitch totals |
| Body is too narrow | Incorrect stitch count or tight tension | Recount stitches and check your hook size |
| Bottom opening is difficult to close | Too much stuffing or loose decreases | Remove excess stuffing and close gradually |
| Ruffle curls too tightly | The decorative edge has insufficient fullness or uneven tension | Check the sequence and make sure all 30 loops are used |
| Ruffle looks uneven | Stitches were skipped or the sequence changed | Follow the same alternating sequence around the hem |
| Arms point in different directions | Arms were attached at different angles | Pin both arms in place before sewing |
| Eyes look asymmetrical | Embroidery placement differs | Mark both positions before stitching |
| Face pulls the fabric inward | Embroidery yarn is too tight | Loosen the stitches and secure the ends gently |
Why Is My Ghost Too Stiff?
A very tight tension combined with firm stuffing can make the body feel stiff.
Try using a slightly larger hook if your stitches remain dense enough to prevent the stuffing from showing. You can also reduce the amount of stuffing.
The goal is a soft but structured shape.
Why Does My Ghost Not Stand Upright?
This pattern is primarily a soft amigurumi decoration, so it is not guaranteed to stand upright on its own.
The shape, yarn, stuffing, and ruffle all affect balance. For display, you can place the ghost against another object or arrange it in a seated position.
If standing is important, consider designing a flat weighted base as a separate modification.
How to Care for Your Crochet Ghost
Proper care helps preserve the shape and appearance of your handmade decoration.
Cleaning
Check the yarn manufacturer’s care instructions before washing.
For many acrylic or cotton yarns, gentle hand washing may be appropriate. Use cool or lukewarm water and a mild detergent, then rinse carefully.
Avoid vigorous rubbing, twisting, or wringing because these actions may distort the stitches or ruffle.
Drying
Gently press out excess water with a clean towel.
Reshape the body and ruffle, then allow the ghost to air-dry completely. Avoid placing a damp amigurumi decoration in a closed container.
If the ghost contains polyester stuffing, make sure the interior dries thoroughly before storing it.
Storage
Store your crochet ghost in a clean, dry place away from direct sunlight, moisture, and sharp objects.
For seasonal decorations, a breathable storage container or fabric bag can help protect the stitches from dust.
Avoid placing heavy items on top of the ghost, as prolonged pressure may flatten its shape.
Frequently Asked Questions
Is this crochet ghost pattern suitable for beginners?
Yes. The pattern uses basic stitches, including single crochet, increases, decreases, slip stitches, and half double crochet. Beginners should be comfortable with counting stitches and working in continuous rounds, or be willing to practice those techniques.
How long does it take to crochet a ghost?
Most crocheters can expect to spend approximately 2–4 hours on a small ghost, depending on their experience, yarn, tension, and the time needed for embroidery and finishing.
What yarn is best for a crochet ghost?
Smooth cotton, acrylic, or cotton-acrylic yarn is a good choice. White or ivory yarn creates the classic ghost appearance, while pastel shades offer a more playful design.
What size crochet hook should I use?
A 3–3.5 mm hook is a useful starting point for this pattern. Adjust the size according to your yarn and tension. The fabric should be firm enough to keep the stuffing from showing.
Can I make the ghost without a magic ring?
Yes. Chain 2 and work 6 single crochet stitches into the second chain from the hook. This is a useful alternative if you have difficulty making a magic ring.
Can I make the crochet ghost without arms?
Absolutely. The arms are optional. Leaving them off creates a simpler silhouette and reduces the amount of sewing required.
How do I make the ruffle?
The ruffle is worked into the front loops left unworked in Round 11. Attach the yarn and repeat one slip stitch in the next loop followed by three half double crochet stitches in the following loop around the body.
Why is Round 11 worked in the back loops only?
Working in the back loops leaves the front loops available for the decorative hem. This allows you to add the ruffle after completing the main body.
Can I use safety eyes instead of embroidery?
You can adapt the design with safety eyes if the finished item is intended for an appropriate age group and you follow the manufacturer’s installation instructions. However, safety eyes can present a choking hazard if they detach, so securely embroidered eyes are the safer choice for decorations intended for young children.
Can I sell finished crochet ghosts made from this pattern?
You can generally sell finished handmade items you make yourself, subject to applicable laws and any terms associated with materials or pattern sources you use. If you sell your finished ghosts, use your own product photographs and original listing text. Do not claim that another creator’s design or photographs are your own.
Is this pattern suitable for Halloween gifts?
Yes. Its small size, simple construction, and customizable face make it a lovely handmade seasonal gift. You can personalize each ghost with a different expression, color, or accessory.
Can I turn the ghost into a keychain?
You can adapt a smaller version into a keychain, but make sure any attachment is securely fastened. The original pattern is designed as a soft decoration rather than a tested keychain design.
Final Thoughts
This easy crochet ghost amigurumi is a fun way to practice basic crochet techniques while creating a charming Halloween decoration. Its rounded body, embroidered face, tiny arms, and wavy hem make it easy to personalize, whether you prefer a traditional white ghost or a colorful collection of little spirits.
The most important steps are keeping your stitch counts accurate, leaving the correct loops available for the ruffle, and taking your time when embroidering the face. Once you have made your first ghost, you can experiment with different expressions, yarn colors, and accessories to create a design that feels uniquely yours.
Gather your yarn, prepare your hook, and enjoy making a handmade ghost for your autumn decorations, Halloween gifts, or seasonal craft collection.
Happy crocheting!






