A handmade hair accessory can completely change a simple hairstyle, and this crochet flower hair tie is a beautiful way to turn leftover yarn into something useful.
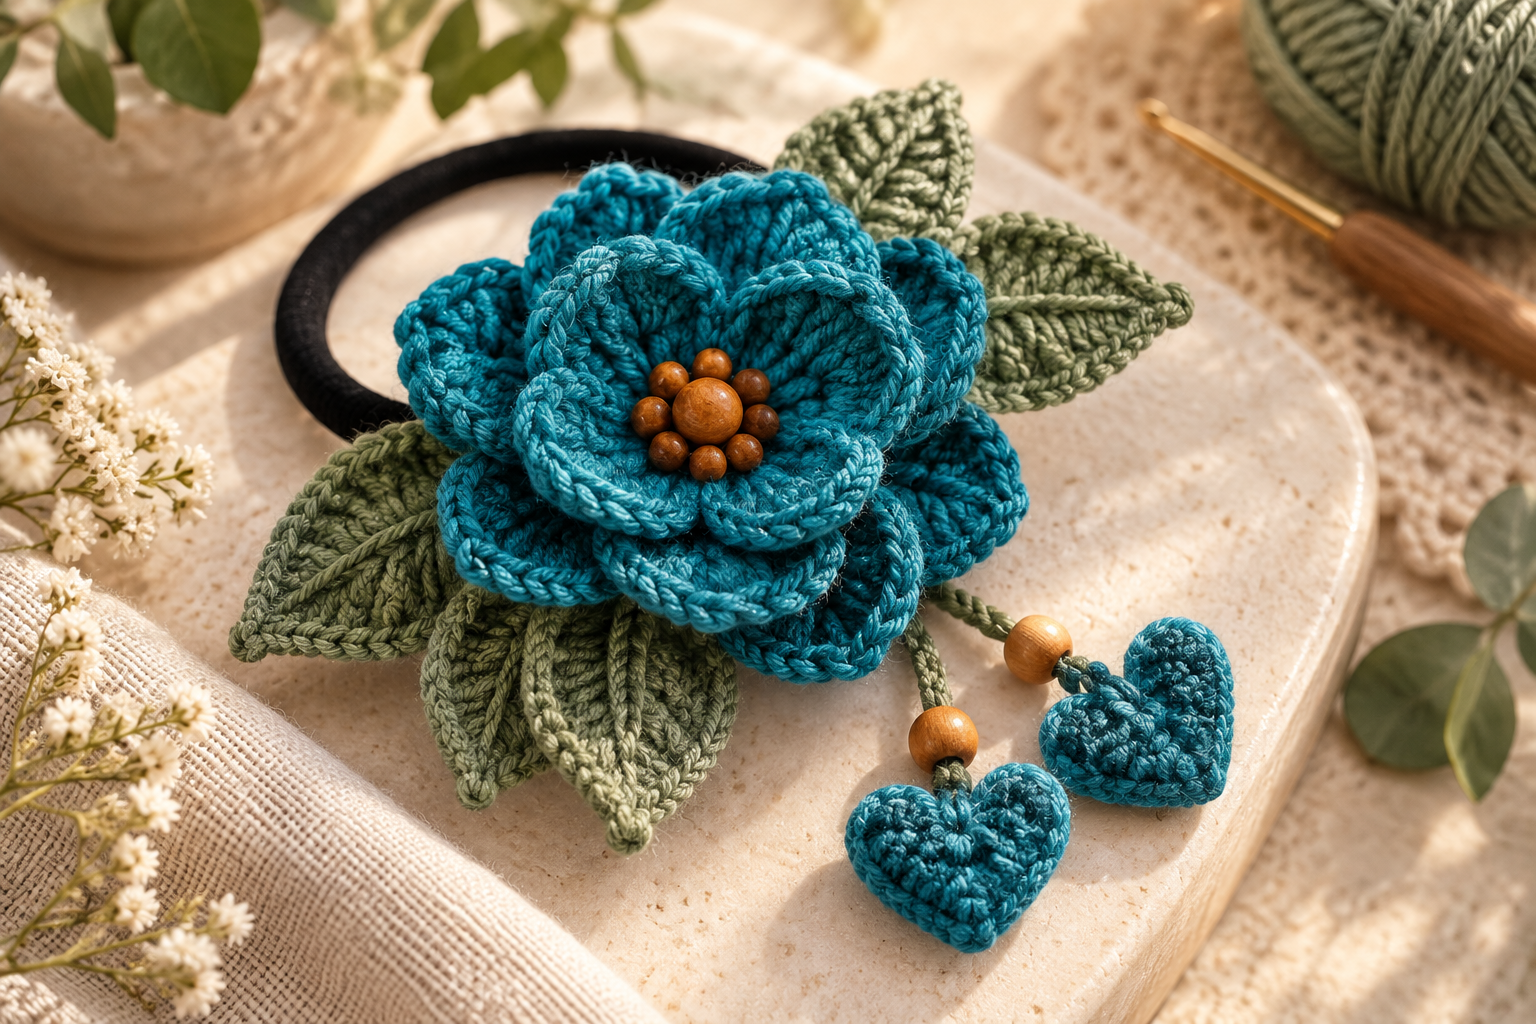
The design shown here combines a large layered crochet flower with green leaves, dangling heart motifs and small wooden beads. The finished accessory can be attached to a standard elastic hair tie and worn with a ponytail, bun or half-up hairstyle.
This tutorial gives you an original crochet pattern inspired by the visual design, rather than copying the instructions from the reference image. You can make the flower in one color or experiment with different combinations to create accessories for different seasons and outfits.
The project is also particularly useful for using small amounts of leftover yarn.
What You’ll Learn
In this tutorial, you’ll learn how to make:
- A layered crochet flower
- Small crochet leaves
- Crochet heart charms
- Decorative hanging cords
- A wrapped crochet center
- A finished flower hair tie
- Several color variations
- Different flower sizes
- A simpler beginner version
- A more detailed layered version
- A version without beads
- A version suitable for selling
You’ll also find:
- Materials tables
- Yarn recommendations
- Hook-size guidance
- Complete abbreviations
- Step-by-step patterns
- Assembly instructions
- Size adjustments
- Color combinations
- Troubleshooting
- Finishing techniques
- Care instructions
- Styling ideas
- Gift ideas
- Selling tips
- Frequently asked questions
Why Make a Crochet Flower Hair Tie?
Crochet hair accessories are small projects with a lot of creative potential.
Unlike a large blanket or garment, a hair tie can often be completed in one sitting.
It is ideal for:
- Using leftover yarn
- Practicing crochet flowers
- Learning basic appliqué techniques
- Making handmade gifts
- Creating matching accessories
- Building a handmade product collection
- Selling at craft fairs
- Creating seasonal accessories
- Making personalized gifts
The same flower can also be attached to:
- Hair clips
- Headbands
- Barrettes
- Scrunchies
- Handbags
- Hats
- Cardigans
- Gift wrapping
- Crochet bags
Finished Crochet Flower Hair Tie
The finished accessory consists of several components.
| Component | Purpose |
|---|---|
| Hair elastic | Creates the functional hair tie |
| Large crochet flower | Main decorative element |
| Flower center | Adds contrast and dimension |
| Leaves | Adds a botanical detail |
| Crochet cords | Creates movement |
| Crochet hearts | Decorative hanging elements |
| Wooden beads | Optional accent |
| Yarn tails | Used for sewing and finishing |
The exact finished size depends on your yarn, hook and tension.
A typical finished flower measures approximately 7–10 cm across.
Materials
| Material | Recommended |
|---|---|
| Worsted or DK yarn | Main flower |
| Green yarn | Leaves |
| Contrasting yarn | Flower center |
| Hair elastic | 1 |
| Crochet hook | 3.5–4.0 mm |
| Tapestry needle | 1 |
| Scissors | 1 |
| Stitch marker | Optional |
| Wooden beads | Optional |
| Measuring tape | Optional |
For the flower shown in the reference style, a medium-weight yarn gives the petals enough structure to hold their shape.
How Much Yarn Do You Need?
This project uses relatively little yarn.
| Component | Approximate Yarn |
|---|---|
| Flower | 10–20 g |
| Leaves | 3–5 g |
| Hearts | 2–4 g |
| Cords | 2–4 g |
| Center | 1–3 g |
Exact consumption depends on yarn weight, hook size, number of petals and the length of the hanging decorations.
This makes the project particularly good for leftover yarn.
Choosing Your Yarn
For a structured flower, choose yarn that holds stitches clearly.
Good options include:
- Cotton
- Cotton blends
- Acrylic
- Cotton-acrylic blends
- Smooth worsted yarn
- Smooth DK yarn
Cotton is particularly nice for flowers because it tends to hold its shape well.
Very fluffy yarn can make the petals difficult to define.
Best Yarn Weight
DK Weight
Good for:
- Lightweight accessories
- Smaller flowers
- Delicate hair ties
Worsted Weight
Good for:
- Larger flowers
- More pronounced petals
- Structured accessories
Bulky Yarn
Can work for oversized flowers, but the finished accessory becomes heavier.
For the design in the reference image, DK or worsted weight is a practical starting point.
Choosing the Crochet Hook
A 3.5–4.0 mm crochet hook works well with many DK and worsted yarns.
Your goal is to create stitches that are:
- Defined
- Firm
- Flexible
- Not excessively loose
If the petals are floppy, try a slightly smaller hook.
If the stitches are difficult to work, move up by 0.5 mm.
Crochet Abbreviations
The pattern uses US crochet terminology.
| Abbreviation | Meaning |
|---|---|
| MR | Magic ring |
| ch | Chain |
| sc | Single crochet |
| hdc | Half double crochet |
| dc | Double crochet |
| tr | Treble crochet |
| sl st | Slip stitch |
| inc | Increase |
| st | Stitch |
| sts | Stitches |
| BLO | Back loop only |
| FO | Fasten off |
Basic Techniques
Before beginning, make sure you are comfortable with:
- Magic ring
- Chain stitch
- Single crochet
- Half double crochet
- Double crochet
- Slip stitch
- Working several stitches into one stitch
- Sewing crochet pieces together
If you’re a beginner, practice a small flower first.
Crochet Flower Hair Tie Pattern
The project is divided into five main sections:
Flower → Center → Leaves → Hearts → Assembly
Let’s start with the flower.
Pattern 1: Layered Crochet Flower
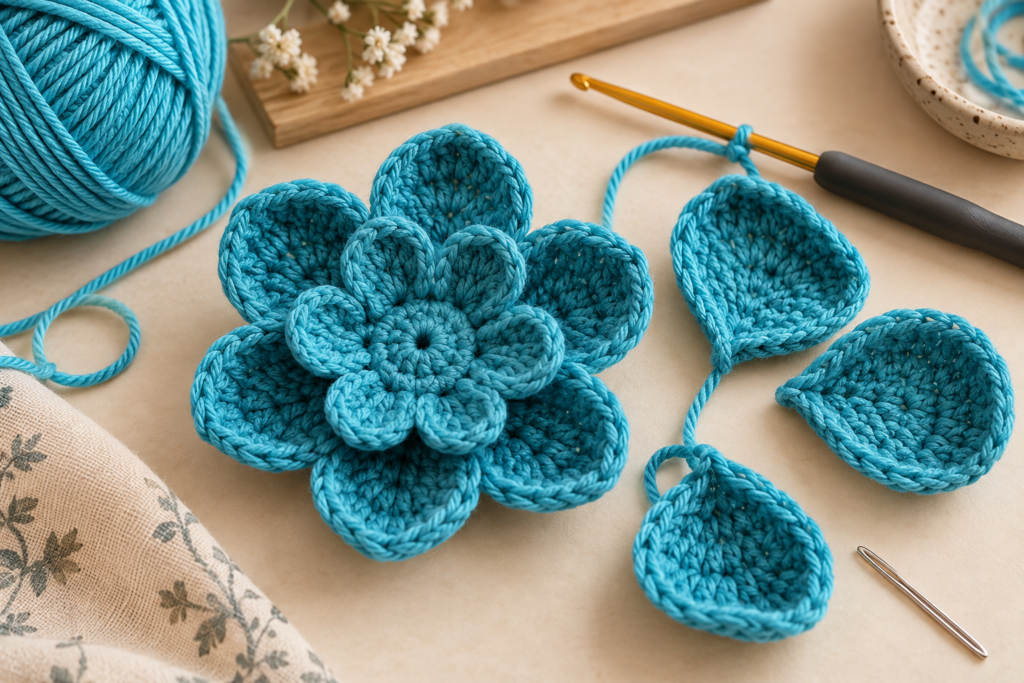
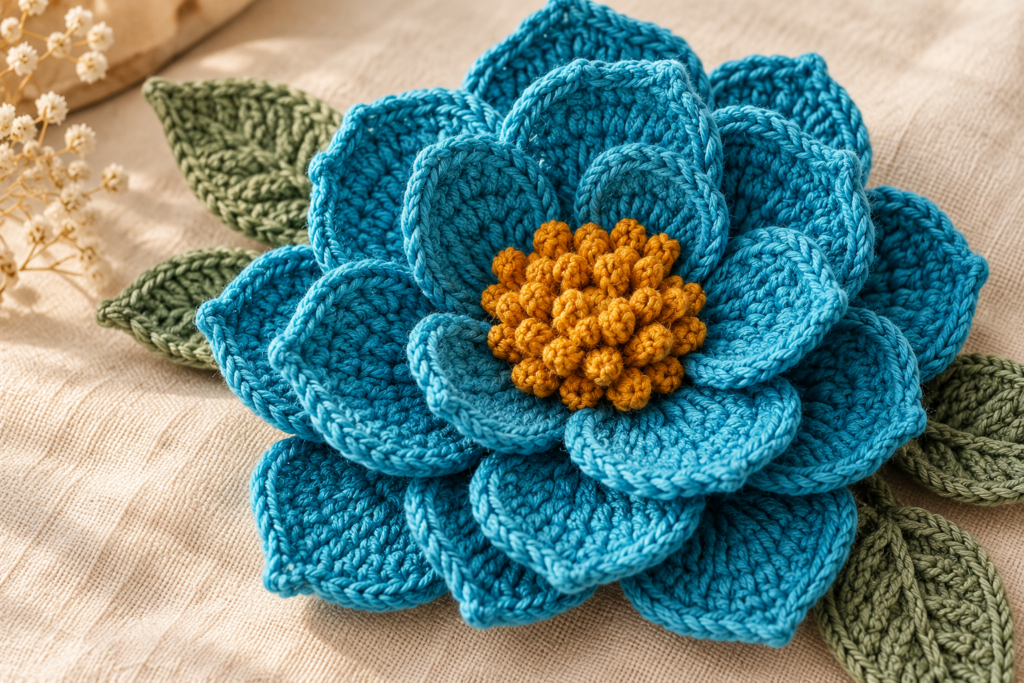
This flower has two layers of petals to create the full dimensional appearance shown in the reference.
You can make it with one color or use two colors.
Flower Base
Start with your main flower color.
Make a magic ring.
Round 1
Work:
12 sc into the magic ring.
Join with a slip stitch.
Total: 12 sts
Pull the center closed.
Creating the First Petal Layer
You will create six rounded petals.
Petal 1
From the current stitch:
ch 2
Work:
3 dc, ch 2, sl st
into the same stitch.
This creates the first rounded petal.
Petal 2
Skip the next stitch.
Into the following stitch:
ch 2, 3 dc, ch 2, sl st
Repeat around.
You should have approximately six petals.
Fasten off.
Weave in the end.
The flower will look relatively small at this stage.
That’s intentional.
The second layer creates the fullness.
Pattern 2: Second Flower Layer
Join a contrasting color or the same color to the back of the first flower.
Work between the first-layer petals rather than directly on top of them.
For each large petal:
ch 3
then work:
5 dc, ch 3, sl st
into the same space.
Repeat around.
You should have approximately six larger petals.
Fasten off.
Weave in the ends.
Shaping the Petals
Don’t leave the petals completely flat.
Gently:
- Separate each petal.
- Curve the outer edge.
- Pull the center slightly forward.
- Arrange the petals so they overlap naturally.
This is what gives the flower its dimensional appearance.
Making the Flower More Full
If you want an especially large flower, add a third layer.
Use the spaces behind the second layer.
For each third-layer petal:
ch 3
Work:
7 dc, ch 3, sl st
into the same space.
This creates a dramatic oversized flower.
For a hair tie, however, two layers are usually more practical because they keep the accessory lighter.
Pattern 3: Crochet Flower Center
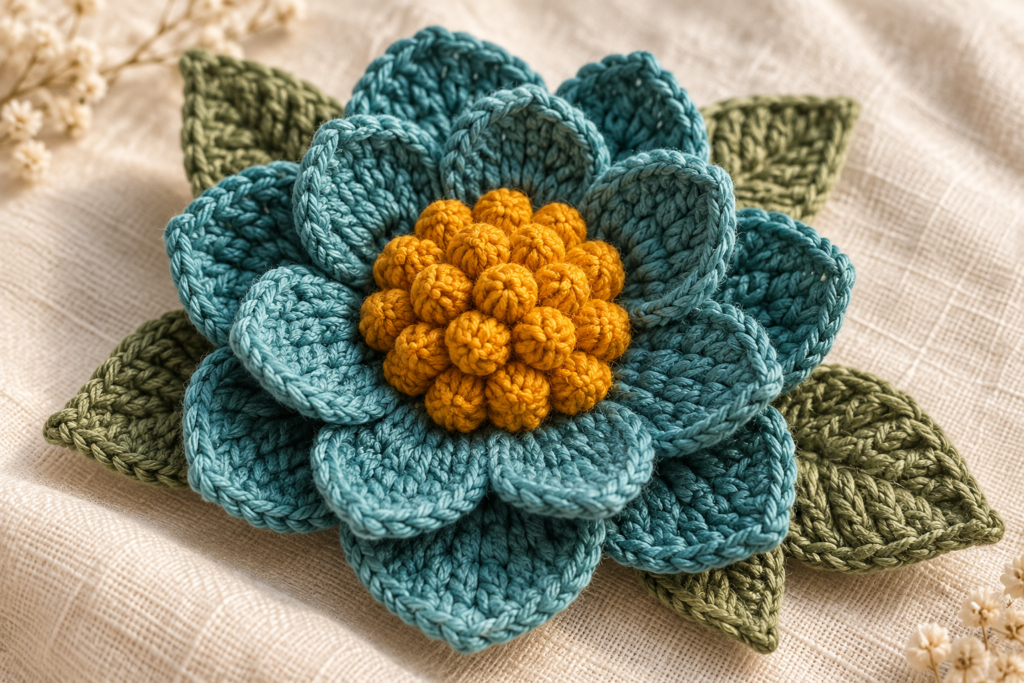
The reference design uses a contrasting center.
A simple textured center can be made using a small crochet circle.
Using your center color:
Round 1
Make a magic ring.
Work:
6 sc
Join.
Round 2
Work:
2 sc in each stitch around
12 sts
Fasten off.
Leave a sewing tail.
Alternative Textured Center
For a more dimensional center, make several tiny crochet bobbles and arrange them in a circular cluster.
This works especially well with:
- Mustard
- Golden yellow
- Orange
- Cream
- Brown
The center can completely change the character of the flower.
Attaching the Flower Center
Place the center directly over the middle of the layered flower.
Using your tapestry needle:
- Insert the needle through the center.
- Stitch through the flower.
- Pull gently.
- Repeat around several points.
- Secure the yarn on the back.
- Weave in the end.
Don’t pull excessively tight.
The flower should remain dimensional.
Pattern 4: Crochet Leaves
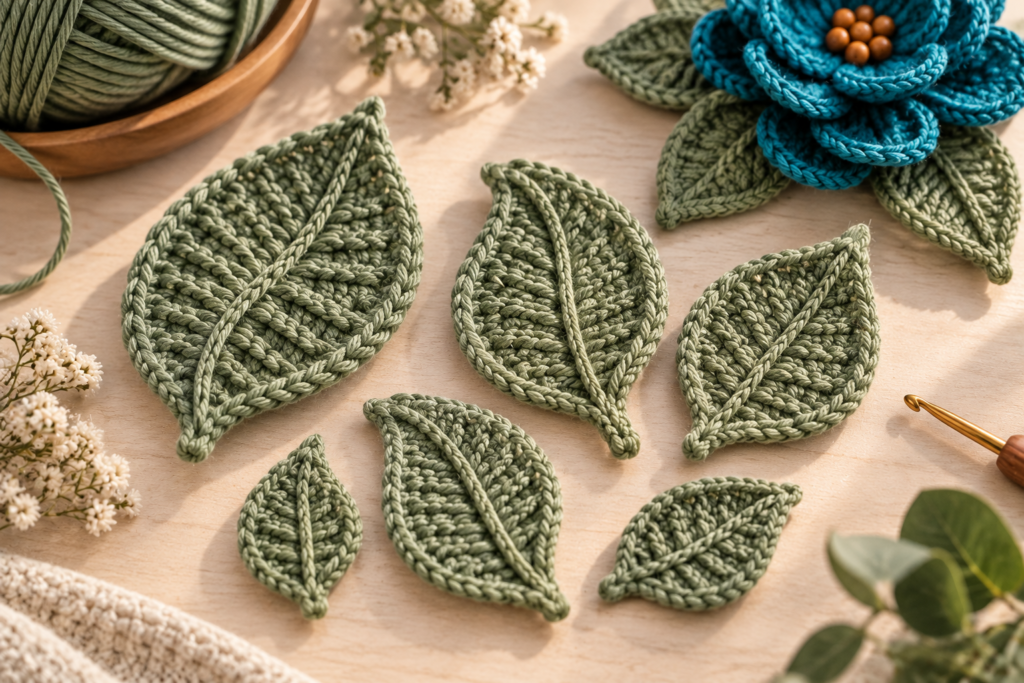
The green leaves are an important part of the design because they balance the large flower.
Make 4–6 leaves, depending on the desired fullness.
Small Crochet Leaf
Using green yarn:
ch 7
Starting in the second chain from the hook:
sc, hdc, dc, dc, hdc, sc
Then work along the opposite side of the foundation chain:
sc, hdc, dc, dc, hdc, sc
Join with a slip stitch.
Fasten off.
Leave a long tail for sewing.
Leaf Shape
The finished leaf should be slightly pointed at both ends.
Gently pull the center lengthwise.
You can also add a small chain or slip-stitch line down the middle to imitate a leaf vein.
Larger Crochet Leaf
For a larger leaf:
ch 10
Starting in the second chain:
sc, hdc, dc, dc, tr, dc, dc, hdc, sc
Continue around the opposite side.
Finish with a slip stitch.
This creates a longer leaf that works well beneath a large flower.
Leaf Color Variations
Try:
- Sage green
- Olive
- Forest green
- Moss
- Eucalyptus
- Dusty green
For a vintage aesthetic, muted greens work particularly well.
Pattern 5: Crochet Heart Charm
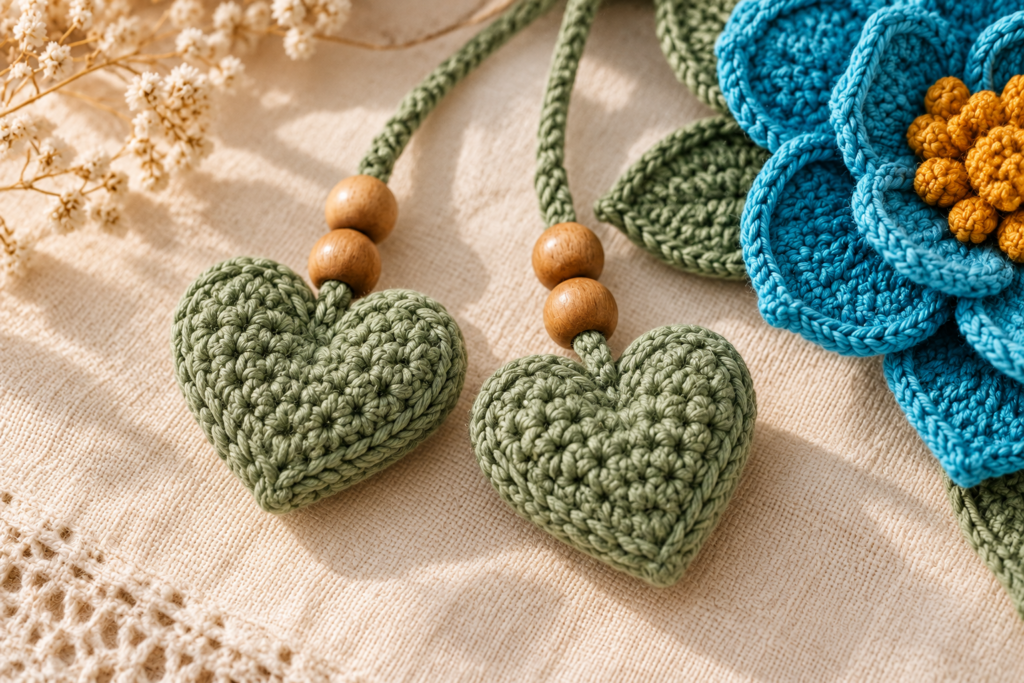
The hanging hearts add movement to the accessory.
Make two or four hearts depending on your preferred arrangement.
Small Crochet Heart
Make a magic ring.
Work:
ch 2
then:
3 dc
3 hdc
1 dc
3 hdc
3 dc
ch 2
Slip stitch into the ring.
Pull the ring closed.
Fasten off.
Leave a long tail.
The exact appearance can vary depending on yarn weight and tension.
Shaping the Heart
After making the heart:
- Pull the center closed.
- Identify the top center.
- Gently pinch the upper indentation.
- Shape the bottom into a point.
- Flatten lightly.
You should now have a recognizable heart shape.
Adding a Crochet Hanging Cord
For each hanging heart:
ch 15–25
depending on how long you want the decoration.
Fasten off.
Attach one end to the back of the flower or leaf cluster.
Sew the heart to the bottom.
Adding Wooden Beads
The reference design includes small wooden beads above the hanging hearts.
You can add them if desired.
Thread the bead onto a yarn tail or cord and secure it above the heart.
Important
Small beads and other detachable decorations should not be used on accessories intended for babies or young children, because they can present a choking hazard.
For an adult hair accessory, they can be used as decorative elements if securely attached.
A completely yarn-based version is the safer and simpler alternative.
Pattern 6: Crochet Hair Tie Base
You have two main options.
Option A — Sew Onto a Standard Elastic
This is the easiest.
Take a regular hair elastic.
Position it behind the flower.
Use strong matching yarn to sew through the flower and around the elastic repeatedly.
Work approximately:
10–15 secure passes
around the elastic.
Tie securely.
Weave the end into the back.
Option B — Crochet Around the Elastic
Place your hook through the elastic.
Attach yarn with a slip stitch.
Work:
sc around the entire elastic
until the elastic is completely covered.
Join with a slip stitch.
Fasten off.
This produces a more integrated crochet finish.
Attaching the Flower to the Hair Tie
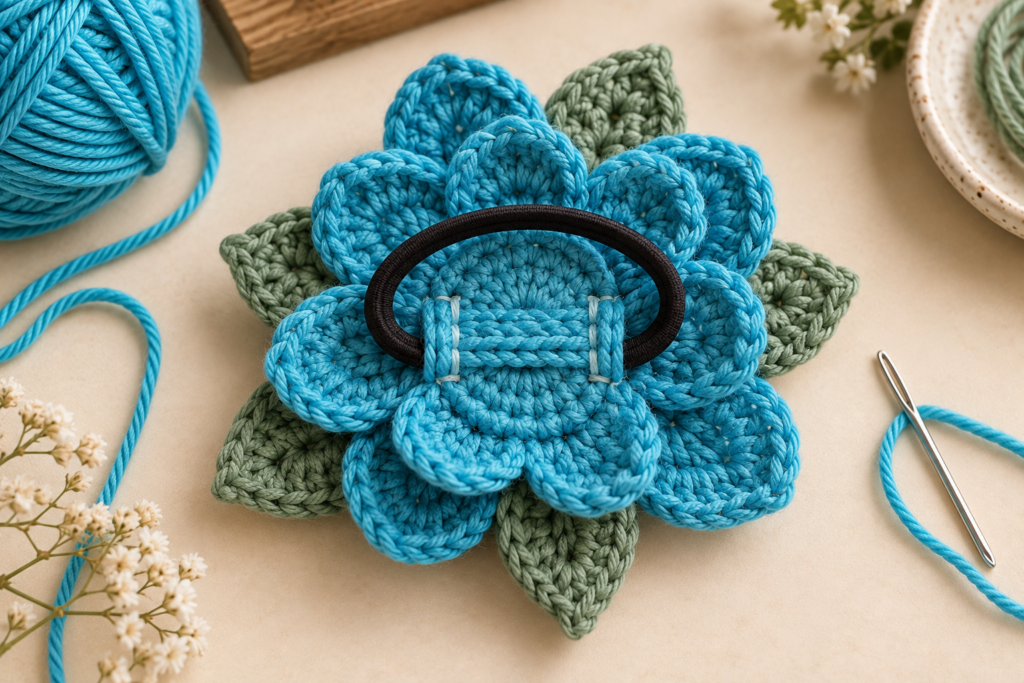
This is the most important assembly step.
Place the flower face down.
Position the hair elastic horizontally across the back.
Use your flower-colored yarn.
Sew through:
flower → elastic → flower
Repeat several times.
Move from one side of the elastic to the other.
Then wrap yarn around the elastic several times.
Finish with a secure knot on the back.
Weave the remaining tail into the flower.
Attaching the Leaves
Arrange the leaves underneath the flower.
A pleasing arrangement is:
- 2 leaves on the left
- 2 leaves on the right
- 1 or 2 leaves pointing downward
Overlap the leaves slightly.
Sew through their bases.
Don’t stitch along the entire leaf.
Securing the base allows the tips to remain slightly flexible.
Attaching the Hanging Hearts
Place the hearts underneath the flower.
For the reference-inspired arrangement, use:
two hanging cords
with one heart at the end of each.
For a fuller design, use:
three or four cords
with different lengths.
This creates movement when the hair accessory is worn.
Final Assembly Layout
A useful arrangement is:
| Element | Position |
|---|---|
| Large flower | Center |
| Flower center | Middle |
| Leaves | Lower sides |
| Long leaf | Bottom/side |
| Hanging cord 1 | Left |
| Hanging cord 2 | Right |
| Heart 1 | Lower left |
| Heart 2 | Lower right |
| Hair elastic | Back |
How to Make the Accessory More Secure
Because the hair tie will be stretched repeatedly, the attachment point needs reinforcement.
Don’t rely on one knot.
Instead:
- Sew through the flower.
- Wrap around the elastic.
- Sew back through the flower.
- Repeat several times.
- Change direction.
- Tie securely.
- Weave the tail through several stitches.
Test the elastic gently before wearing it.
Beginner Version
If you’re new to crochet, simplify the project.
Make:
- One flower layer
- One center
- Two leaves
- One hair elastic
Skip:
- Hanging hearts
- Beads
- Second flower layer
This version can be completed much faster and is an excellent first crochet accessory.
Advanced Version
For a more elaborate design:
- Use three flower layers
- Add 6–8 leaves
- Add multiple hanging cords
- Add crochet berries
- Add small flowers
- Mix three yarn colors
- Add a wrapped elastic
- Create textured petals
This creates a boutique-style accessory.
Crochet Flower Hair Tie Size Guide
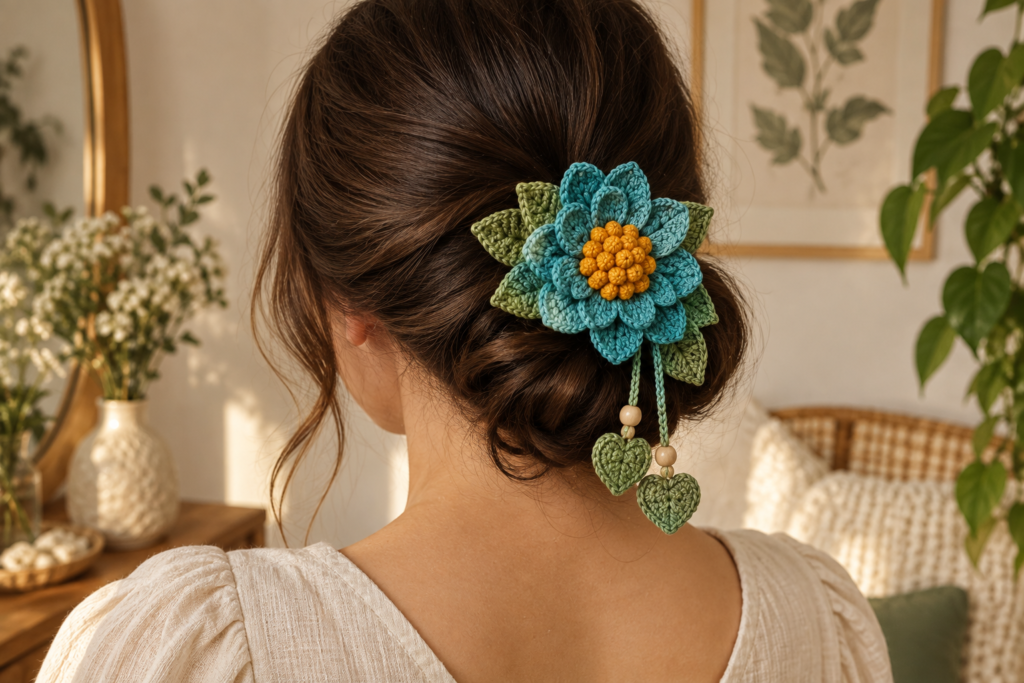
You can modify the size depending on the hairstyle.
| Style | Flower Diameter | Best Use |
|---|---|---|
| Mini | 4–5 cm | Small ponytail |
| Small | 5–7 cm | Everyday wear |
| Medium | 7–9 cm | Standard statement accessory |
| Large | 9–12 cm | Bun or statement hairstyle |
| Oversized | 12+ cm | Fashion/editorial accessory |
For the reference-inspired design, a 7–10 cm flower is a good target.
How to Make a Smaller Flower
To reduce the flower:
- Use DK yarn
- Use a 3.0–3.5 mm hook
- Make fewer petals
- Use only one layer
- Make a smaller center
How to Make a Larger Flower
To enlarge it:
- Use worsted yarn
- Use a 4–5 mm hook
- Increase petal stitch count
- Add a second or third layer
- Use larger leaves
Color Combinations
The flower in the reference image uses a beautiful turquoise and sage combination, but there are many possibilities.
| Flower | Leaves | Center |
|---|---|---|
| Turquoise | Sage | Mustard |
| Dusty Pink | Olive | Cream |
| Burgundy | Forest Green | Gold |
| Lavender | Sage | Yellow |
| Cream | Olive | Brown |
| Mustard | Forest Green | Rust |
| Coral | Sage | Cream |
| Blue | Eucalyptus | Golden |
| White | Sage | Yellow |
| Plum | Dusty Green | Blush |
Seasonal Crochet Hair Tie Ideas
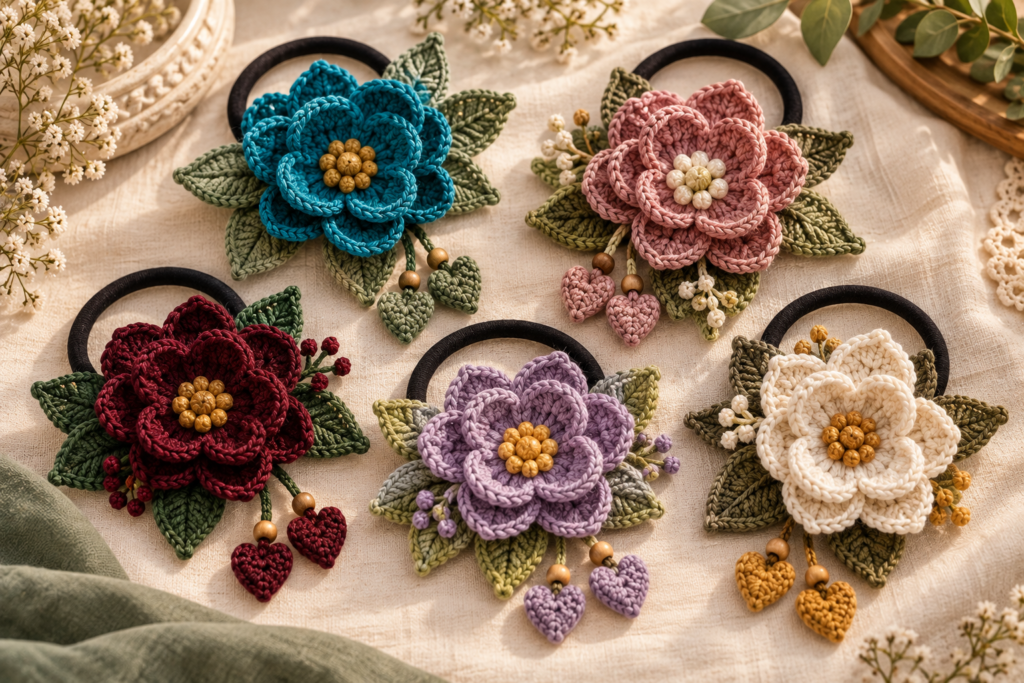
Spring
Use:
Lavender + sage + cream
Add small flowers instead of hearts.
Summer
Try:
Turquoise + green + golden yellow
This creates a fresh botanical look similar to the reference.
Autumn
Use:
Rust + mustard + olive
Add small crochet leaves.
Winter
Try:
Burgundy + forest green + cream
Replace the dangling hearts with small crochet stars.
Valentine’s Day
Use:
Dusty pink + burgundy + cream
Keep the heart charms.
Crochet Flower Hair Tie With No Beads
If you prefer a completely yarn-based accessory, remove the wooden beads.
Instead:
- Crochet a small ball
- Crochet a tiny flower
- Make a second heart
- Add a leaf
- Use a small yarn knot
This keeps the entire project made from yarn and elastic.
Crochet Hair Tie With a Scrunchie Base
You can also attach the flower to a crochet scrunchie.
Instead of a thin elastic, use a fabric-covered hair elastic.
Then crochet around it with:
sc
or
hdc
until the elastic is covered.
Attach the flower afterward.
This creates a larger, softer accessory.
How to Style the Crochet Flower Hair Tie
The finished accessory works particularly well with simple hairstyles.
Low Bun
Wrap the hair into a loose low bun.
Position the flower slightly to one side.
Allow the leaves and hearts to hang downward.
Low Ponytail
Place the flower directly over the elastic.
This gives the accessory maximum visibility.
Half-Up Hairstyle
Use the flower to secure the upper section of the hair.
This creates a softer romantic look.
Side Ponytail
Position the flower slightly behind the ear.
The dangling pieces become more visible.
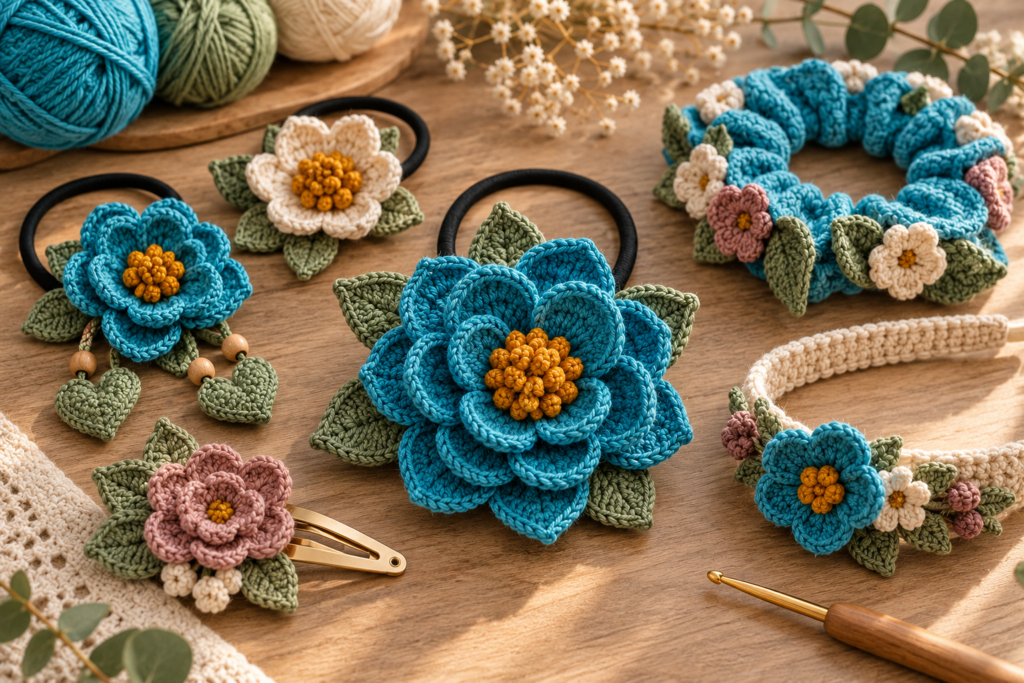
Matching Crochet Accessories
You can turn one flower design into a complete collection.
Make matching:
- Hair tie
- Hair clip
- Headband
- Scrunchie
- Brooch
- Bag charm
- Keychain
- Hat appliqué
This is especially useful if you’re creating handmade collections for a shop.
How to Make a Matching Hair Clip
Instead of attaching the flower to an elastic:
- Make the flower.
- Make the leaves.
- Assemble the front.
- Attach a metal or plastic hair clip to the back.
- Sew it securely through the crochet base.
Make sure the clip is firmly attached before use.
Crochet Flower Hair Tie as a Gift
This project makes a lovely handmade gift because it is:
- Small
- Lightweight
- Personal
- Customizable
- Relatively quick to make
Create a set of three.
Gift Set Example
| Hair Tie | Color |
|---|---|
| 1 | Turquoise + sage |
| 2 | Dusty pink + olive |
| 3 | Cream + mustard |
Package them together on a simple handmade card.
Packaging Ideas
For a handmade gift or small business:
Use:
- Kraft card
- Cream paper
- Cotton ribbon
- Small paper envelope
- Botanical illustration
- Simple care card
A neutral presentation works particularly well with handmade crochet accessories.
Selling Crochet Flower Hair Ties
These are also suitable for handmade markets because they are relatively quick projects.
Before selling, calculate:
Materials + Labor + Packaging + Platform Fees + Profit
For example:
| Cost | Example |
|---|---|
| Yarn | $0.80 |
| Elastic | $0.40 |
| Beads | $0.30 |
| Packaging | $0.50 |
| Labor | $3.00 |
| Total Cost | $5.00 |
Your actual costs will vary.
Don’t price handmade accessories based only on yarn consumption. Your time, finishing, photography, packaging and selling expenses matter too.
Product Description Example
If you’re listing the accessory online, you could describe it as:
Handmade crochet flower hair tie featuring a layered textured flower, leafy details and delicate hanging crochet hearts. Each accessory is made with soft yarn and carefully finished by hand. Choose your favorite color combination or request a custom palette.
Avoid claiming that the accessory is identical to a particular creator’s design if you have made your own version.
Photography Tips
A crochet hair accessory needs both a lifestyle photograph and a product photograph.
Lifestyle Photo
Show the accessory worn with a simple hairstyle.
The flower should be the visual focus.
Flat Lay
Place the accessory on:
- Cream linen
- Wooden table
- Botanical fabric
- Neutral paper
Add:
- Yarn
- Crochet hook
- Leaves
- Scissors
Close-Up
Photograph the:
- Petal texture
- Center
- Leaves
- Heart charms
- Stitch definition
Close-up photographs are especially useful for demonstrating handmade quality.
Care Instructions
Crochet hair accessories are generally easy to maintain.
For washable yarn:
- Follow the yarn label.
- Use gentle washing methods.
- Avoid harsh detergents.
- Reshape the flower while damp.
- Allow it to dry completely.
Avoid high heat because it can distort the flower or damage elastic.
How to Keep the Flower Looking Full
Over time, petals may become flattened.
To restore the shape:
- Remove the accessory from the hair.
- Gently separate the petals.
- Shape the center.
- Curl the petal edges outward.
- Leave it flat to rest.
Don’t pull aggressively on individual stitches.
Troubleshooting
| Problem | Cause | Solution |
|---|---|---|
| Flower looks flat | Loose shaping | Curve petals manually |
| Petals curl too much | Tight tension | Use a larger hook |
| Flower is floppy | Hook too large | Use a smaller hook |
| Center is loose | Too few securing stitches | Add more stitches |
| Leaves won’t hold shape | Very loose stitches | Use smaller hook |
| Elastic comes loose | Weak attachment | Reinforce with multiple passes |
| Heart looks uneven | Inconsistent tension | Shape after crocheting |
| Flower is too small | Lightweight yarn | Use thicker yarn |
| Flower is too large | Thick yarn | Use DK yarn |
| Petals overlap excessively | Petal count/size too large | Reduce petal stitches |
| Accessory feels heavy | Too many decorations | Reduce layers and beads |
| Cords tangle | Too many/long cords | Shorten or reduce cords |
Making the Petals More Defined
If you want crisp petals:
- Use smooth yarn
- Maintain consistent tension
- Don’t use an oversized hook
- Block the flower lightly
- Shape each petal individually
Cotton is especially useful when you want clearly defined crochet texture.
Light Blocking
For cotton flowers, light blocking can improve the final shape.
Gently dampen the flower.
Arrange the petals.
Allow it to dry naturally.
Don’t stretch the flower excessively.
For acrylic yarn, avoid high heat unless you’re intentionally using an appropriate blocking technique.
Why This Is a Great Scrap-Yarn Project
One of the best things about this project is its low yarn requirement.
You can use small leftover amounts from:
- Crochet cardigans
- Baby blankets
- Granny squares
- Crochet bags
- Baby accessories
- Amigurumi
- Crochet bandanas
Instead of keeping tiny yarn balls unused, turn them into colorful accessories.
Create a Matching Set
A particularly attractive collection could include:
Flower Hair Tie + Flower Hair Clip + Crochet Headband + Matching Scrunchie
Use the same flower pattern across all four products.
This creates a cohesive handmade collection.
Quick Pattern Reference
Flower
Base: MR, 12 sc
Small petals:
ch 2, 3 dc, ch 2, sl st
Repeat around approximately 6 times.
Large petals:
ch 3, 5 dc, ch 3, sl st
Repeat around approximately 6 times.
Center
R1: MR, 6 sc
R2: inc around = 12
Small Leaf
ch 7
sc, hdc, dc, dc, hdc, sc
Work the same sequence along the opposite side.
Heart
MR, ch 2, 3 dc, 3 hdc, dc, 3 hdc, 3 dc, ch 2, sl st.
Assembly
Flower → center → leaves → hanging cords → hearts → elastic.
Frequently Asked Questions
Is this crochet flower hair tie beginner-friendly?
Yes. The individual components are relatively simple. Beginners can start with the one-layer flower version and add the leaves and decorative elements later.
How long does it take to make?
A simple version may take around 30–60 minutes, while a more elaborate layered version can take longer.
What yarn is best?
Smooth DK or worsted-weight yarn works particularly well because it gives the flower clear stitch definition.
What crochet hook should I use?
A 3.5–4.0 mm hook is a useful starting point, but adjust according to your yarn.
Can I use leftover yarn?
Absolutely. This project is excellent for scrap yarn.
Can I make the flower bigger?
Yes. Use thicker yarn, a larger hook, larger petals or an additional flower layer.
Can I make the flower smaller?
Yes. Use lighter yarn, a smaller hook and fewer/smaller petals.
Can I attach the flower to a scrunchie?
Yes. Crochet around the scrunchie base or use a fabric-covered elastic and sew the finished flower securely onto it.
Do I have to use wooden beads?
No. They are completely optional. You can replace them with crochet balls, flowers or simply omit them.
Can I make it without dangling decorations?
Yes. Simply make the flower and leaves and attach them directly to the elastic.
Can I sell finished hair ties made from this tutorial?
You can make and sell your own finished handmade accessories, while following any applicable marketplace rules and using your own product photography and descriptions.
How do I keep the flower from flattening?
Use appropriately firm yarn, avoid an oversized hook and shape the petals after assembly. Light blocking can also help with suitable fibers.
Can I use this flower for other crochet projects?
Yes. The flower can become an appliqué for bags, hats, cardigans, headbands, hair clips and other accessories.
10 Ways to Customize the Design
Once you understand the basic pattern, experiment with:
- Single-layer flower
- Double-layer flower
- Three-layer statement flower
- Five-petal flower
- Six-petal flower
- Flower with large leaves
- Flower with hanging hearts
- Flower with crochet berries
- Flower with a pom-pom center
- Flower with contrasting petals
You can essentially create an entirely different accessory without changing the basic construction.
Final Project Checklist
Before considering your hair tie finished, check:
- Flower petals are evenly shaped
- Center is securely attached
- Leaves are firmly sewn
- Hanging cords are secure
- Hearts are firmly attached
- Beads, if used, are securely fastened
- Elastic is firmly attached
- No loose yarn tails remain
- Flower is not excessively heavy
- All decorative elements are secure
- The accessory stretches comfortably
- The finished piece has been gently shaped
Final Thoughts
This DIY crochet flower hair tie is a small project, but it gives you plenty of opportunities to practice useful crochet techniques.
The layered flower teaches you how to build dimension, the leaves introduce simple shaping, the heart charms let you experiment with small motifs, and the elastic attachment teaches you how to turn crochet pieces into functional accessories.
The design can remain simple with one flower and two leaves, or become a more elaborate statement accessory with multiple petals, dangling hearts and contrasting colors.
The turquoise, sage and golden combination shown in the reference creates a beautiful botanical look, but don’t be afraid to experiment. Dusty pink and olive can create a romantic style, burgundy and forest green work beautifully for autumn, while lavender, cream and sage give the accessory a softer spring-inspired appearance.
Most importantly, this is an excellent scrap-yarn crochet project. Instead of waiting for a large project, you can take a few small amounts of leftover yarn and turn them into something wearable, giftable and potentially sellable.
Once you’ve made your first flower, try making a matching hair clip, headband and scrunchie. The same crochet flower can become the foundation of an entire handmade accessory collection.