
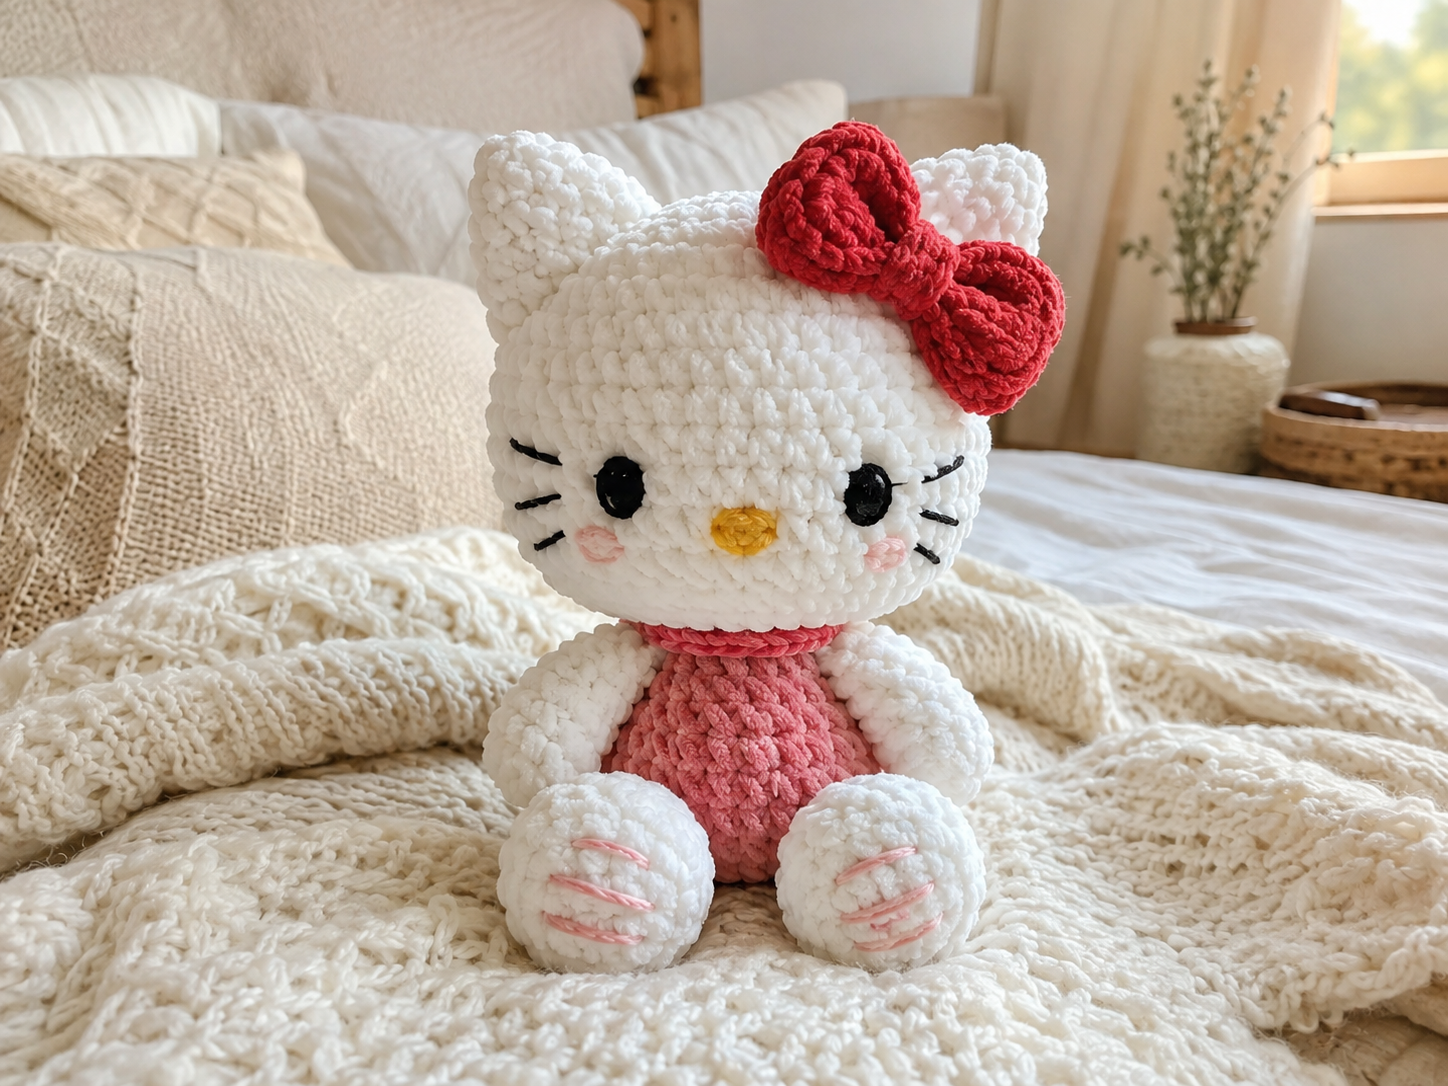
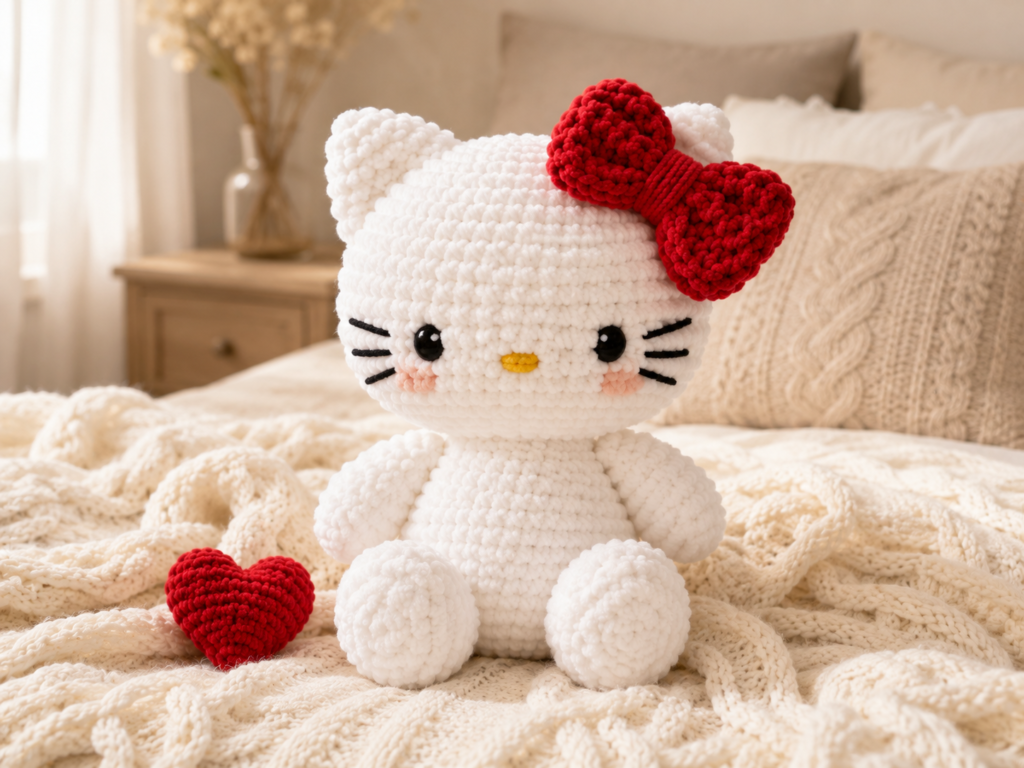
If you love cute crochet plushies, this crochet kitty plush is a fun project to add to your handmade collection. With its soft chenille texture, oversized bow, tiny paws and sweet expression, it makes an adorable gift, shelf decoration or cozy handmade companion.
The design is inspired by the classic look of a cute cartoon kitty, but this tutorial uses original crochet instructions for a simple cat plush rather than an official character pattern.
The best part? You can easily customize the colors, bow, facial details and size to create your own unique kitty.
Important: This is an original kitty-inspired crochet project and is not affiliated with or endorsed by any character or brand.
Table of Contents
- What You’ll Make
- Why You’ll Love This Pattern
- Skill Level
- Finished Size
- Materials You’ll Need
- Crochet Abbreviations
- Basic Stitches You’ll Use
- Color Combination Ideas
- How the Plush Is Constructed
- Crochet Kitty Plush Pattern
- Body Pattern
- Head Pattern
- Ears Pattern
- Arms Pattern
- Legs Pattern
- Muzzle Pattern
- Bow Pattern
- Assembly Tutorial
- How to Add the Face
- Step-by-Step Assembly
- How to Make the Plush Extra Soft
- Common Mistakes and How to Fix Them
- Easy Size Variations
- Gift Ideas
- Care Instructions
- Safety Notes
- Frequently Asked Questions
- Related Crochet Patterns
- Final Thoughts
What You’ll Make
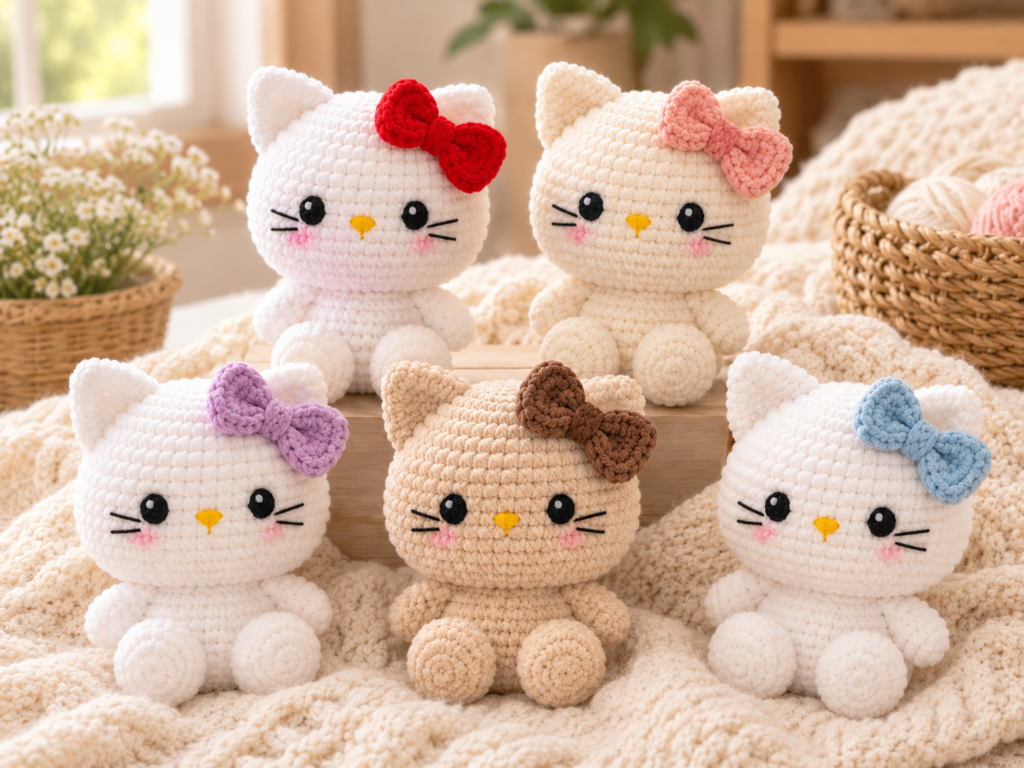
This pattern creates a soft, rounded crochet kitty plush with:
- A large round head
- Small triangular ears
- A rounded body
- Short arms
- Cute little legs
- Embroidered facial details
- A large decorative bow
- Soft plushy texture
- Optional heart-shaped accessory
The finished kitty is designed to look cute and cuddly rather than overly complicated, making it a great project for crocheters who want to practice basic amigurumi techniques.
Why You’ll Love This Pattern
There are plenty of reasons to try this project.
🧶 Beginner-friendly construction
Most of the main pieces are worked using simple single crochet stitches and basic increases and decreases.
🎀 Easy to customize
Change the bow color, dress color, facial expression or yarn type to create completely different versions.
🎁 Great handmade gift
A finished plush can make a sweet gift for birthdays, baby showers, holidays or simply as a handmade surprise.
🏠 Cute home decoration
Place your finished kitty on a shelf, desk, bedside table or reading nook.
🧸 Soft and cuddly
Using plush or chenille yarn gives the finished project a soft, squishy texture.
Skill Level
Beginner to confident beginner
You should be comfortable with:
- Magic ring
- Single crochet
- Increasing
- Invisible decreasing
- Working in continuous rounds
- Basic sewing
- Stuffing amigurumi
- Embroidering simple facial details
If you’re completely new to amigurumi, don’t worry. The pattern below explains the construction step by step.
Finished Size
Using medium-weight plush or chenille yarn and a hook appropriate for your yarn, the finished kitty will generally measure approximately:
8–11 inches tall
Your final size will vary depending on:
- Yarn thickness
- Crochet hook size
- Tension
- Amount of stuffing
- Size of the bow
For a smaller kitty, use thinner yarn and a smaller hook.
For a larger plush, use bulky yarn and a larger hook.
Materials You’ll Need
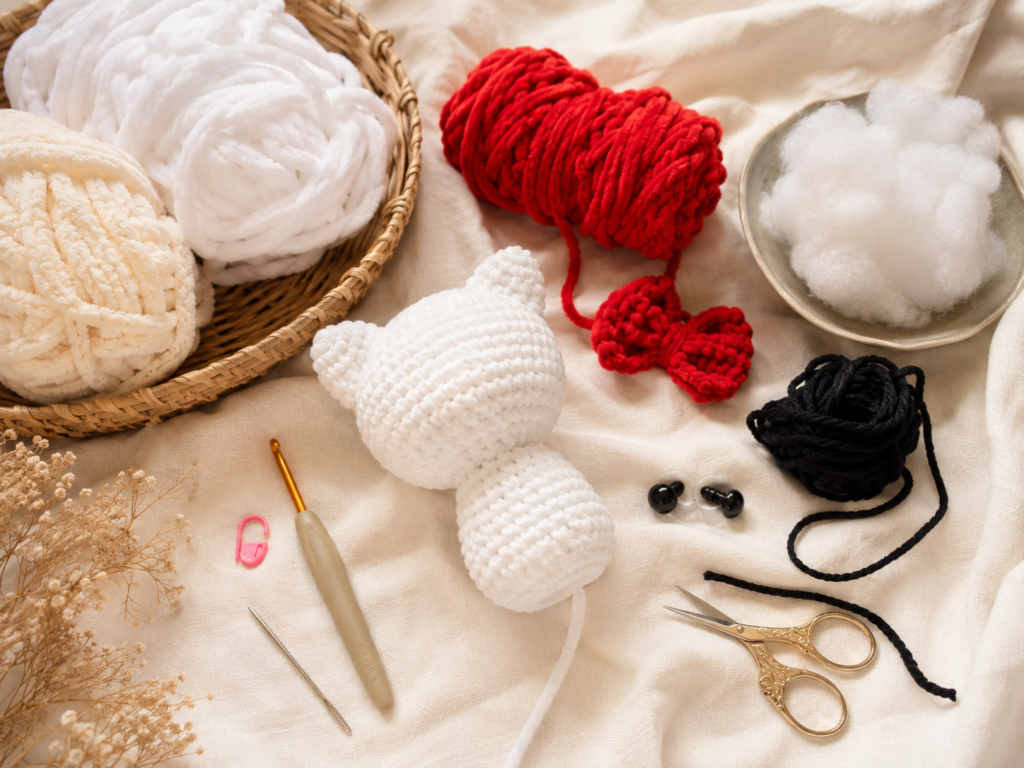
What You’ll Make – Cute Crochet Kitty Plushies
These soft, beginner-friendly crochet kitty plushies are pure cuteness! With their big eyes, tiny whiskers, and colorful bows, they look just like the ones in the photo. Perfect for gifts, desk decorations, or starting your amigurumi collection.
Even if you’ve never crocheted before, these projects are designed to be easy and fun. Most kits come with everything you need: yarn, safety eyes, stuffing, hook, and clear video tutorials.
Recommended Kits:
- Official Hello Kitty style kits (with the classic bow)
- Multi-cat beginner kits so you can make several in different colors
- Soft, high-quality yarn that gives that plush, huggable finish
👉 Shop Beginner Cat Crochet Kits on Amazon
👉 Woobles Hello Kitty Crochet Kit
As an Amazon Associate, I earn from qualifying purchases.
| Material | Suggested Choice |
|---|---|
| Main yarn | White or cream plush/chenille yarn |
| Accent yarn | Red, pink or your favorite color |
| Black yarn | For embroidered facial details |
| Crochet hook | 3.5–4.5 mm, depending on yarn |
| Fiberfill | Polyester stuffing |
| Yarn needle | Large-eye blunt needle |
| Stitch marker | Helpful for continuous rounds |
| Scissors | Sharp craft scissors |
| Safety eyes | 10–14 mm, optional |
| Stitch pins | Optional for assembly |
Optional
- Pink embroidery thread
- Small amount of yellow yarn
- Fabric-safe craft glue
- Rattle insert for a baby-safe version, if appropriate
Crochet Abbreviations
| Abbreviation | Meaning |
|---|---|
| MR | Magic ring |
| sc | Single crochet |
| inc | Increase |
| dec | Decrease |
| sl st | Slip stitch |
| ch | Chain |
| hdc | Half double crochet |
| dc | Double crochet |
| FO | Fasten off |
| st | Stitch |
| rnd | Round |
US crochet terminology is used throughout this tutorial.
Basic Stitches You’ll Use
Single Crochet
Insert the hook into the stitch, yarn over, pull up a loop, yarn over again and pull through both loops.
Increase
Work 2 single crochets into the same stitch.
Written as:
sc inc
Decrease
Work two stitches together to reduce the stitch count.
For a neater amigurumi finish, use an invisible decrease whenever possible.
Color Combination Ideas
The classic white-and-red combination shown in the inspiration image is adorable, but you don’t have to stop there.
| Kitty Style | Main Color | Bow Color |
|---|---|---|
| Classic | White | Red |
| Sweet Pastel | Cream | Pink |
| Lavender Kitty | White | Lavender |
| Strawberry | Cream | Strawberry pink |
| Cozy Autumn | Cream | Rust |
| Winter | White | Burgundy |
| Soft Neutral | Beige | Mocha |
| Rainbow | White | Rainbow colors |
| Baby Blue | White | Sky blue |
| Spring | Cream | Sage green |
You can even make several tiny kitties in different colors for a matching collection.
How the Plush Is Constructed
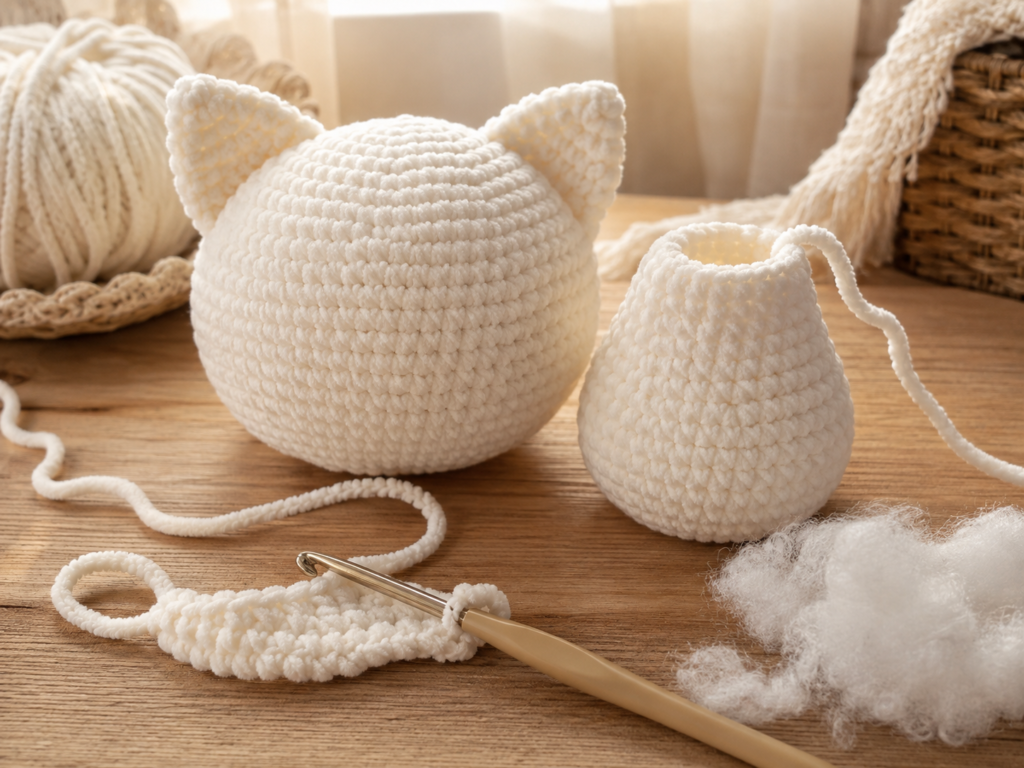
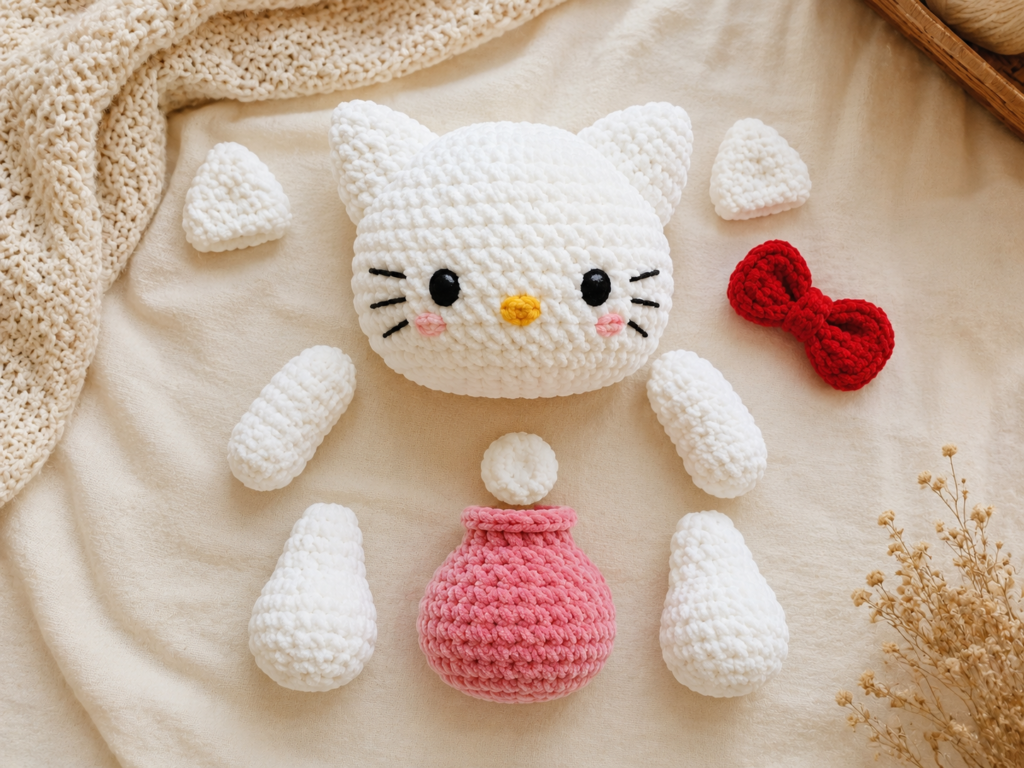
This project is easiest if you think of it as several small pieces.
Main pieces:
- Head
- Body
- Two ears
- Two arms
- Two legs
- Muzzle
- Bow
- Facial details
Most pieces are crocheted separately and then sewn together.
Crochet Kitty Plush Pattern
Part 1: Body
Start with your main color.
Round 1
Make a magic ring.
Work:
6 sc into MR
You should have 6 stitches.
Round 2
inc around
You should have 12 stitches.
Round 3
(sc, inc) × 6
You should have 18 stitches.
Round 4
(2 sc, inc) × 6
You should have 24 stitches.
Round 5
(3 sc, inc) × 6
You should have 30 stitches.
Rounds 6–14
sc around
30 stitches.
This creates the main rounded section of the body.
Round 15
(3 sc, dec) × 6
24 stitches.
Round 16
(2 sc, dec) × 6
18 stitches.
Begin adding stuffing.
Round 17
(sc, dec) × 6
12 stitches.
Add a little more stuffing and shape the body with your fingers.
Round 18
dec around
6 stitches.
Fasten off.
Use your yarn needle to close the remaining opening.
Part 2: Head
The head should be larger than the body.
Use your main color.
Round 1
MR with:
6 sc
6 stitches.
Round 2
inc around
12 stitches.
Round 3
(sc, inc) × 6
18 stitches.
Round 4
(2 sc, inc) × 6
24 stitches.
Round 5
(3 sc, inc) × 6
30 stitches.
Round 6
(4 sc, inc) × 6
36 stitches.
Round 7
(5 sc, inc) × 6
42 stitches.
Rounds 8–16
sc around
42 stitches.
This creates the main rounded head.
Round 17
(5 sc, dec) × 6
36 stitches.
Round 18
(4 sc, dec) × 6
30 stitches.
Start stuffing the head.
Round 19
(3 sc, dec) × 6
24 stitches.
Round 20
(2 sc, dec) × 6
18 stitches.
Add more stuffing.
Round 21
(sc, dec) × 6
12 stitches.
Round 22
dec around
6 stitches.
Fasten off.
Close the opening carefully.
Tip for Stuffing the Head
Don’t stuff the head all at once.
Instead:
- Add a small amount.
- Push it toward the sides.
- Crochet another round.
- Add more stuffing.
- Shape the head with your fingers.
The goal is firm but soft.
If you can easily see large dents when you squeeze the head, add a little more stuffing.
Part 3: Ears
Make two.
Use your main color.
Round 1
MR:
6 sc
Round 2
(sc, inc) × 3
9 stitches.
Round 3
sc around
9 stitches.
Round 4
(2 sc, inc) × 3
12 stitches.
Rounds 5–6
sc around
12 stitches.
Fasten off, leaving a long sewing tail.
Do not fully stuff the ears.
Instead, lightly pinch the bottom together.
This creates the cute triangular kitty-ear shape.
Part 4: Arms
Make two.
Round 1
MR:
6 sc
Round 2
inc around
12 stitches.
Rounds 3–8
sc around
12 stitches.
Add a small amount of stuffing.
Round 9
(sc, dec) × 4
8 stitches.
Fasten off.
Leave a long tail for sewing.
Don’t overstuff the arms.
A slightly soft arm will look more natural.
Part 5: Legs
Make two.
Round 1
MR:
6 sc
Round 2
inc around
12 stitches.
Round 3
(sc, inc) × 6
18 stitches.
Rounds 4–6
sc around
18 stitches.
Round 7
(sc, dec) × 6
12 stitches.
Add stuffing.
Rounds 8–10
sc around
12 stitches.
Fasten off.
Leave a long sewing tail.
Optional Pink Paw Pads
For an extra-cute effect, embroider a small pink oval or circle onto each foot.
You can use:
- Pink embroidery thread
- Pink yarn
- A small crocheted circle
Keep the detail simple so the plush maintains a soft handmade appearance.
Part 6: Muzzle
The muzzle is optional, but it gives the face more dimension.
Use white or cream yarn.
Round 1
MR:
6 sc
Round 2
inc around
12 stitches.
Round 3
sc around
12 stitches.
Fasten off.
Leave a sewing tail.
Add only a tiny amount of stuffing, then sew the muzzle onto the lower center of the face.
Part 7: The Big Crochet Bow 🎀
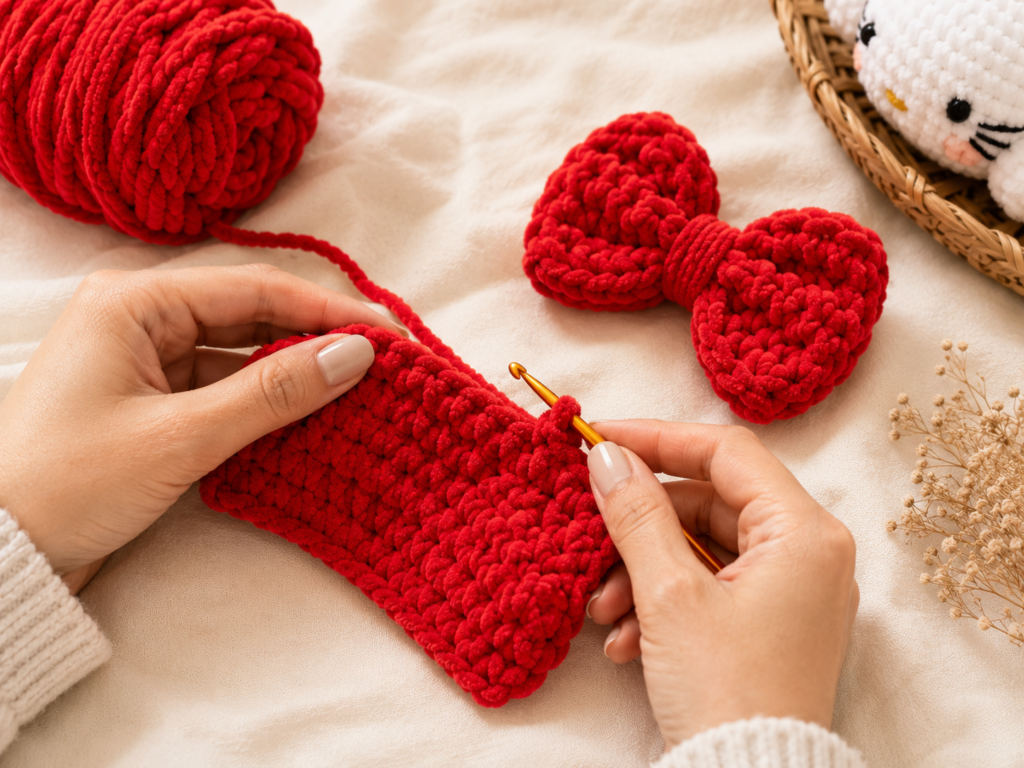
The bow is one of the most important details because it gives the kitty its recognizable cute aesthetic.
Use your accent color.
Bow Piece
Chain:
18
Row 1
Starting in the second chain from the hook:
17 sc
Rows 2–8
Chain 1.
Turn.
17 sc
Fasten off.
You now have a small rectangular crochet panel.
Shape the Bow
Pinch the center of the rectangle.
Wrap yarn several times around the center.
Pull tightly.
This creates two rounded bow loops.
Bow center
Chain:
6
Work several rows of single crochet until you have a small strip.
Wrap the strip around the middle of the bow and sew it securely at the back.
You now have a simple crochet bow.
Optional Bow Upgrade
For a fuller bow, make the rectangle slightly larger.
For example:
24 chains
and work:
23 sc
for approximately 8–10 rows.
This creates a larger bow suitable for a bigger plush.
How to Assemble the Kitty
Now comes the fun part.
Lay all your finished pieces next to the head and body before sewing.
This lets you experiment with the proportions.
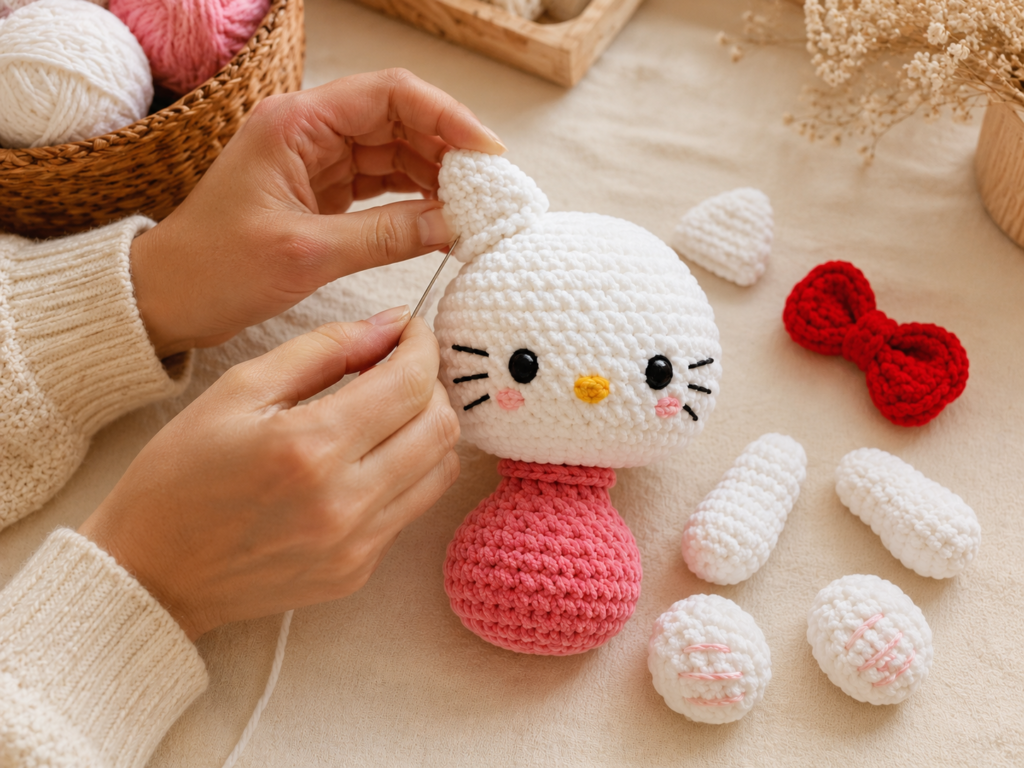
Step 1: Attach the Ears
Place the ears toward the top of the head.
For a cute expression, angle them slightly outward.
Pin them in place.
Check the symmetry before sewing.
Then stitch around the base several times.
Secure the yarn inside the head.
Step 2: Attach the Head
Place the head directly on top of the body.
Use the long yarn tail from the head or a separate length of matching yarn.
Sew around the entire connection.
Work several passes so the head doesn’t wobble.
Step 3: Attach the Arms
Place one arm on each side of the body.
Position them slightly below the head.
Sew through the upper portion of the arm and into the body.
Repeat on the other side.
Step 4: Attach the Legs
Place the legs near the lower portion of the body.
Keep them symmetrical.
Sew securely.
Before finishing, check that the kitty can sit upright.
Step 5: Add the Muzzle
Place the muzzle slightly below the center of the head.
Pin it first.
Then sew around the edge.
Don’t pull the stitches too tightly because you want the muzzle to remain slightly raised.
Step 6: Add the Bow
Place the bow near one ear.
Pin it in place first.
Once you’re happy with the position, sew the center securely to the head.
You can also attach the bow to the body or neck if you’d prefer a different look.
How to Add the Face
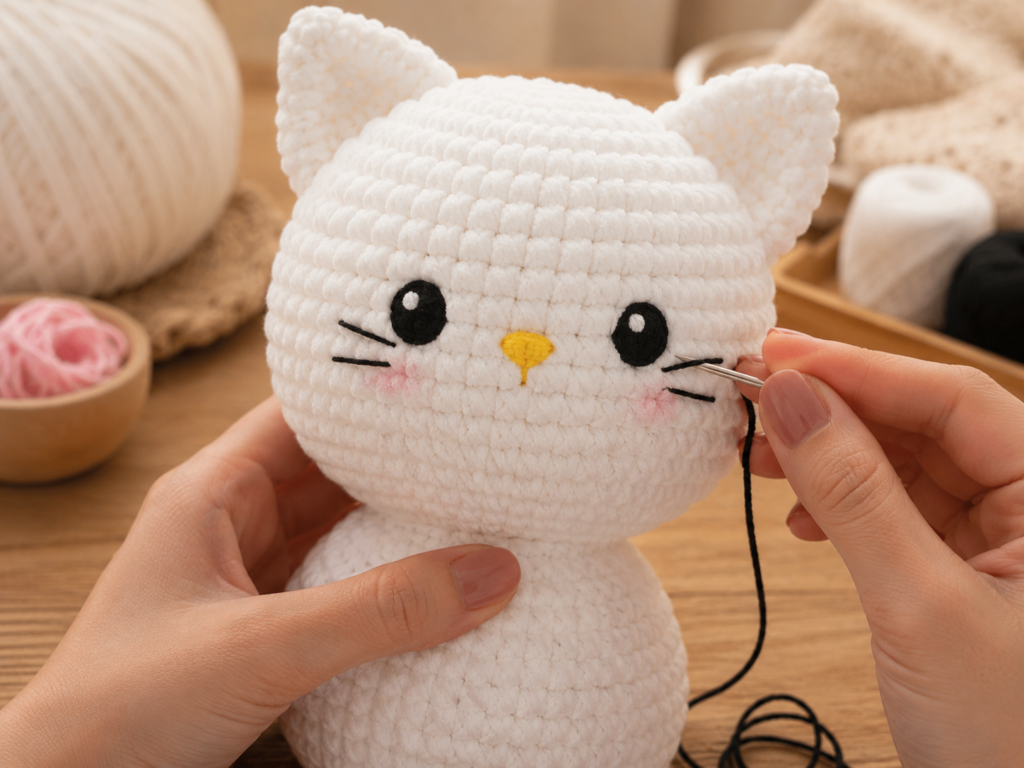
The face is where your kitty really comes to life.
For a simple cute expression, use:
- Black yarn for eyes
- Black yarn for whiskers
- Yellow yarn for the nose
- Optional pink thread for cheeks
Eyes
You have two options.
Option 1: Safety Eyes
Use small black safety eyes.
Place them symmetrically.
Option 2: Embroidered Eyes
For a softer handmade look, embroider the eyes using black yarn.
This is also the preferred choice for toys intended for very young children.
Nose
Use a small amount of yellow or gold yarn.
Embroider a tiny oval or triangular nose in the center of the face.
Don’t make it too large.
A tiny nose gives the plush a much sweeter appearance.
Whiskers
Use black embroidery thread.
Add three short lines on each side of the face.
Keep the whiskers relatively thin.
You can adjust their length to change the personality of the kitty.
Optional Cheeks
Add tiny pink embroidered cheeks.
This is especially cute when making pastel-colored versions.
Step-by-Step Assembly Checklist
Before calling your plush finished, check each part:
☐ Head securely attached
☐ Ears symmetrical
☐ Arms positioned evenly
☐ Legs balanced
☐ Muzzle centered
☐ Eyes aligned
☐ Nose centered
☐ Whiskers even
☐ Bow securely attached
☐ All yarn ends woven in
How to Make the Plush Extra Soft
If you’re using chenille yarn, the finished kitty should naturally have a wonderfully soft texture.
For an extra-plush result:
Use plush yarn
Chenille yarn creates a soft, velvety surface.
Use a slightly smaller hook
A smaller hook creates tighter stitches, which helps prevent stuffing from showing through.
Stuff gradually
Don’t pack the stuffing into one area.
Spread it evenly.
Shape while stuffing
Use your fingers to gently round the head and body.
Common Mistakes and How to Fix Them
The stuffing is visible
Your hook may be too large.
Solution:
Try a smaller hook.
The head looks too small
The head should generally be noticeably larger than the body for this cute plush style.
Solution:
Add one or two additional increase rounds.
The kitty looks uneven
This usually happens when pieces are attached without checking their position first.
Solution:
Pin everything before sewing.
The ears don’t match
Count your rounds carefully.
Solution:
Make both ears separately while following the same stitch counts.
The face looks crooked
Don’t sew the facial details immediately.
First pin or lightly mark their positions.
Then step back and check the face from several angles.
Easy Size Variations
Mini Kitty
Use:
- DK or sport-weight yarn
- 2.5–3 mm hook
Reduce the number of increase rounds.
This creates a tiny plush suitable for keychains or small decorations.
Standard Kitty
Use:
- Chenille yarn
- 3.5–4.5 mm hook
Follow the pattern as written.
Giant Kitty
Use:
- Super bulky yarn
- 5–7 mm hook
Increase the number of body and head rounds while maintaining the same basic increase/decrease structure.
This creates a large cuddly version.
How to Make a Matching Kitty Collection
Once you’ve made one, it can be fun to create a whole collection.
Try:
🌸 Spring Kitty
Cream body + pastel pink bow
🍓 Strawberry Kitty
White body + strawberry-red bow
🌙 Night Kitty
White body + lavender bow
🎃 Halloween Kitty
Cream body + orange bow
❄️ Winter Kitty
White body + burgundy bow
🌈 Rainbow Kitty
White body + multicolor bow
☕ Cozy Kitty
Cream body + mocha bow
The basic pattern stays the same—you simply change the colors.
Gift Ideas
A crochet kitty plush can become even more special when combined with a small handmade gift.
Gift Set 1
Crochet kitty + handmade card
Gift Set 2
Crochet kitty + crochet flower
Gift Set 3
Crochet kitty + small blanket
Gift Set 4
Crochet kitty + personalized ribbon
Gift Set 5
Crochet kitty + matching mini bow
For birthdays, you could even make the bow in the recipient’s favorite color.
Care Instructions
Because plush yarn can be delicate, gentle care is best.
For small spots:
Use a slightly damp cloth and gently dab the area.
For more thorough cleaning:
Follow the washing instructions for your specific yarn.
Avoid excessive heat because it can damage or distort some synthetic plush yarns.
Drying:
Allow the plush to air dry completely.
Don’t store it while damp.
Safety Notes
If you’re making this plush for a young child, pay particular attention to the small parts.
For babies and toddlers:
Consider replacing safety eyes with securely embroidered eyes.
Make sure:
- Eyes are firmly embroidered
- Bow is securely sewn
- No loose yarn ends remain
- Small accessories are removed
- The stuffing cannot escape
Always choose materials appropriate for the intended age of the recipient.
Frequently Asked Questions
Is this crochet kitty plush beginner-friendly?
Yes. The main pieces use basic amigurumi techniques such as single crochet, increases and decreases. The sewing and facial embroidery may take a little practice, but the construction is straightforward.
What yarn is best for a crochet kitty plush?
Chenille or plush yarn gives the softest result and creates the cuddly texture shown in the inspiration image.
However, cotton yarn is easier to see while learning amigurumi stitches and can be a good choice for beginners.
How much yarn do I need?
The exact amount depends on yarn weight and the size of your plush.
For a standard-sized kitty, having at least one full skein of your main color plus smaller amounts of accent colors is a good starting point.
Can I make the kitty smaller?
Yes.
Use thinner yarn and a smaller crochet hook, or reduce the number of increase rounds.
Can I make it bigger?
Absolutely.
Use bulky or super-bulky yarn and a larger hook.
You can also add additional rounds to the widest part of the head and body.
Can I change the bow color?
Yes. This is one of the easiest ways to personalize the project.
Try pink, purple, blue, lavender, burgundy, orange or pastel yellow.
Can I sell finished crochet kitties made from this pattern?
If you’re selling finished handmade items, make sure your product and marketing don’t imply that the item is an official licensed character product.
It’s best to describe it as your own kitty-inspired crochet plush and check any applicable intellectual-property and marketplace rules.
Tips for Getting a Professional Finish
The difference between a homemade-looking plush and a polished handmade plush often comes down to small details.
1. Keep your tension consistent
This gives the stitches an even appearance.
2. Use invisible decreases
They make amigurumi look much cleaner.
3. Stuff evenly
Avoid lumps.
4. Pin before sewing
This is one of the easiest ways to improve symmetry.
5. Hide your yarn ends
Thread them inside the plush rather than leaving visible tails.
6. Spend time on the face
A few millimeters can make a huge difference in the expression.
7. Don’t rush the bow
The bow is one of the main decorative details, so make sure its loops are balanced.
Quick Pattern Reference
Save this table while crocheting:
| Piece | Quantity | Main Technique |
|---|---|---|
| Head | 1 | Sc + increases/decreases |
| Body | 1 | Sc + increases/decreases |
| Ears | 2 | Sc |
| Arms | 2 | Sc |
| Legs | 2 | Sc |
| Muzzle | 1 | Sc |
| Bow | 1 | Rows of sc |
| Eyes | 2 | Safety eyes/embroidery |
| Nose | 1 | Embroidery |
| Whiskers | 6 | Embroidery |
Project At a Glance
| Detail | Recommendation |
|---|---|
| Skill level | Beginner–Intermediate |
| Project type | Amigurumi plush |
| Main stitch | Single crochet |
| Yarn | Chenille/plush |
| Hook | 3.5–4.5 mm |
| Construction | Separate pieces |
| Approx. size | 8–11 inches |
| Stuffing | Polyester fiberfill |
| Main color | White/cream |
| Accent | Red, pink or custom |
| Best use | Gift, décor, plush toy |
Related Crochet Articles
If you enjoyed making this kitty plush, you might also like:
23 Adorable Crochet Cat Ideas for Cat Lovers
Cute spooky crochet projects for Halloween and fall.
18 Unique Ghost Crochet Patterns for Halloween
More cute amigurumi inspiration for animal lovers.
21 Crochet Skirt Shapes for Beginners to Try
Simple projects to build your amigurumi skills.
21 Crochet Spider Web Bandana Ideas THAT Will Transform Your Halloween Look
A collection of fun animal-inspired crochet projects.
23 Crochet Halloween Cardigan Ideas, Patterns & Tutorials
Handmade projects that make thoughtful gifts.
23 Crochet Butterfly Cardigan Ideas, Patterns & Tutorials
Soft and cuddly projects perfect for chenille yarn.
Final Thoughts
This crochet kitty plush is a great example of how a few simple crochet shapes can become an adorable handmade character.
The head, body, ears, arms and legs are all based on straightforward amigurumi construction, while the bow and embroidered face give the finished plush most of its personality.
Don’t be afraid to experiment.
Try a lavender bow instead of red, make a tiny version for a bag charm, create a giant cuddly version, or make several kitties in different colors for a handmade collection.
The most important thing is to enjoy the process and give your finished kitty its own personality. 🧶🎀
Happy crocheting!







